LYFA Course - Launch Your First App
Resources:
https://www.dropbox.com/sh/nh92vdepniipw2v/AAAaizYNZvE1_l5MXozzDMgCa?e=1&dl=0
Start: 07. November 2024
Module 1 - The War Card Game + Basic Syntax
Lesson 3 - UI Building
https://github.com/dmkeks1/L3-Demo
Lesson 4 - War Card Game UI
https://github.com/dmkeks1/War-Card-Game
Lesson 6 - Swift functions
```Swift
func doAdd(a:Int, b:Int) {

    var sum = a + b
    print(sum)
}

doAdd(5, 6)
```


Man kann die Funktion auch mit labels versehen was die Arbeit damit vereinfacht:

```Swift
func doAdd(firstNum a: Int, secondNum b: Int) -> Int {

    var sum = a + b
    return sum
}


doAdd(firstNum: 5, secondNum: 5)
```


Möchte man keine Labels(z.B. a: b: etc.) anzeigen, dann kann man _ bei der Deklaration verwenden:

```Swift
func doAdd(_ a: Int, _ b: Int) -> Int {

    var sum = a + b
    return sum
}

doAdd(2,5)
```


Wenn die Funktion was returnen soll →

![[99 - meta/attachements/image 44.png|image 44.png]]

![[99 - meta/attachements/image 1 2.png|image 1 2.png]]
-
Lesson 7 - Buttons and Properties
https://github.com/dmkeks1/War-Card-Game
Button aus image erstellen. Hier wird eine closure benutzt.
Button { deal(). //action oder funktion } label: { Image("button") //image des buttons } -
Lesson 8 - War Card Game Logik - randomizer, Punkte, Auswertung, @State properties, conditional Logic (if statement)
https://github.com/dmkeks1/War-Card-Game
number randomizer
Int.random(in: 2...14) // randomizes Nummer zwischen 2 und 14, inkl. 2 & 14@State properties
@State ist ein property wrapper, die variable danach eine property
@State var playerCard: String = "back" // @State ist ein property wrapper -> danach property -
Challenge 1 - Number Climb Game
Module 2 - The Menu App
-
Lesson 2 - Arrays
var b: [Int] = [5, 10, 15, 20, 25] b[0] = 20 print(b) // Ausgabe ist nun 20 -
Lesson 3 - Structures
Structs sollten immer mit großbuchstaben beginnen da Sie sonst mit Funktionen verwechselt werden können.
testFunktion()→ funktionMenuItems()→ struct ohne definierte varsstructs sind wie Blueprints für einen eigens erstellten Datentypen.
Um diese zu nutzen muss man Instances erstellen.
functions können in einer structure definiert sein.
firstItem.testPrint()variablen in einer structure nennt man property!
functions in einer structure nennt man method!
Wenn man in der struct Definition einen Wert zuweist gilt dieser quasi als Default Wert für alle neu erstelle Instanzen und muss bei der Instance Erstellung nicht angegeben werden.
// Struct erstellen, vorzugsweise in eigener Datei MenuItem.swift struct MenuItem { var name: String var price: String var imageName: String } // erstellten Struct "initialisieren" var menuItems: [MenuItem] = [] // Instance erstellen var firstItem = MenuItem(name: "Sushi", price: "1,99€", imageName: "sushi") -
Lesson 5 - Swift UI List
https://github.com/dmkeks1/Menu
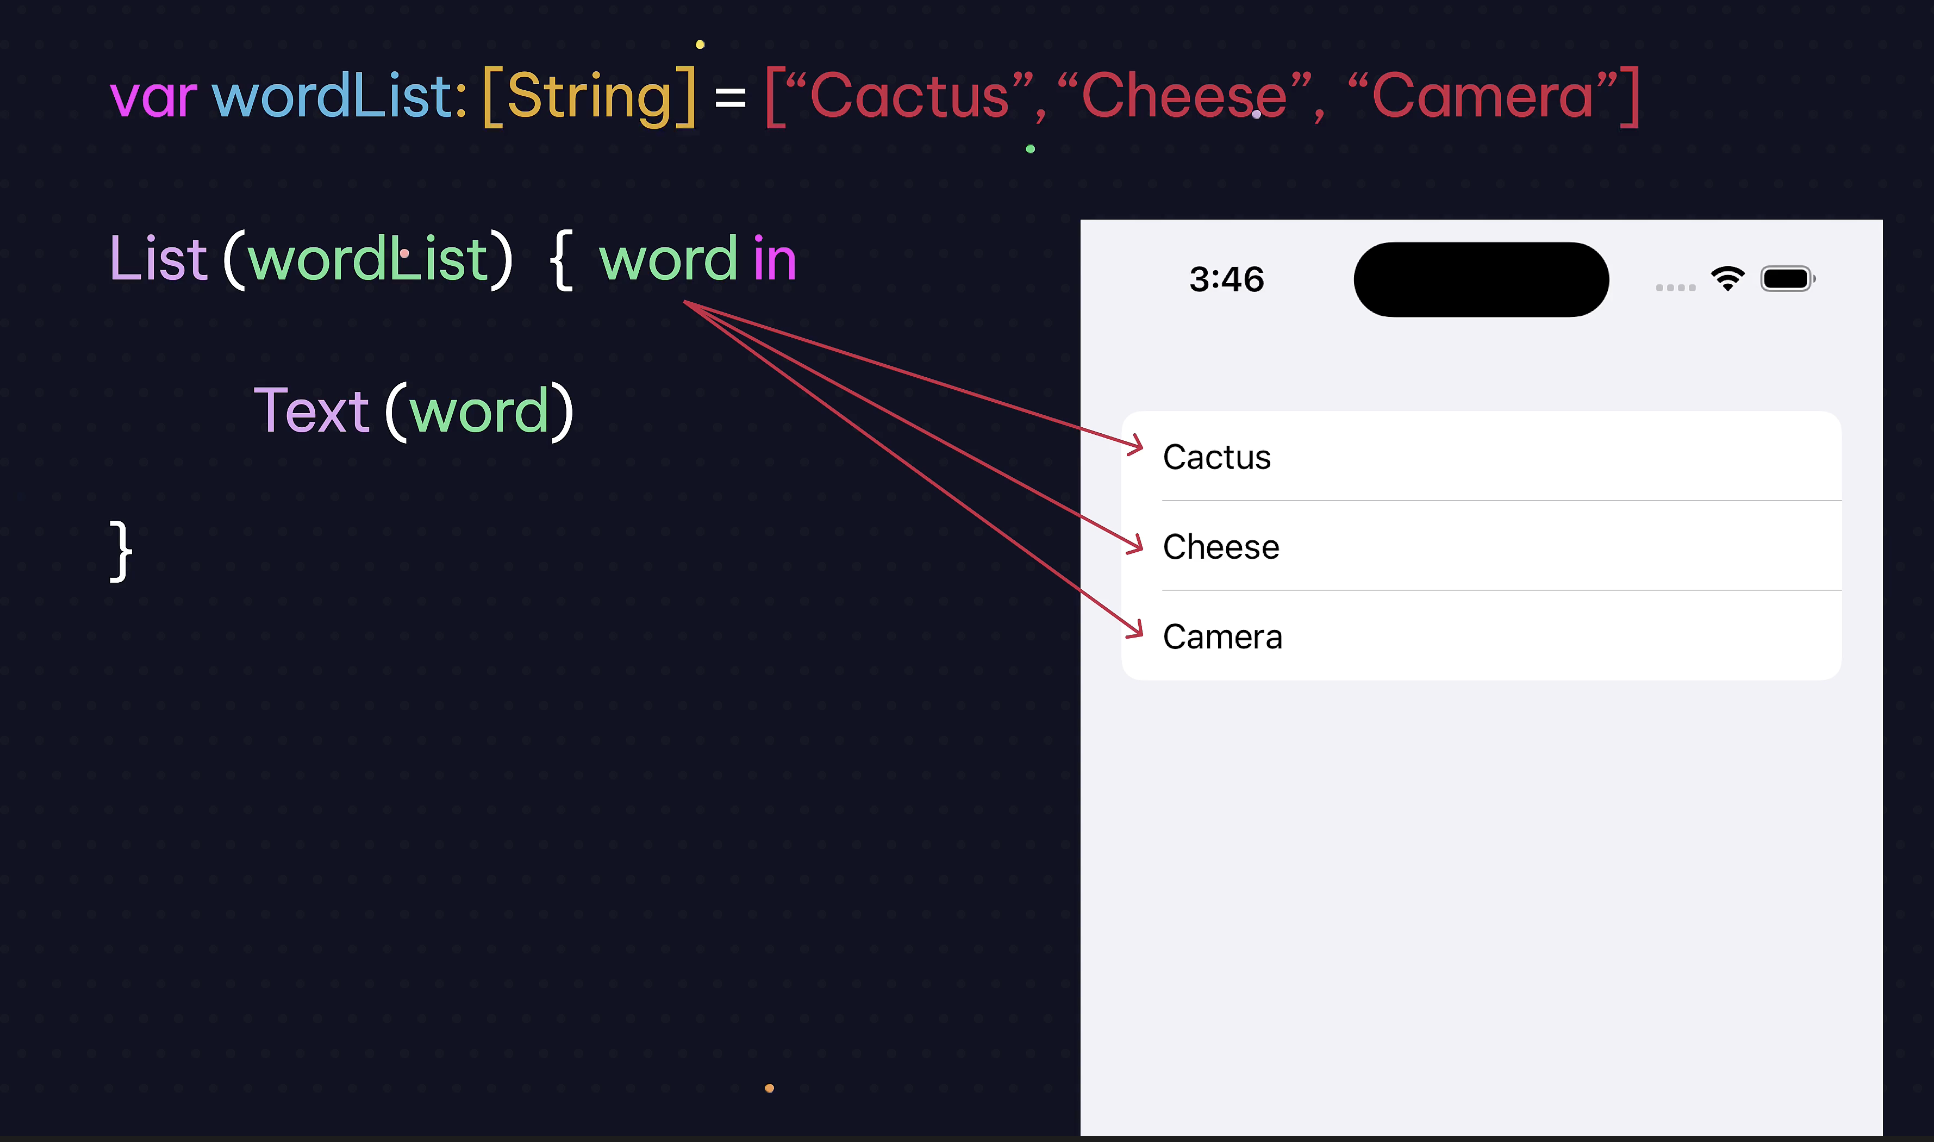
… {word in …
word wird als variable deklarierthttps://github.com/dmkeks1/Menu/blob/main/Menu/MenuView.swift
-
result
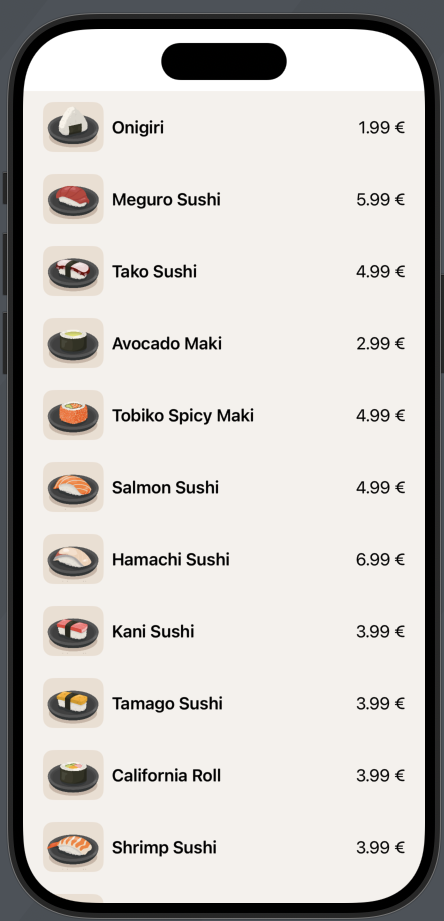
-
-
Lesson 5 - Challenge
Challenge
Build a UI with a List and a Button below it.
Declare a property that contains an array of 5 strings. These can be any 5 words you want.
Each time the button is tapped, choose a random word from the array and put it in the list.
The number of items in the list should grow as you tap the button.
https://github.com/dmkeks1/Lesson5Challenge/blob/main/Lesson5Challenge/ContentView.swift
-
Lesson 7 - Structures Part 2
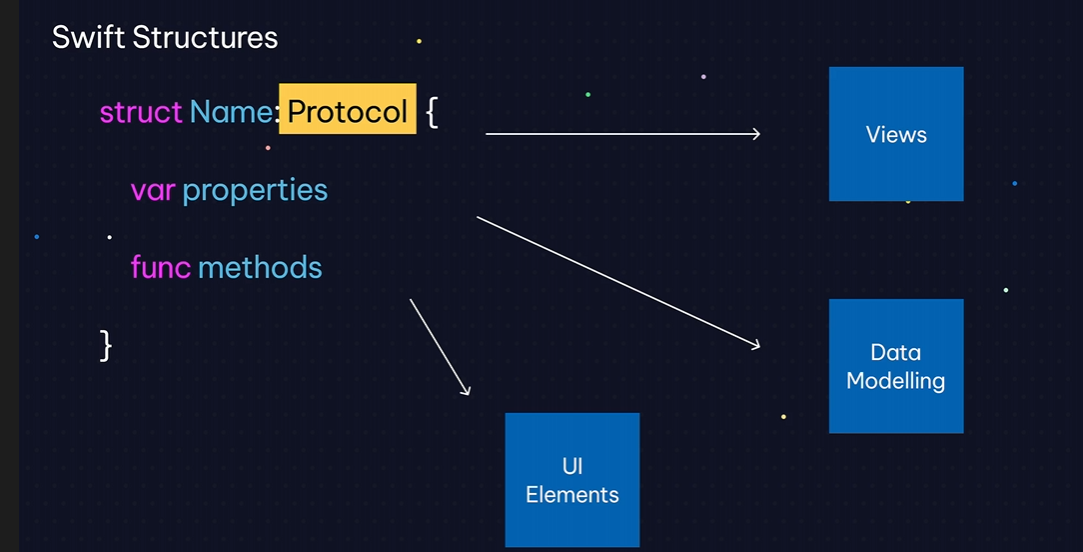
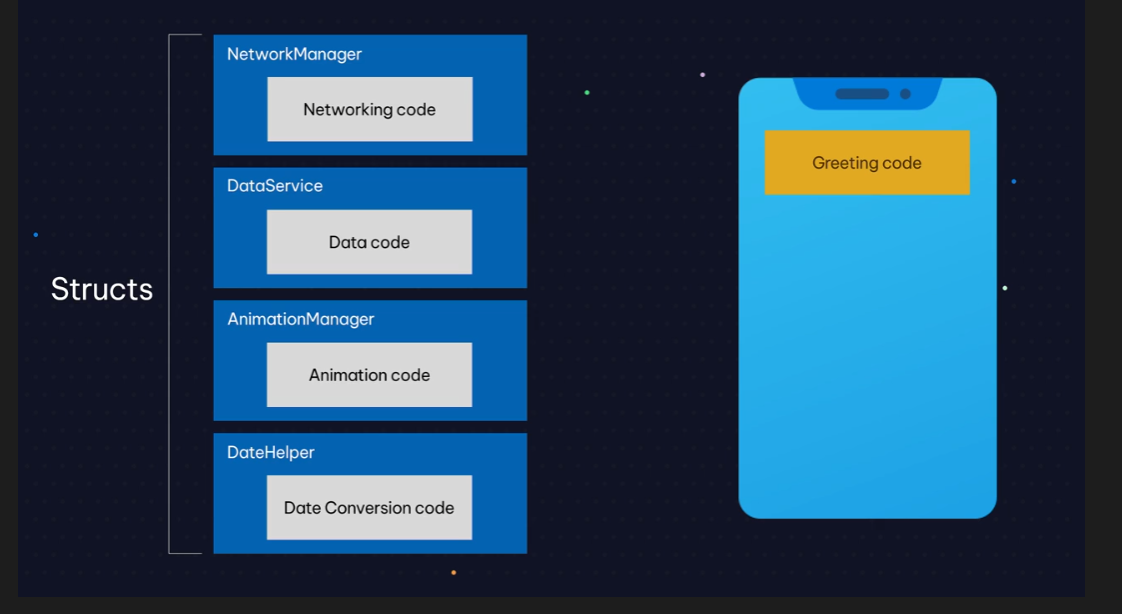
try to organize your code logically into other files.
-
Lesson 8 - State and Updating Views
Outsourcing Data into another file/struct.
File of data is called DataService here because it provides data for us.
https://github.com/dmkeks1/Menu/blob/main/Menu/DataService.swift
Instance muss danach in dem View indem wir die Data benötigen erstellt werden.
@State var menuItems: [MenuItem] = [MenuItem]() // @State sagt SwiftUI, dass die variable wichtig ist fürs UI. // Änderungen werden überwacht und View wird bei jeder Änderung neu gedrawed var dataService = DataService() // creating an instance of DataService ... List(menuItems) {item in ... } .onAppear { // modifier of the List // call for the data menuItems = dataService.getData() -
Lesson 9 - Reusing your Views
https://github.com/dmkeks1/Menu
Views können reused werden in anderen views, z.B. ein Button.
CustomButton()Es können auch parameter übergeben werden wenn diese in CustomButton definiert wurden.
CustomButton(buttonText: “Mein Custom Button”) -
Module 2 Challenge - Movie List
Module 3 - The Restaurant App
https://github.com/dmkeks1/Restaurant
-
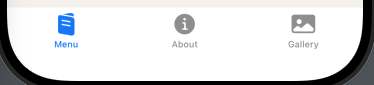
Lesson 2 - TabView
TabView {
            MenuView().tabItem {

                VStack {
                    Text("Menu")
                    Image(systemName: "menucard")
                }


            }

            AboutView().tabItem {

                VStack {
                    Text("About")
                    Image(systemName: "info.circle")

                }

            }

            GalleryView().tabItem {
                VStack{
                    Text("Gallery")
                    Image(systemName: "photo")
                }
            }
        }
-
Lesson 3 - ScrollView
VStacks mit viel Inhalt verhalten sich komisch was Text und Images angeht da nicht genug Platz vorhanden ist. Sobald man ScrollView definiert verhält es sich wie gewünscht.
ScrollView {}ScrollView { VStack (alignment: .leading) { Text("About") .font(.largeTitle) .bold() Image("restaurant") .resizable() .scaledToFit() .padding(.bottom) Text("Sukiyabashi Jiro (すきやばし次郎, Sukiyabashi Jirō) is a sushi restaurant in Ginza, Chūō, Tokyo, owned by Jiro Ono.[2] Ono previously operated as the head chef, but stepped aside in favor of his son Yoshikazu Ono in 2023 due to ill health. Sukiyabashi Jiro was the first sushi restaurant[4] to receive three stars from the Michelin Guide.[5] It was removed from the Michelin Guide in November 2019 as it does not receive reservations from the general public,[6][7] instead requiring reservations to be made through the concierge of a luxury hotel.[8]") Image("map") .resizable() .scaledToFit() Text(""" Tsukamoto Sogyo Building Basement Floor 1 2-15, Ginza 4-chome Chūō, Tokyo Japan """) } }You can hide the scrollbars
ScrollView (showsIndicators:**false**``) {}You can also hide them individually for horizontal or vertically scroll.
ScrollView(.horizontal, showsIndicators: false) -
Lesson 4 - Dynamically Generating UI Elements using For Each
ForEach Syntax
ForEach(wordList) { word in
		Text(word)
	}


	ForEach(range) { _ in // range could be for example 2..5
		Text("Hello")
		}
ForEach(wordList, id: \.``**self**``) { word**in**Text(word)}id: \.self→ legt fest, dass der String/Int-Wert etc. sich selbst als identifier nimmt. So brauch man das “Identifiable” nicht. -
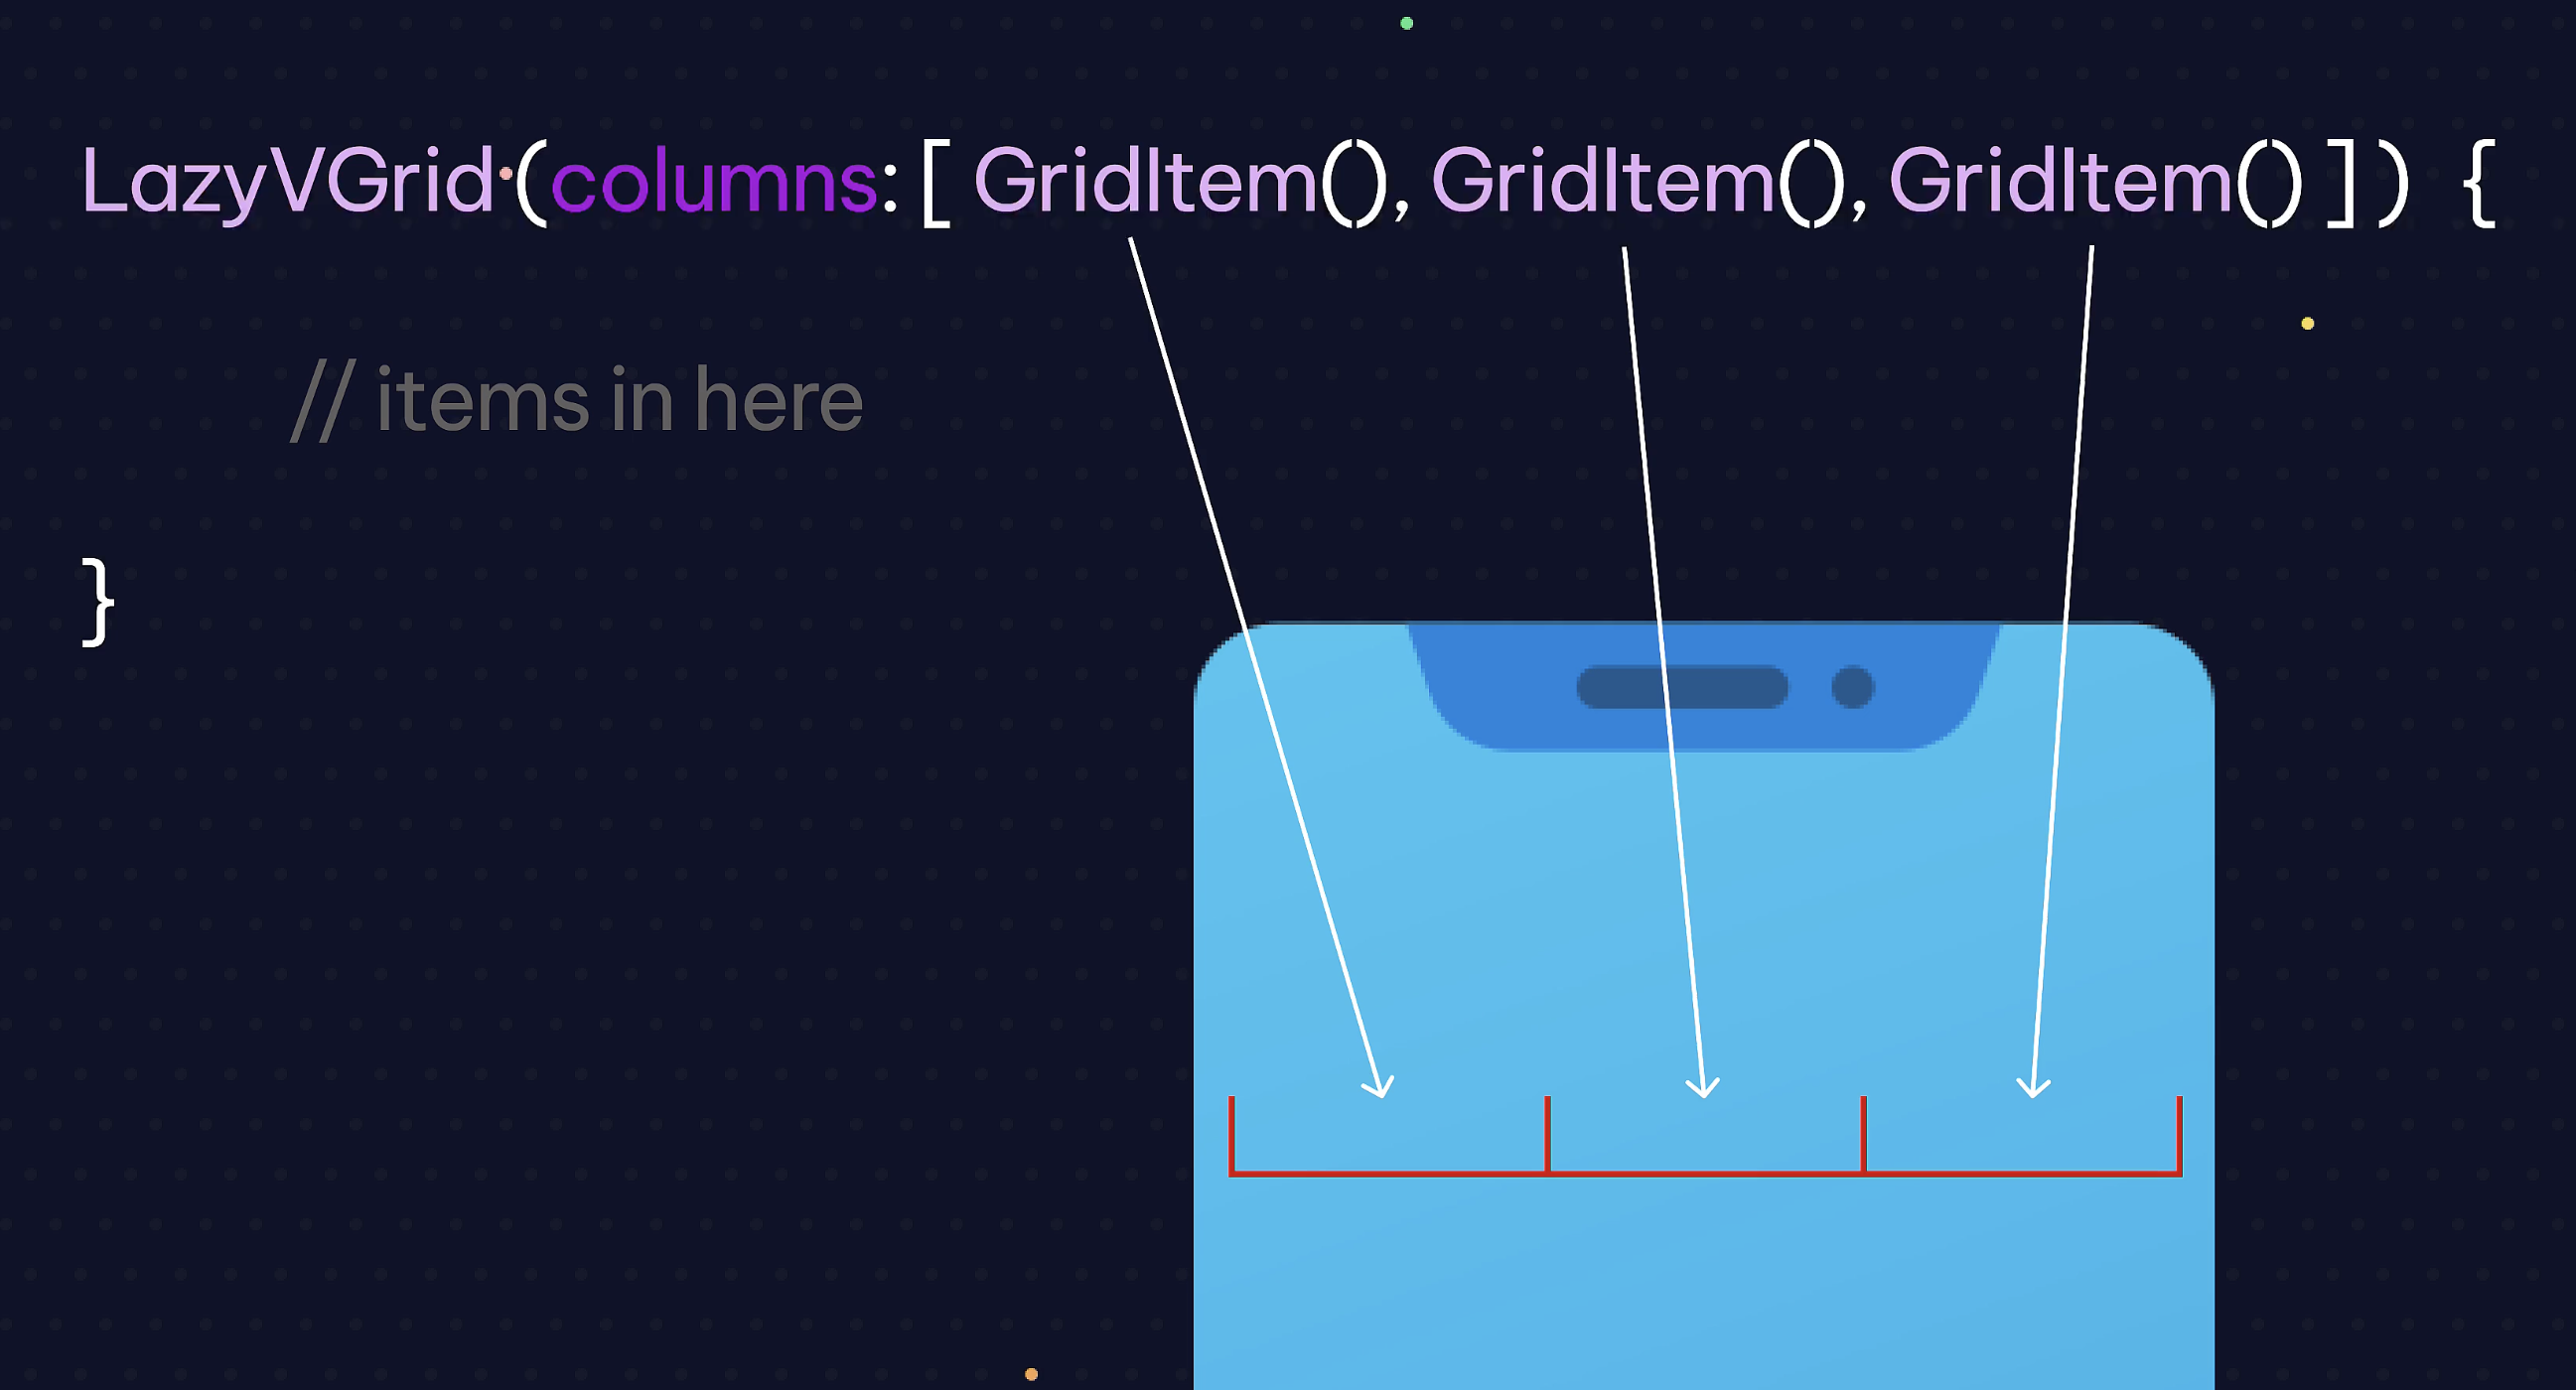
Lesson 5 - LazyVGrids
LazyVGrid(columns: [GridItem(), GridItem(), GridItem()]) {

}
Beispiel:
import SwiftUI

struct ContentView: View {

    var photos = ["gallery1", "gallery2", "gallery3", "gallery4", "gallery5", "gallery6", "gallery7", "gallery8", "gallery9", "gallery10", "gallery11"]


    var body: some View {

        ScrollView {

            LazyVGrid(columns: [GridItem(), GridItem(), GridItem()]) {
                ForEach(photos, id: \.self) { p in
                    Image(p)
                        .resizable()
                        .scaledToFit()
                }
            }
        }

    }

}


\#Preview {
    ContentView()
}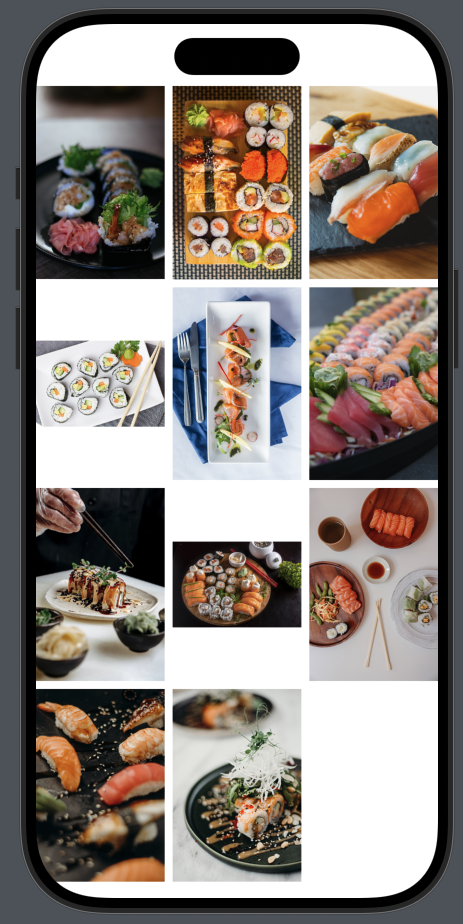
Ist so nicht scrollable, dafür muss es in einen ScrollView
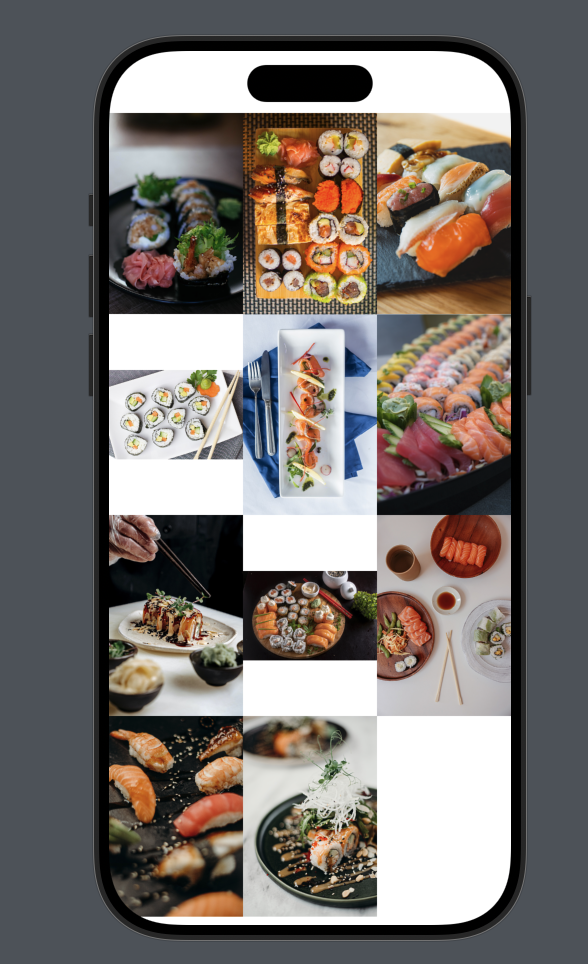
Beispiel wenn kein Abstand gewünscht: #LazyVGrid
ScrollView {

            LazyVGrid(columns: [GridItem(spacing:0), GridItem(spacing:0), GridItem(spacing:0)], spacing: 0) {
                ForEach(photos, id: \.self) { p in
                    Image(p)
                        .resizable()
                        .scaledToFit()
                }
            }
        }
-
Lesson 6 - Displaying Images in a Grid
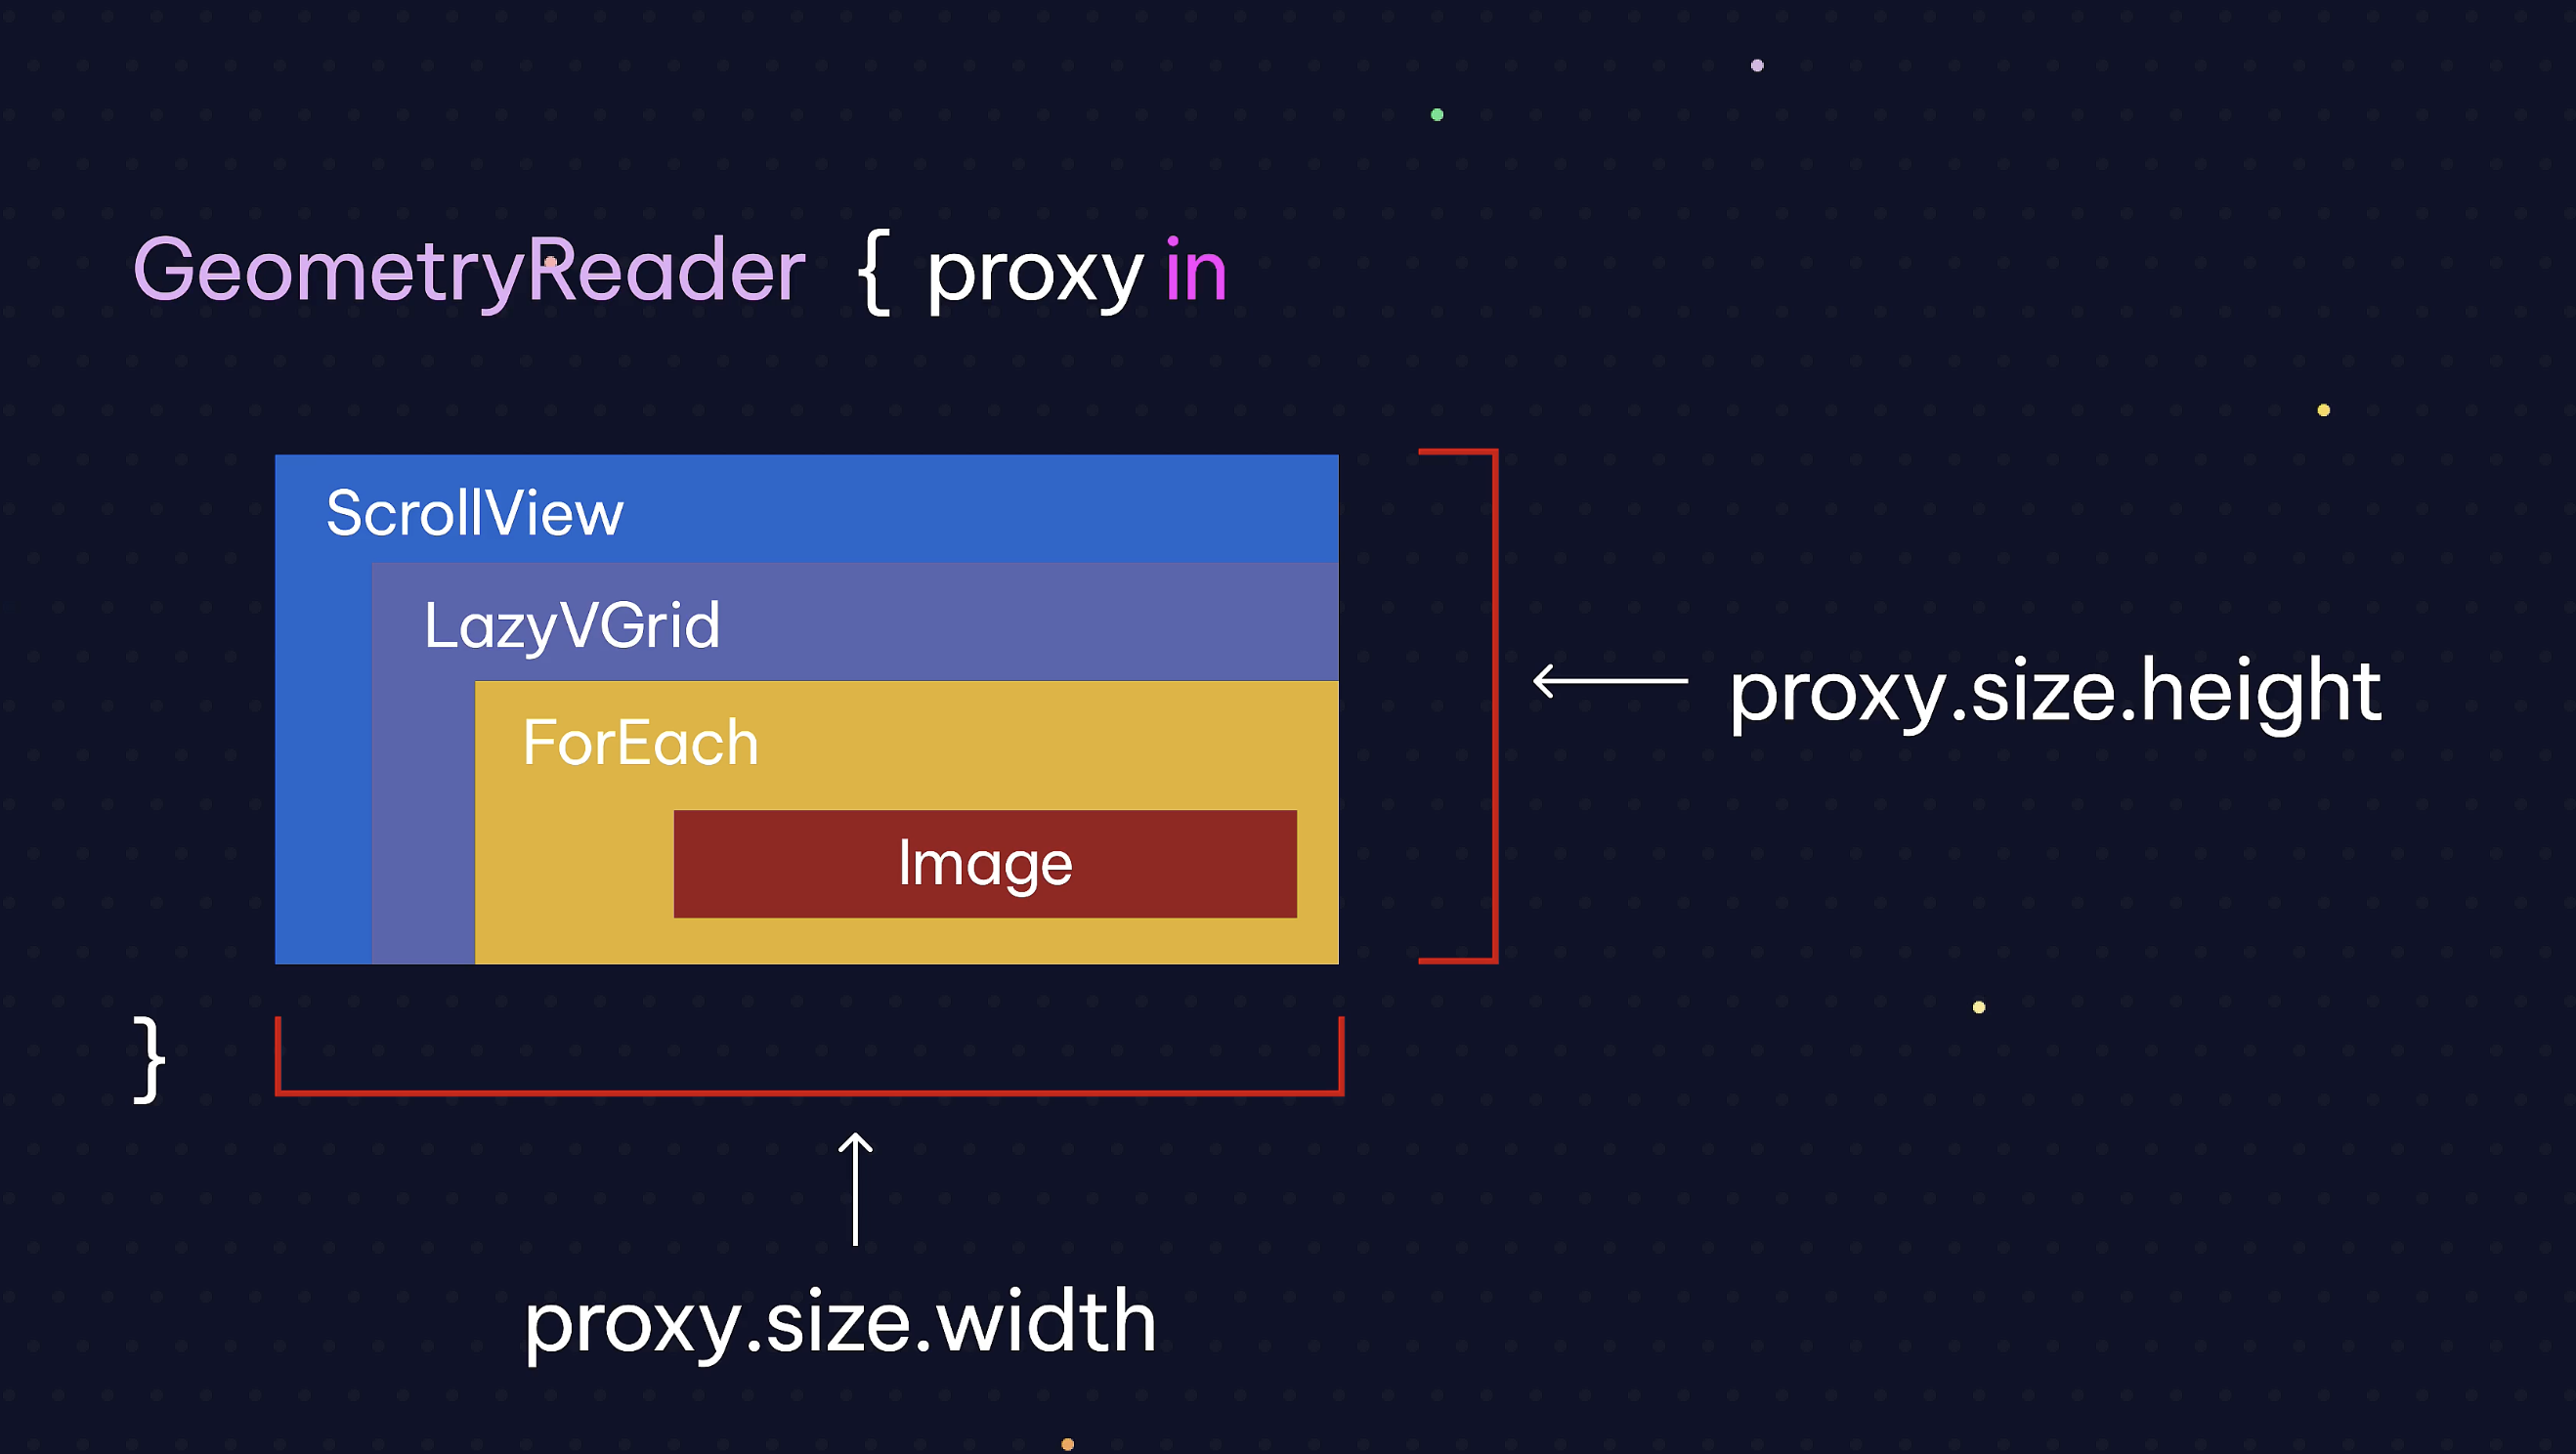
GeometryReader { proxy in
	ScrollView {
	LazyVGrid {
	...
	}
	}

}
https://github.com/dmkeks1/Restaurant/blob/main/Restaurant/GalleryView.swift
-
Lesson 7 - Modal Views Using Sheets
Sheets | Apple Developer Documentation
A sheet helps people perform a scoped task that’s closely related to their current context.
https://developer.apple.com/design/human-interface-guidelines/sheetsBest practice ist:
-
eigenen View anlegen, in diesem Fall ein View für ein Bild.
-
bool variable anlegen:
@State var sheetVisible = false -
.sheet(isPresented: $sheetVisible) { PhotoView() }als modifier für den VStack.
$sheetVisibleist eine bool variable die bei dem Tap auf ein Bild umgeschaltet wird. Das $ Zeichen symbolisiert ein Binding. PhotoView() die erstellte View. -
.onTapGesture { sheetVisible.toggle() // same as sheetVisible = true }als modifier für den Content, in dem Fall für
Image(photo)
-
-
Lesson 8 - Passing Data with Bindings
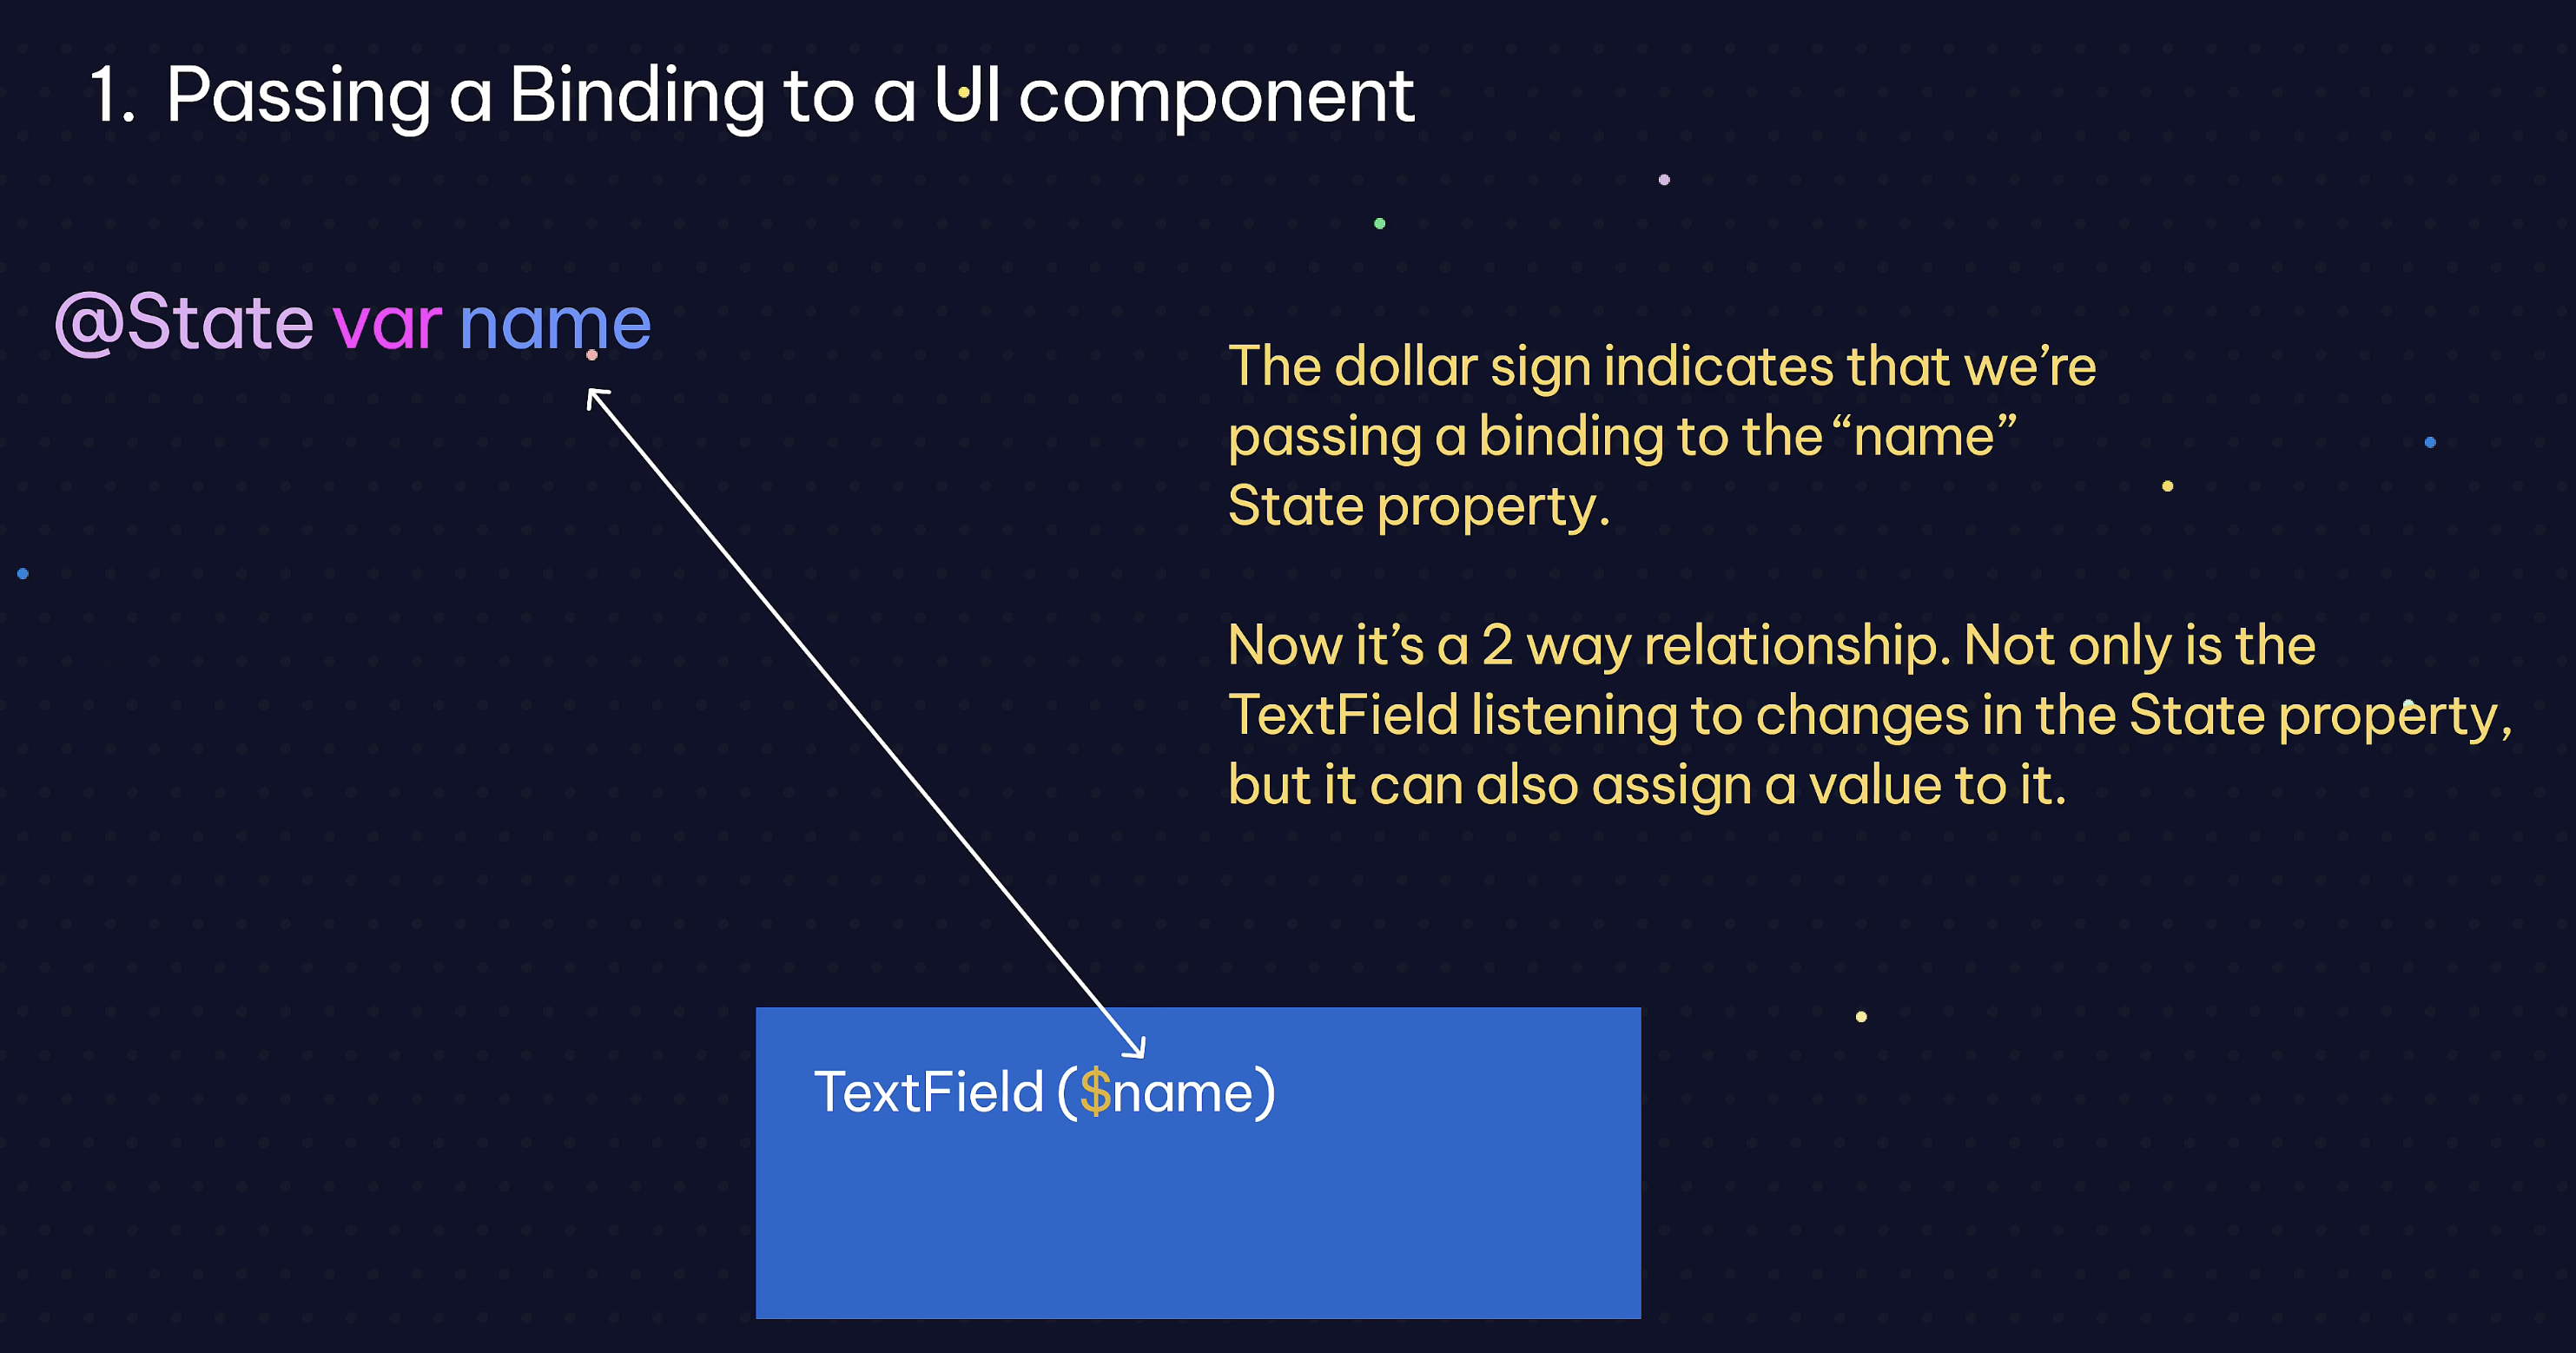
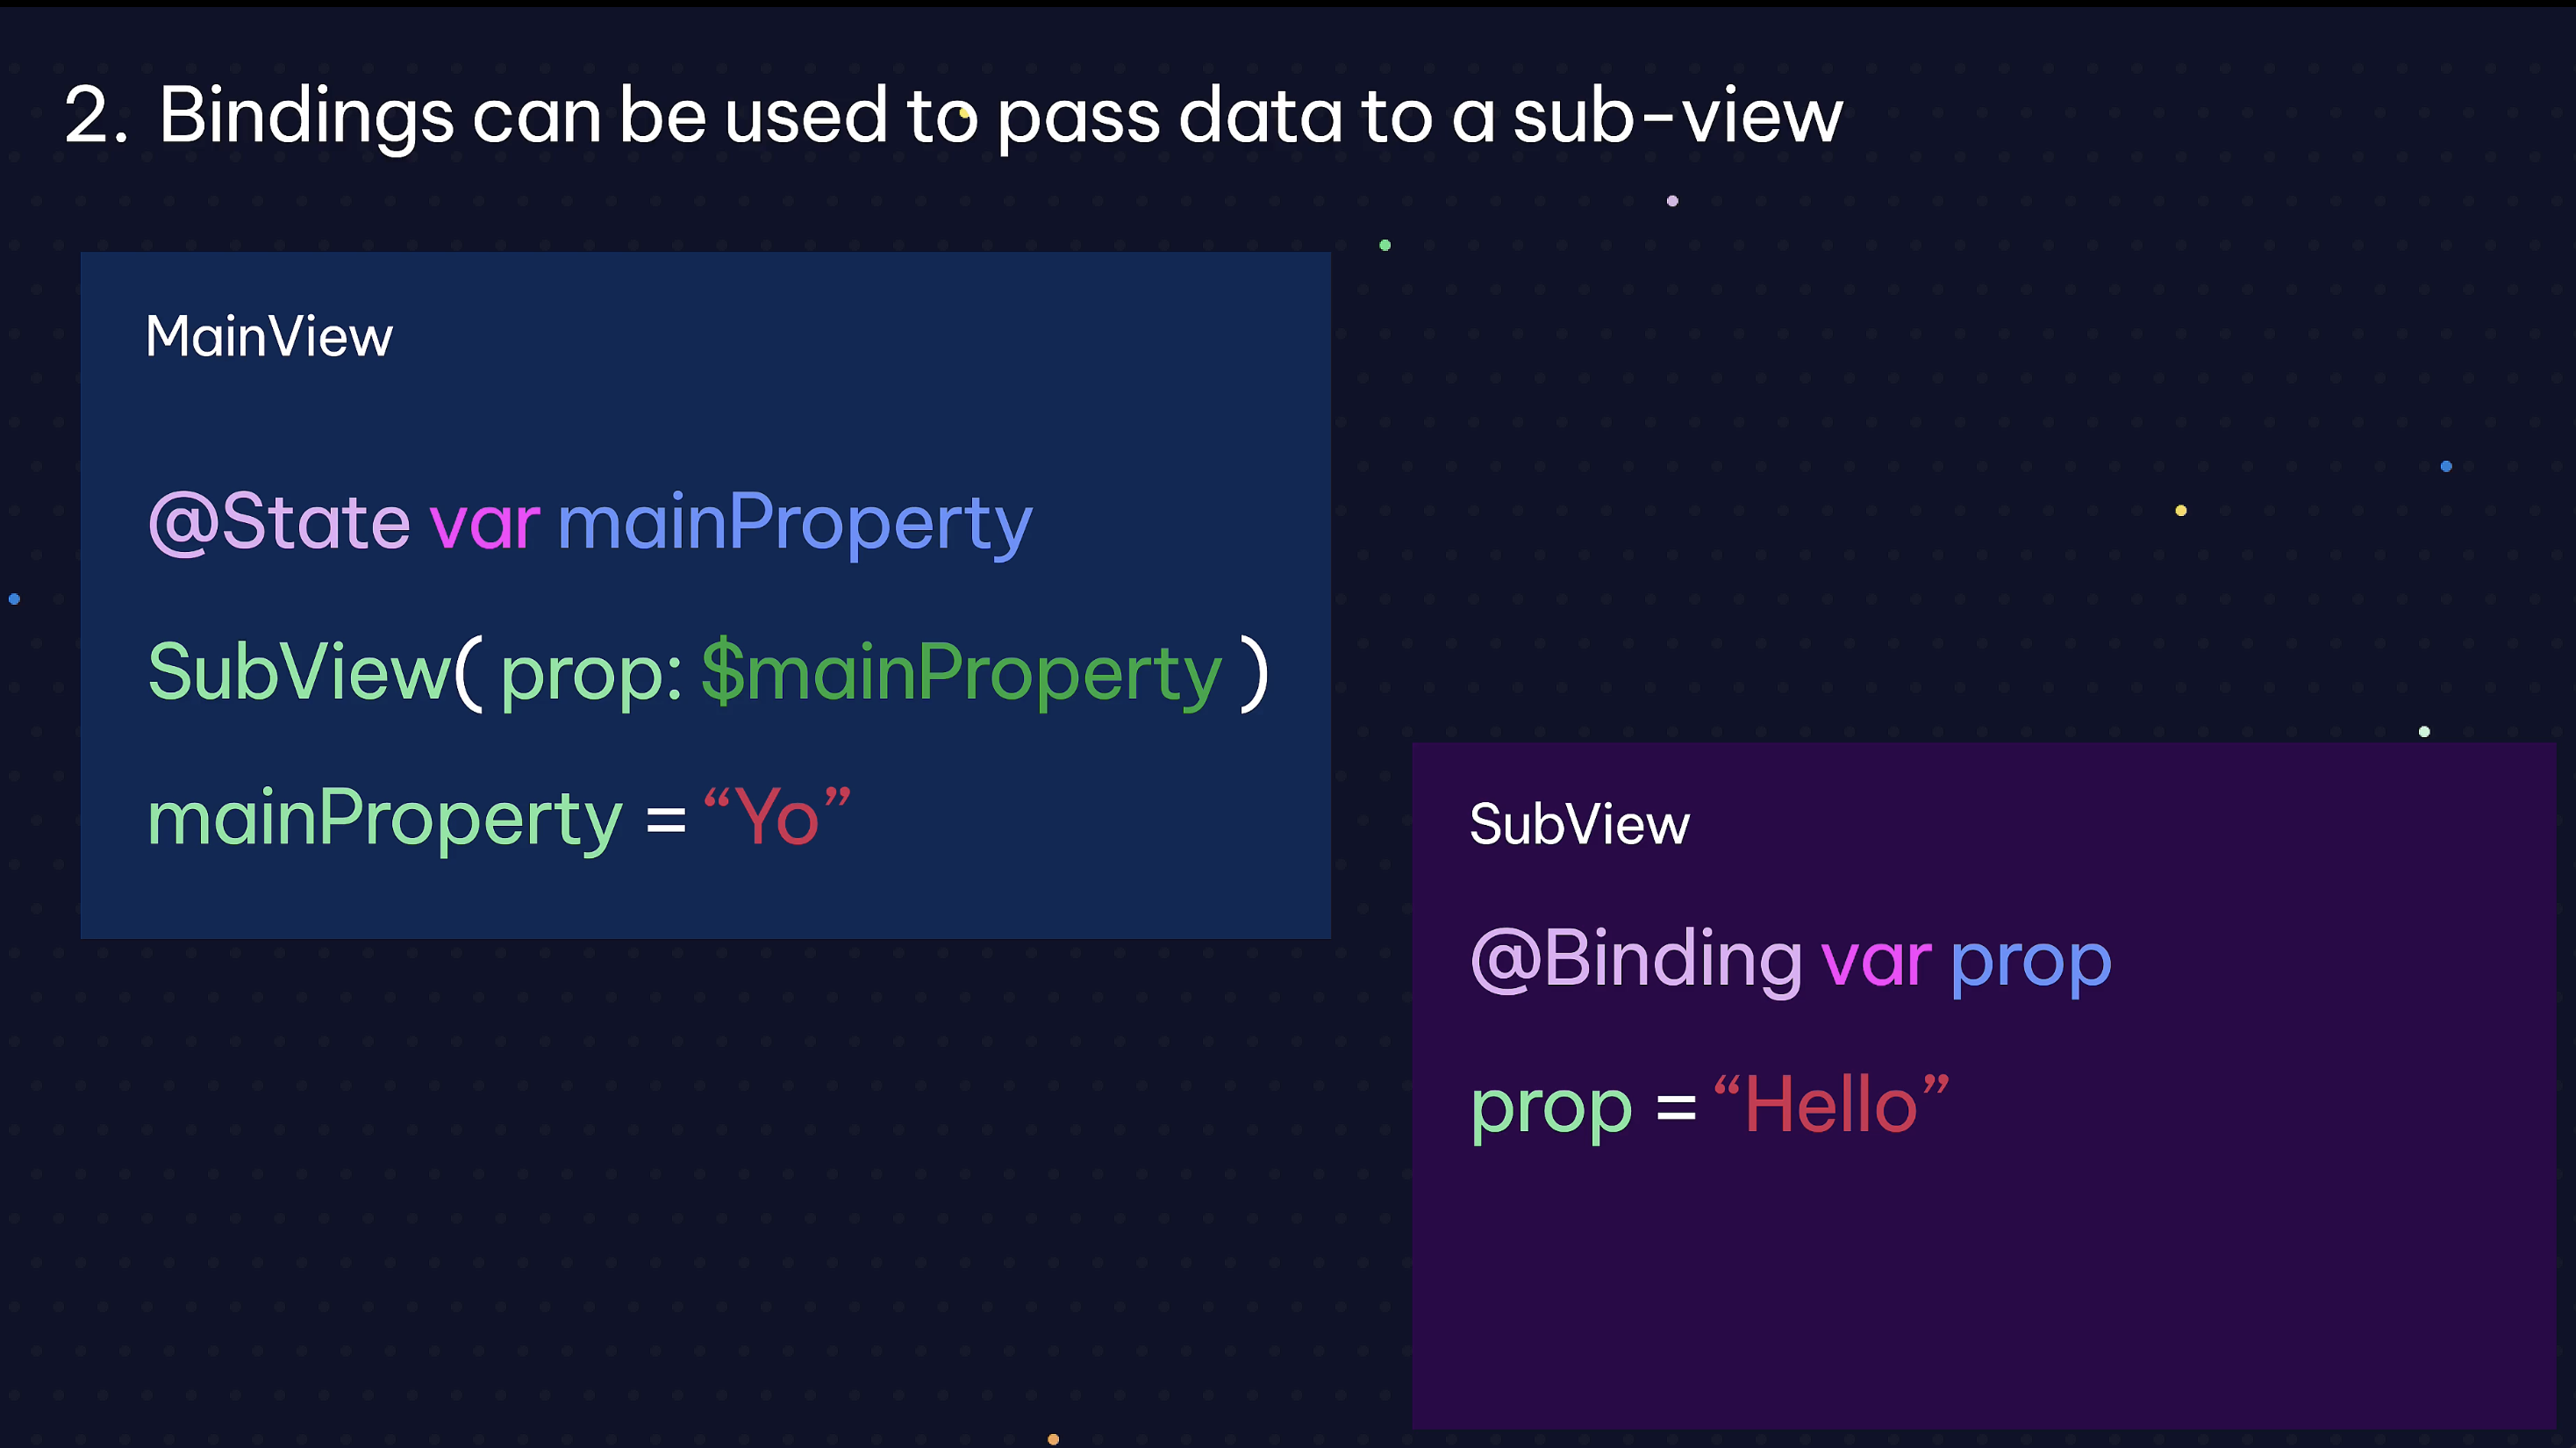
@State var dataArrayA binding is a reference to a State property that allows a two way relationship.
Binding müssen immer in andere Views gepassed werden sollten Sie dort gebraucht werden z.B.:
PhotoView(selectedPhoto: $selectedPhoto, sheetVisible: $sheetVisible)There are two common ways to use bindings:
- Textfield listens to changes, but also can write data in the property. (here we are in the same view)
- able to pass data/variables into another views and back.
Für eine funktionierende Preview muss ein “FakeBinding” in einer Form einer Konstanten erstellt werden z.B. für den PhotoView View:
#Preview { PhotoView(selectedPhoto: Binding.constant("gallery1")) }selectedPhoto ist die Binding property/variable und für eine funktionierende preview müssen wir quasi eine imaginäre auswahl getroffen haben. Mit einer konstanten, in dem Fall gallery1, simulieren wir eine Auswahl. Sonst kommt es zu Fehlern.
https://github.com/dmkeks1/Restaurant/blob/main/Restaurant/PhotoView.swift
In der GalleryView muss .sheet diese variable für den PhotoView übergeben werden:
.sheet(isPresented: $sheetVisible) { PhotoView(selectedPhoto: $selectedPhoto) }und in der PhotoView natürlich definiert werden:
@Binding**var**selectedPhoto: String -
Lesson 9 - Swift Closures, Initializers, Access Modifiers and More
Initializer
An initializer is a method that gets called when a new instance is created.
The initializer method is responsible for making sure that the instance is ready to use.
In order for an Instance to be ready to use all of its properties have to have a value.
You can define an init() {} method in an instance so if you create a new instance of that a piece of code runs when you create it.
.selfrefers to the struct itself, gets used in initializers.Closures
Closures are simply block of code without a name.
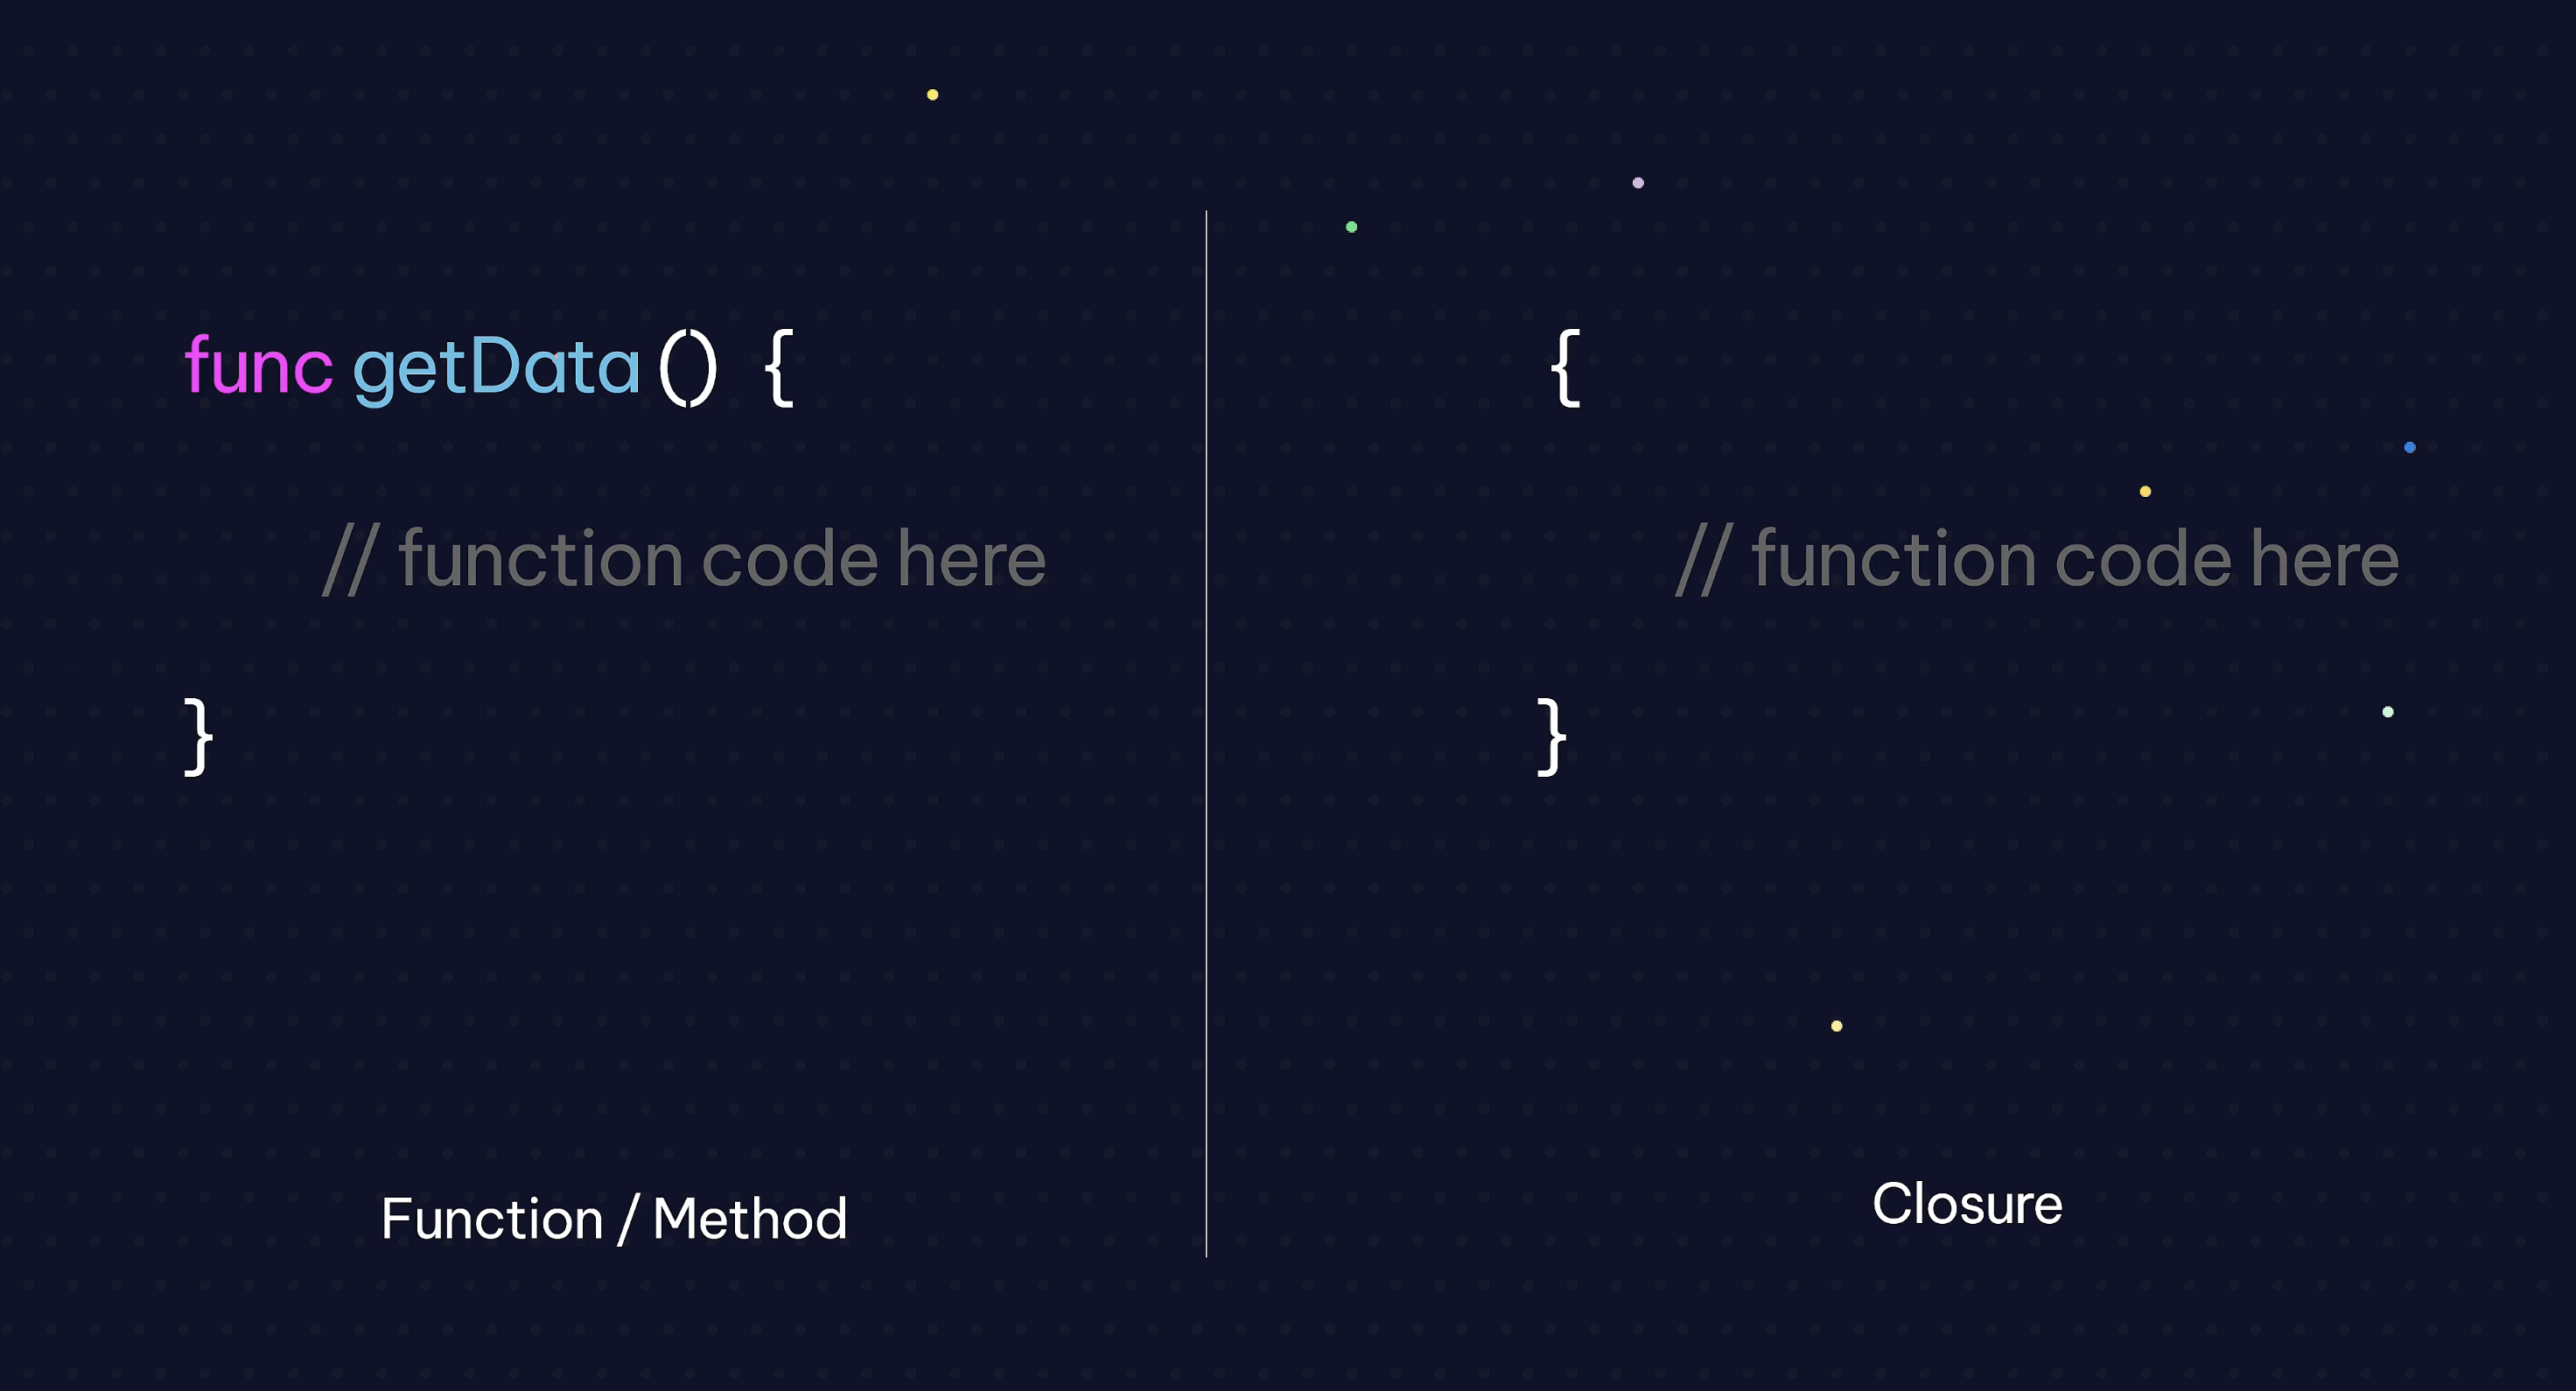
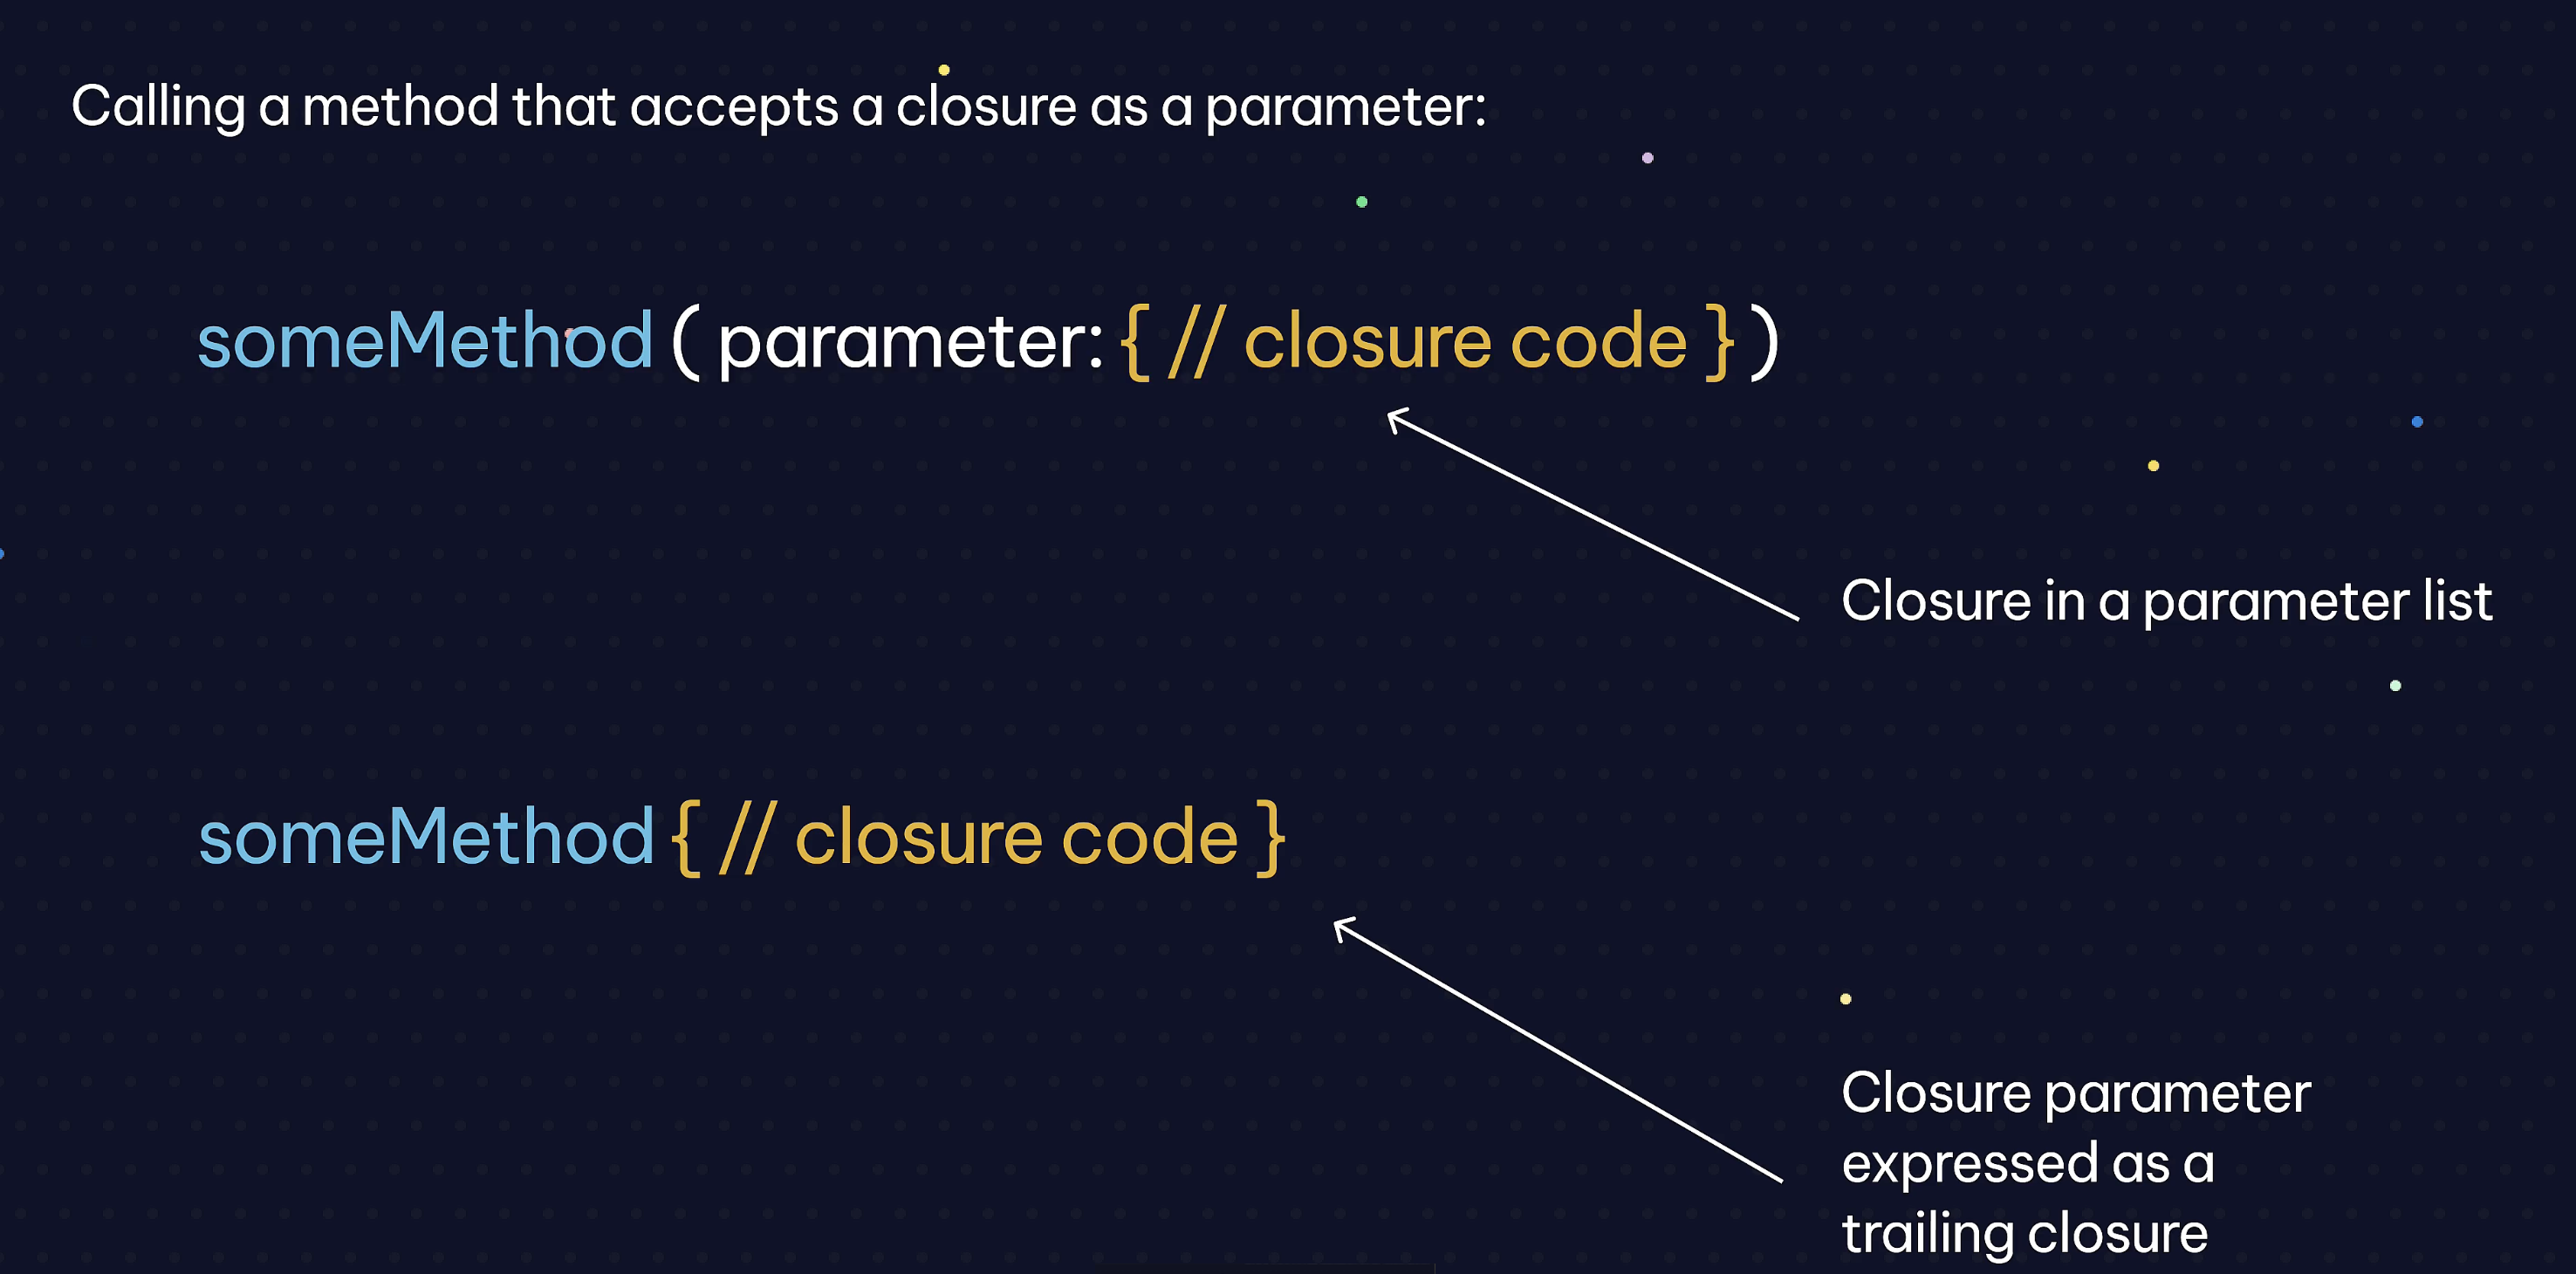
XCode often changes methods into trailing closure format, so don’t worry. Just know what closures are.
Access Modifiers
Access modifiers allow you to change who can access the properties and methods of a structure.
Arten von access modifiers:
public= defaultprivate= can only be used inside a struct/function. Can’t be accessed outside of a structure/function.fileprivate= you can access outside a struct, but only inside the current swift file.internal= only inside the same target. this is more advanced and probably wont be used.by default : everything in a struct is public, you dont need to specific public.
-
Module 3 Challenge
Habs ohne DataService und eventuell etwas unsauber gemacht was das spacing des LazyVGrids angeht.
Module 4 - The Guidebook App
https://github.com/dmkeks1/Guidebook
-
Lesson 03 - NavigationStack and NavigationLink
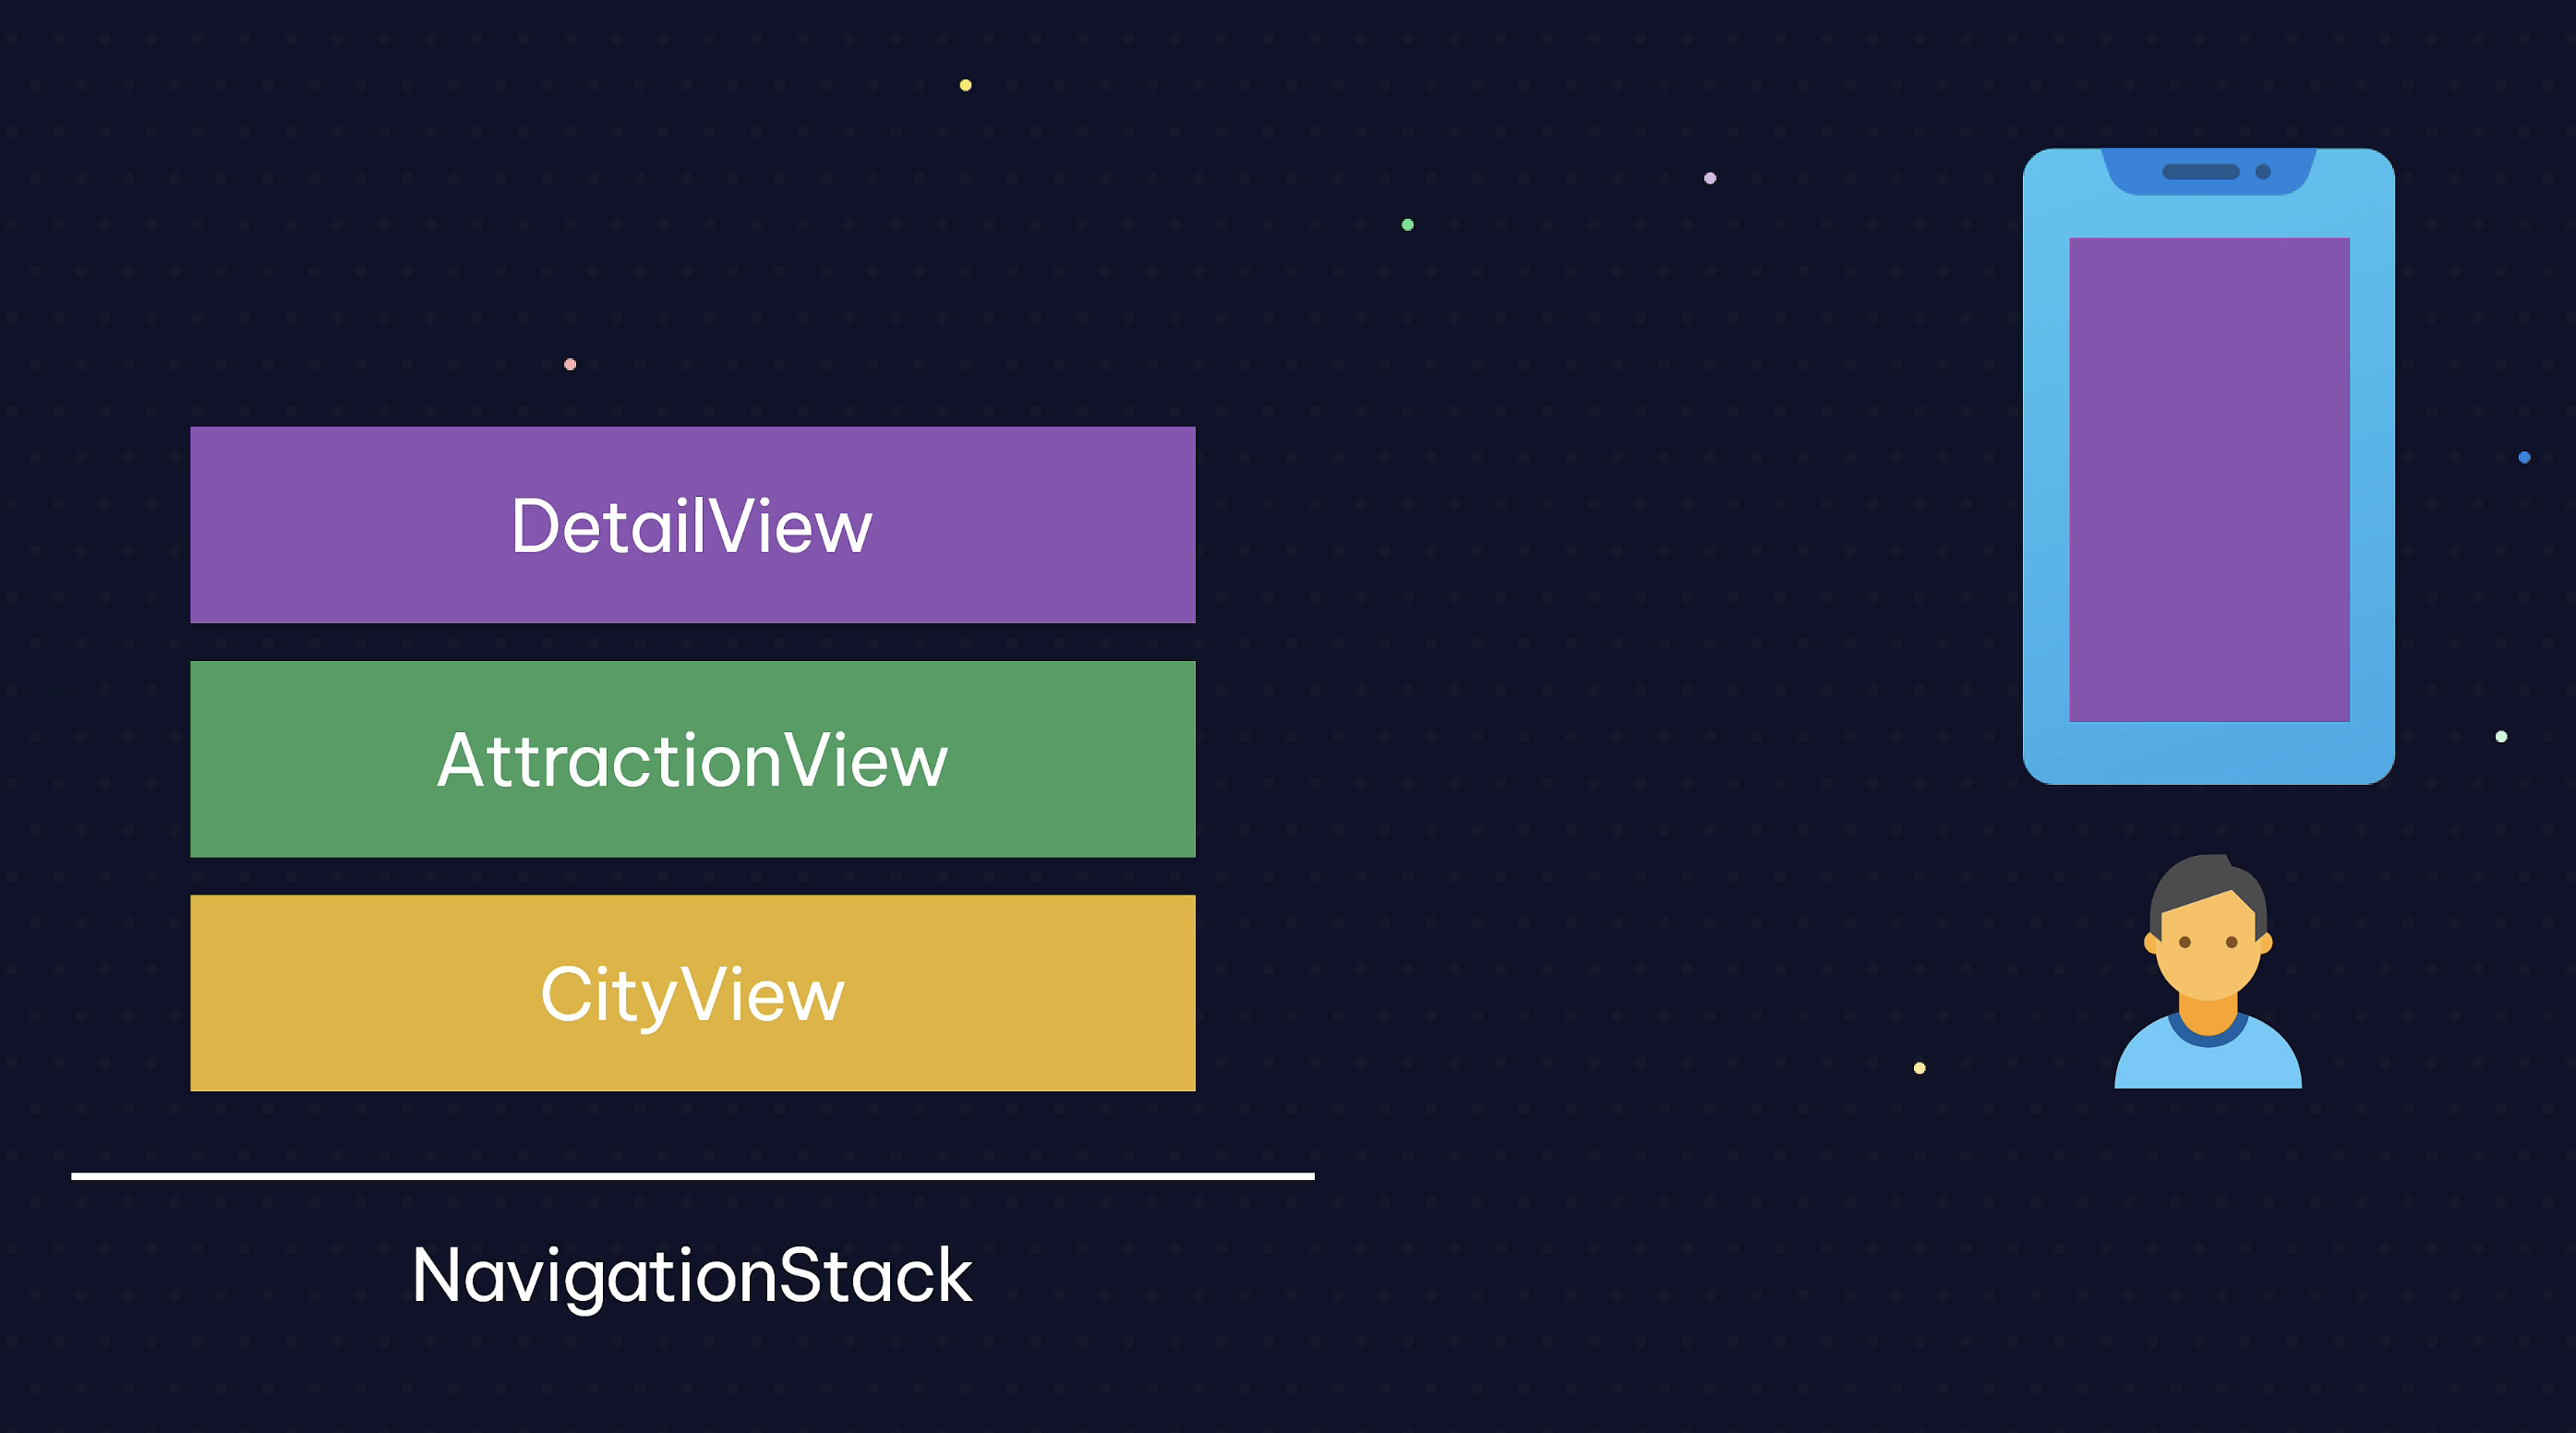
NavigationStack{

            ScrollView {

                VStack {

                    ForEach(cities) { city in
                        NavigationLink {
                            AttractionView()
                        } label: {
                            Text(city.name)
                        }
                    }
                }
            }
            .padding()
        }

        .onAppear() {
            cities = dataService.getData()
        }
NavigationLink { DetailView(attraction: attraction) } label: { Text(attraction.name) } -
Lesson 04 - Building the Guidebook UI
-
Lesson 05 - Debugging in Xcode
Info
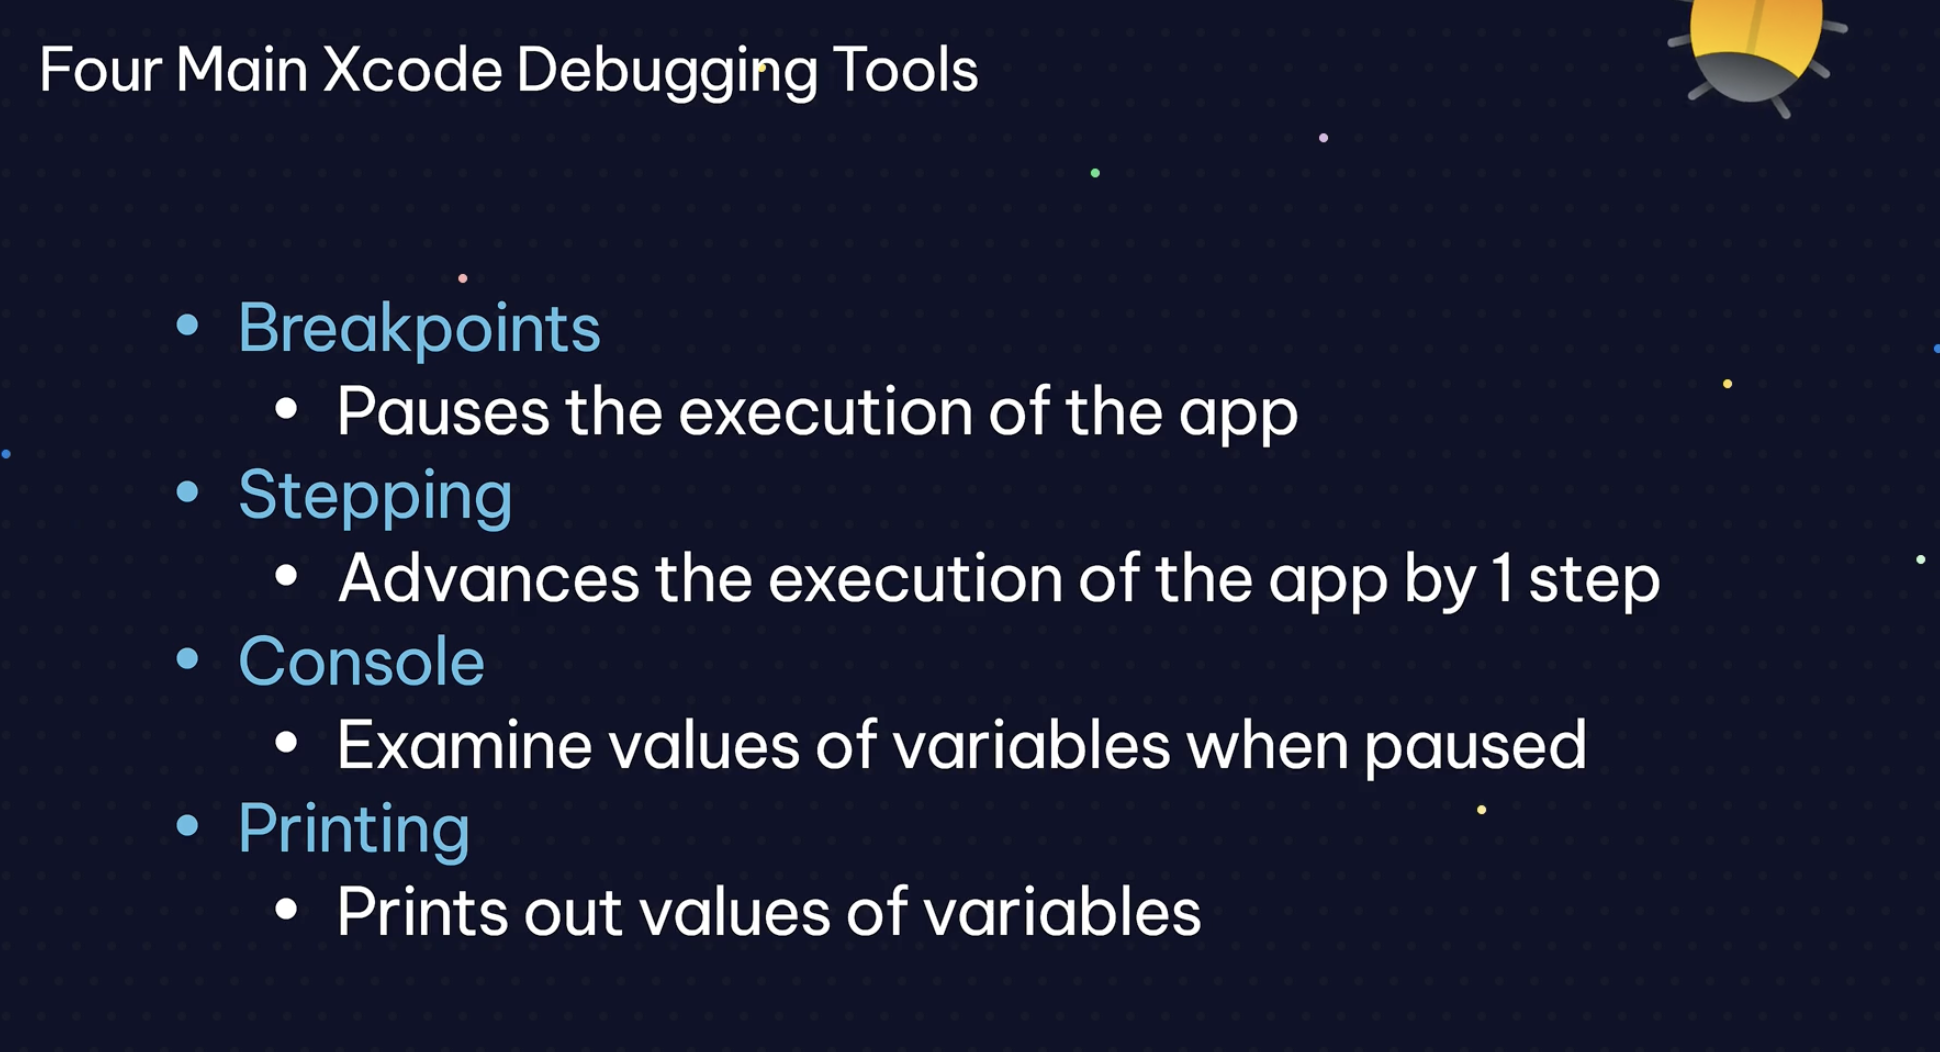
to debug variables in the console type:
po apo stands for print out. A is a variable.
-
Lesson 06 - Swift Optionals
Sometimes a variable is just empty at a certain point, maybe because the user hasnt made a selection yet. For that case we can set a variable to an Optional by adding a ? at the Datatype.
var selectedFood: String? = nilnil indicates that there is no value at the moment.
An Optional needs to get unwrapped. They way you do that is by adding a !
Text(selectedFood!)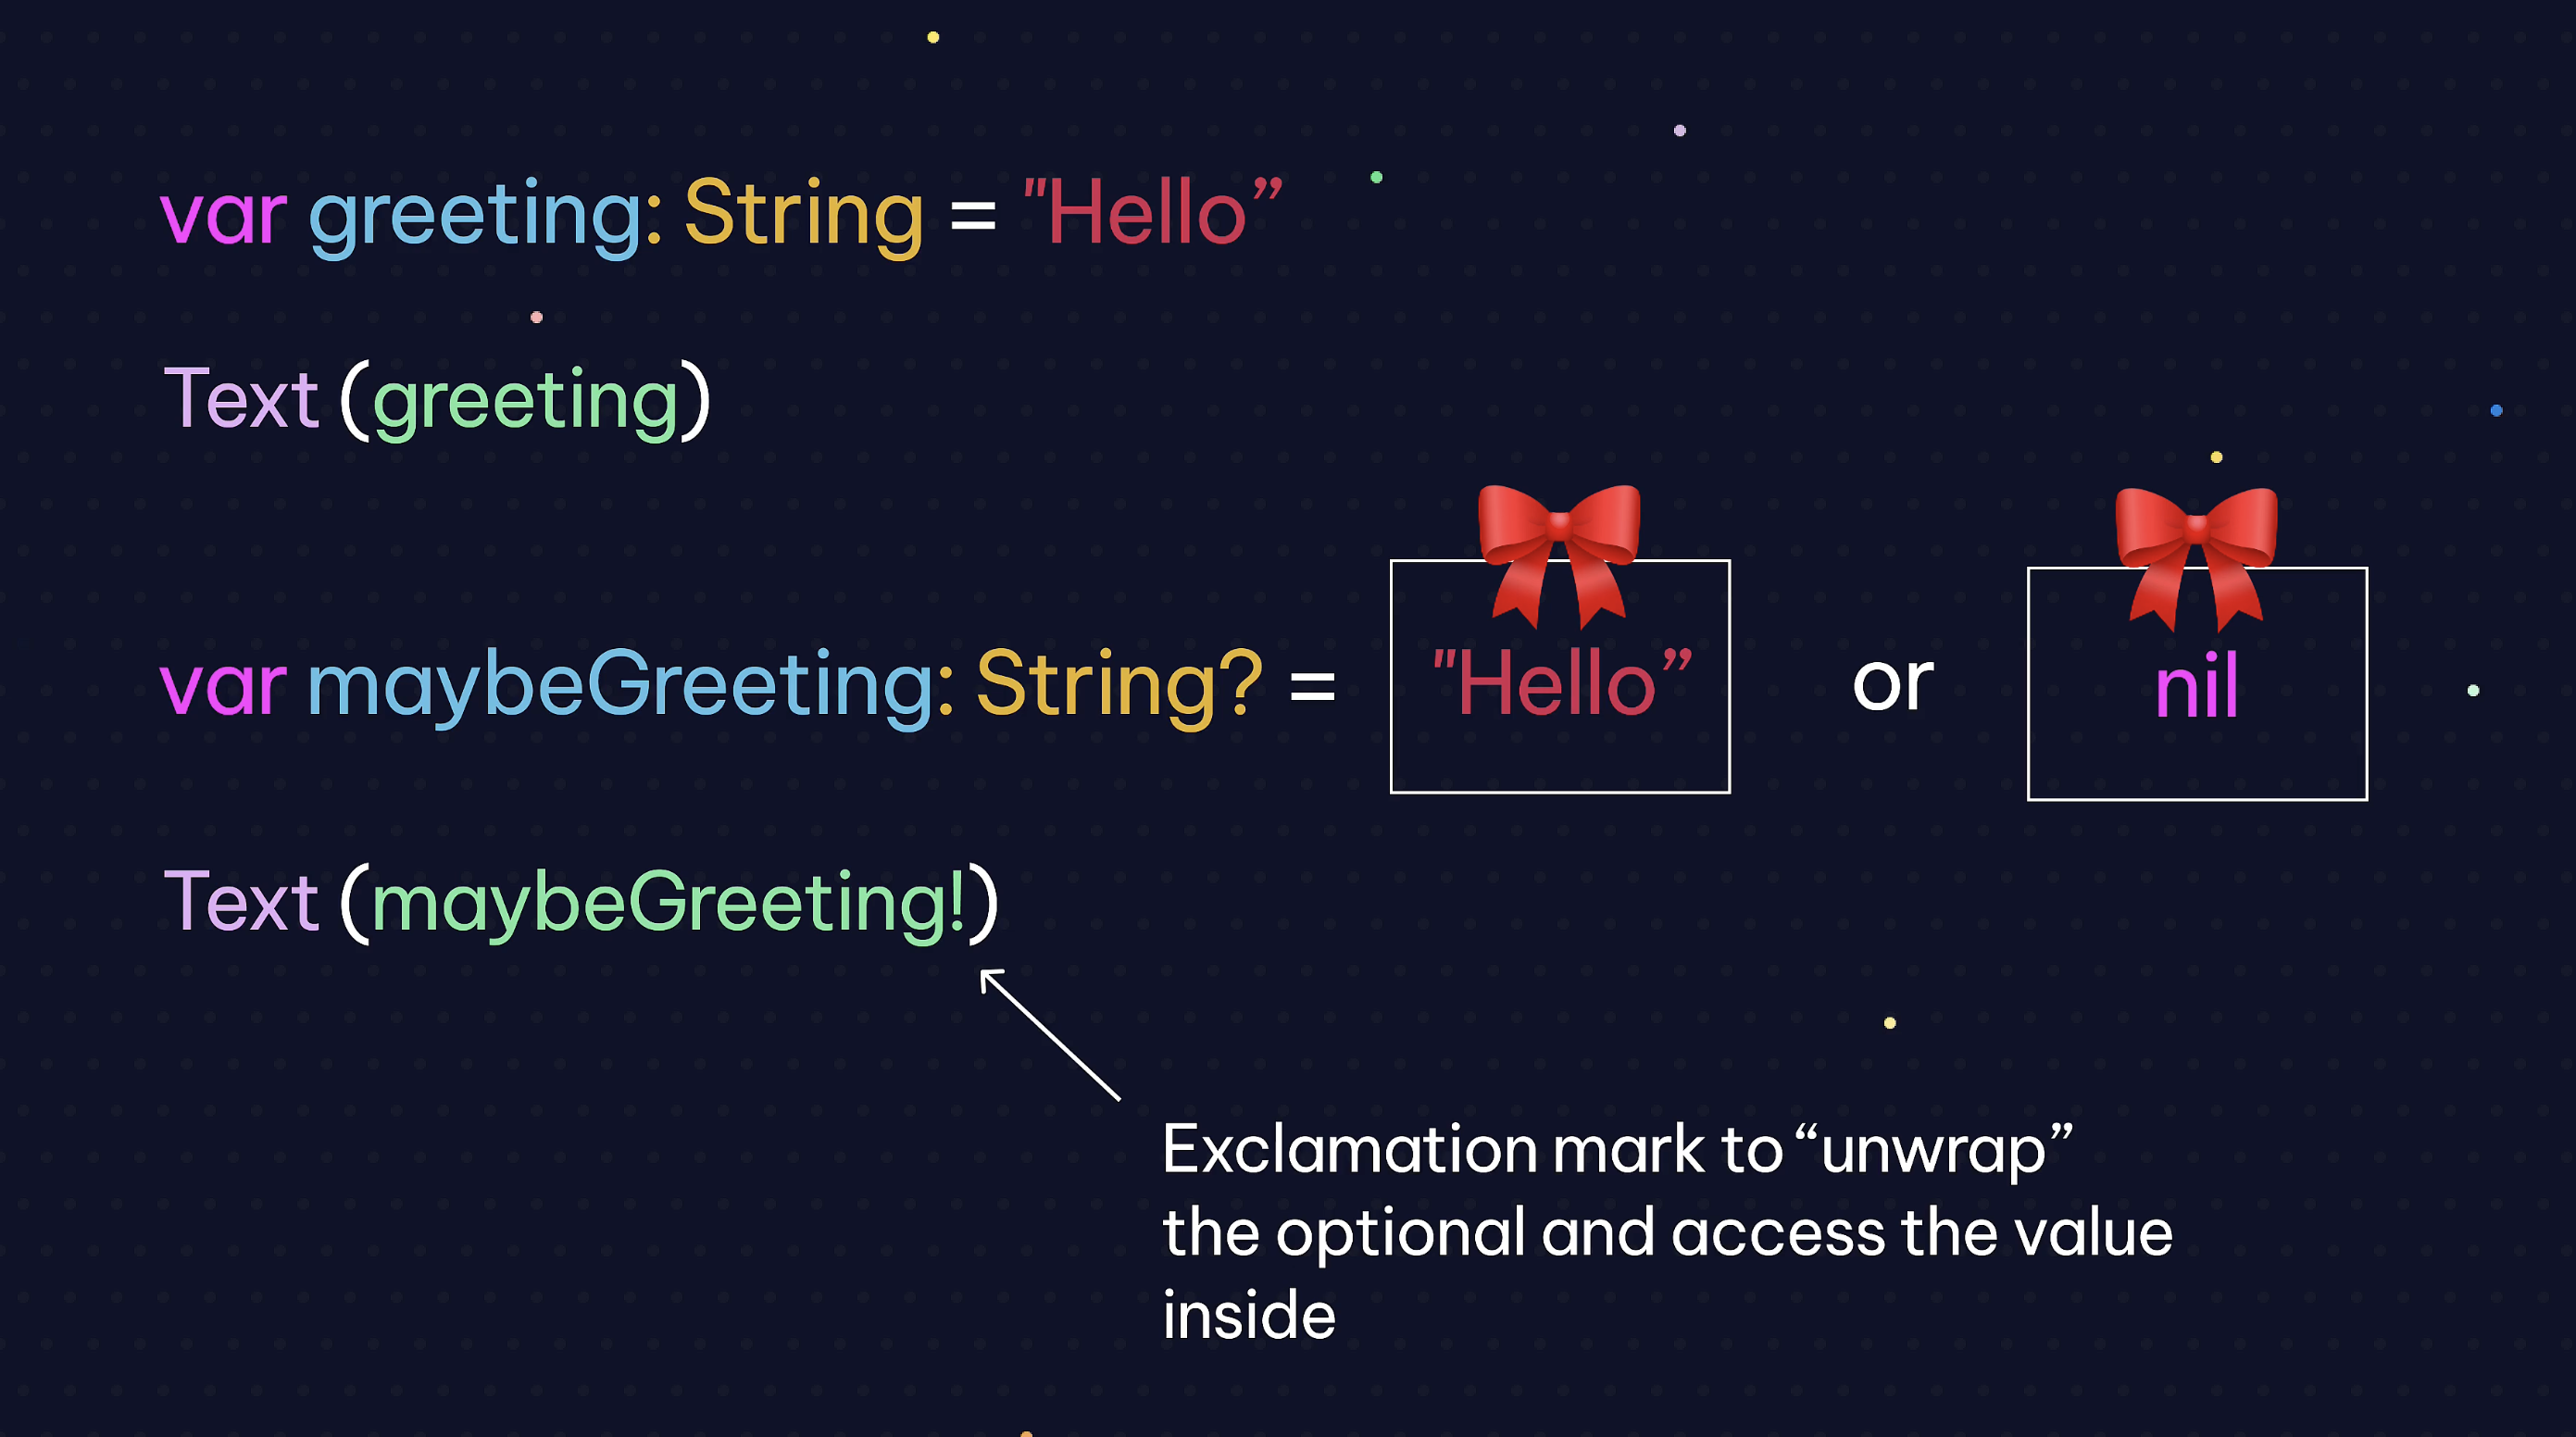
Unwrapping an optional with nil will crash the app!
To prevent crashin you can user either
- if statement
if selectedFood != nil { Text(selectedFood!) } OR if selectedFood == nil { Text("Ice Cream") } else { Text(selectedFood!) }- optional binding
if let food = selectedFood { Text(food) } // if value is nil, this check just bypasses the lines -> no error- nil coalescent operator
Text(selectedFood ?? "Sushi")

// if the value is valid, it will display selectedFood. If its nil
// it will display Sushi.

//can also be used for optional chaining:

Text(selectedMenuItem?.name ?? "Pizza")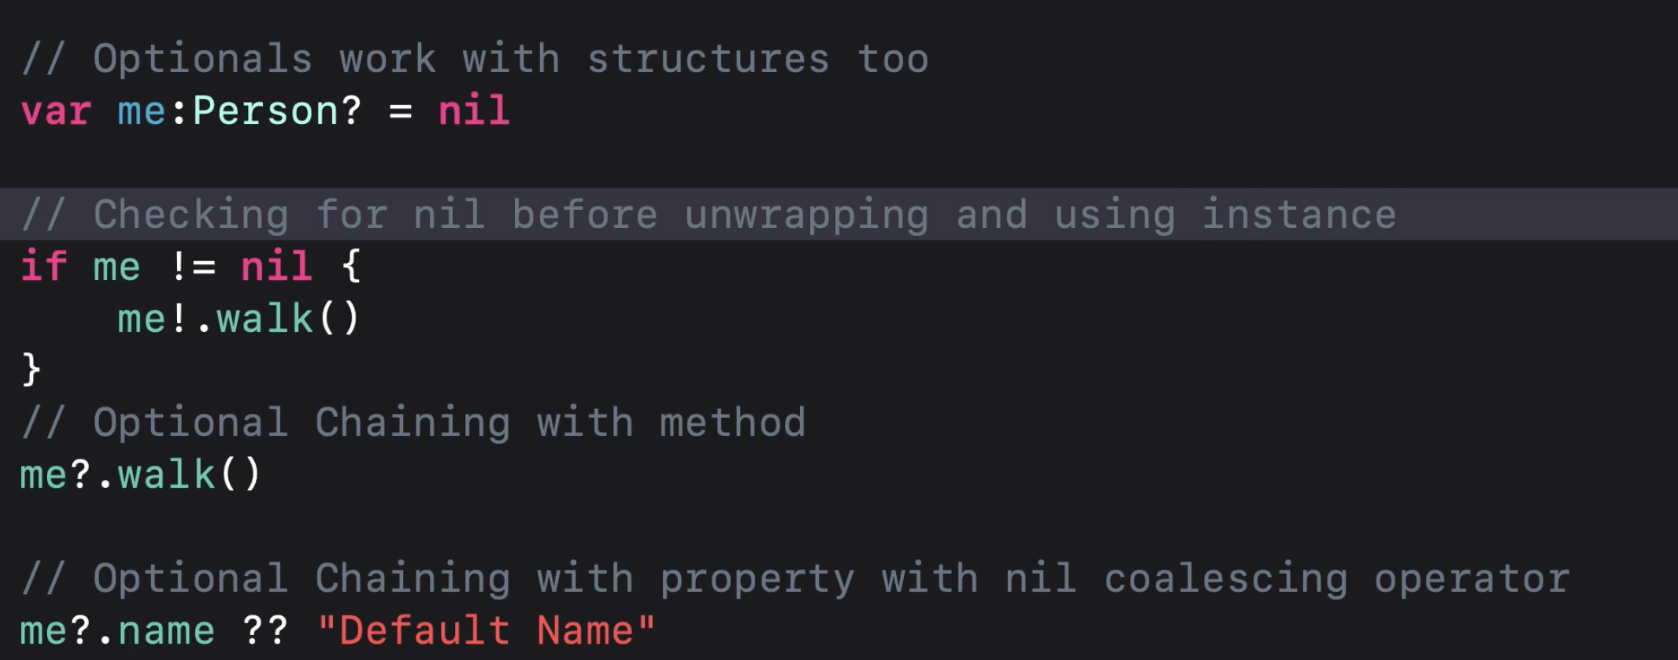
optional chaining:
me?.walk()tzhe = checks if the var contains something, if yes, call method() on in. if not, do nothing.
-
Lesson 07 - Swift Dictionaries
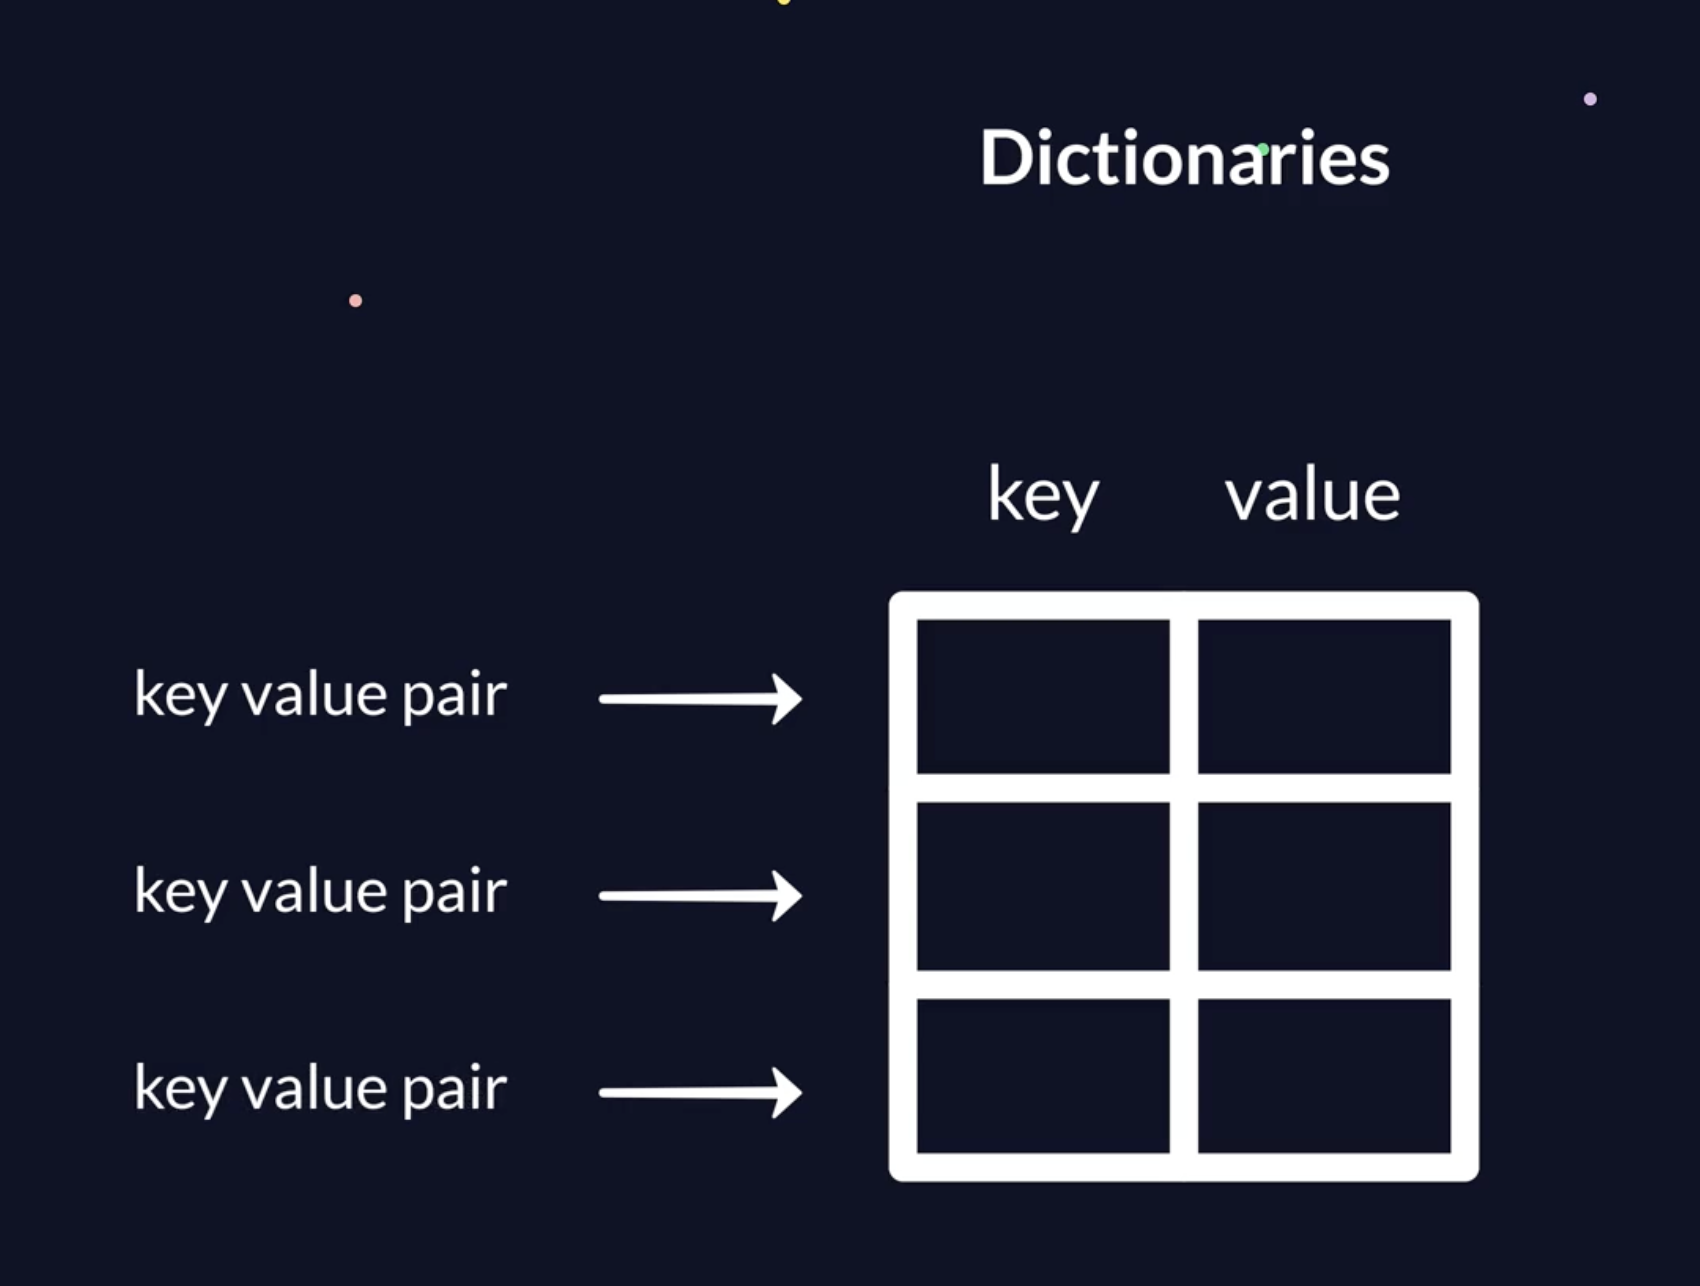
keys are unique!
they have associated values
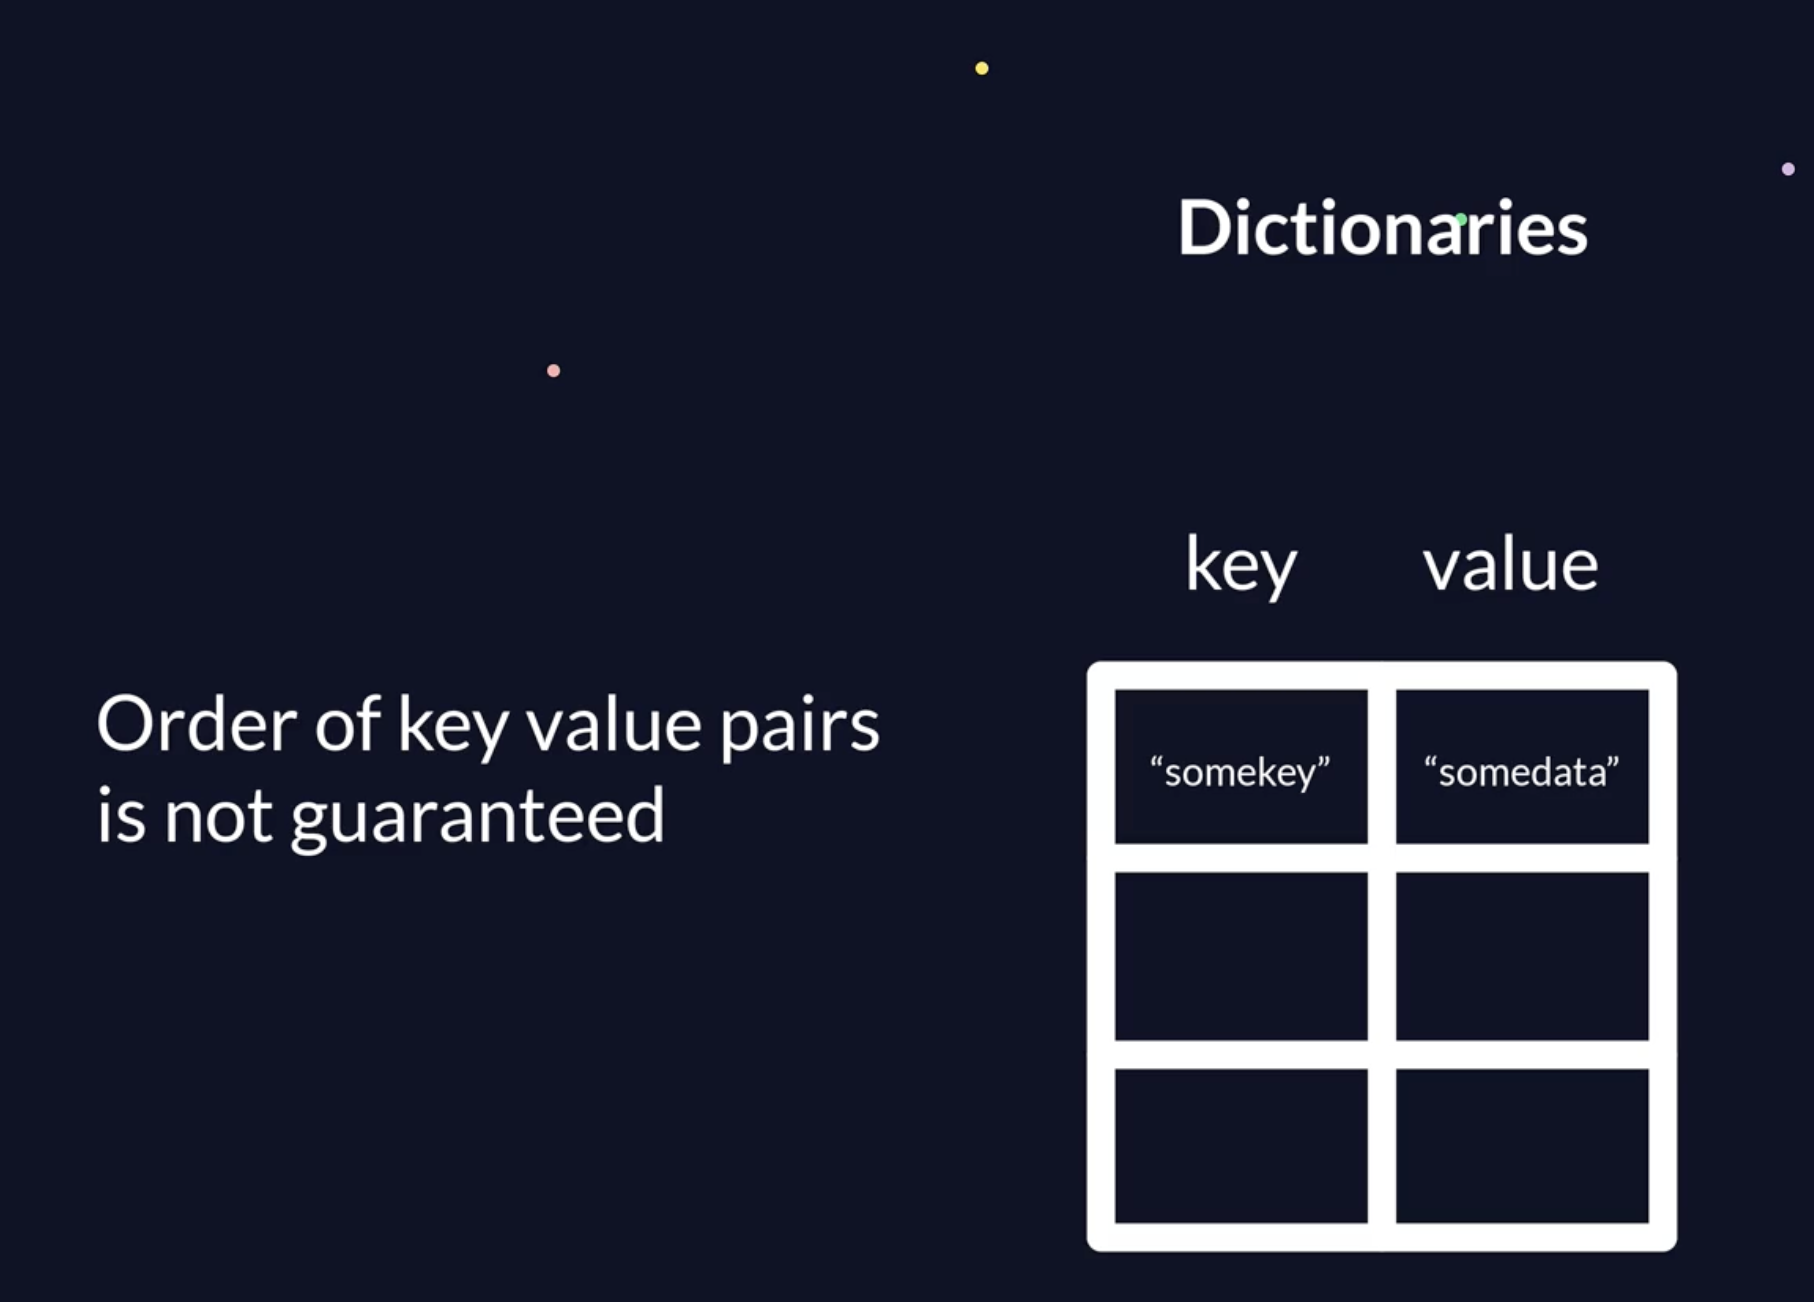
import UIKit var myArray: [String] = ["Orange", "Apple","Banana"] // Array var myEmptyArray = [String]() var myDictionary: [String:String] = ["OR":"Orange", "AP":"Apple", "BA":"Banana"] //Dictionary var myEmptyDictionary = [String:String]() myArray.append("Pear") myDictionary["PR"] = "Pear" // create key value pair myDictionary["PR"] = "Prune" //updates value for key "PR" myDictionary["PR"] = nil // deletes value from the dictionary myArray[1] // read from array - ORDER MATTERS // // if a Dictionary entry is not there, its nil, so you need to check: // if myDictionary["OR"] != nil { myDictionary["OR"] // read from array - WILL OUTPUT ORANGE } print(myDictionary["JDF"] ?? "Peach") -
Lesson 08 - Swift Loops
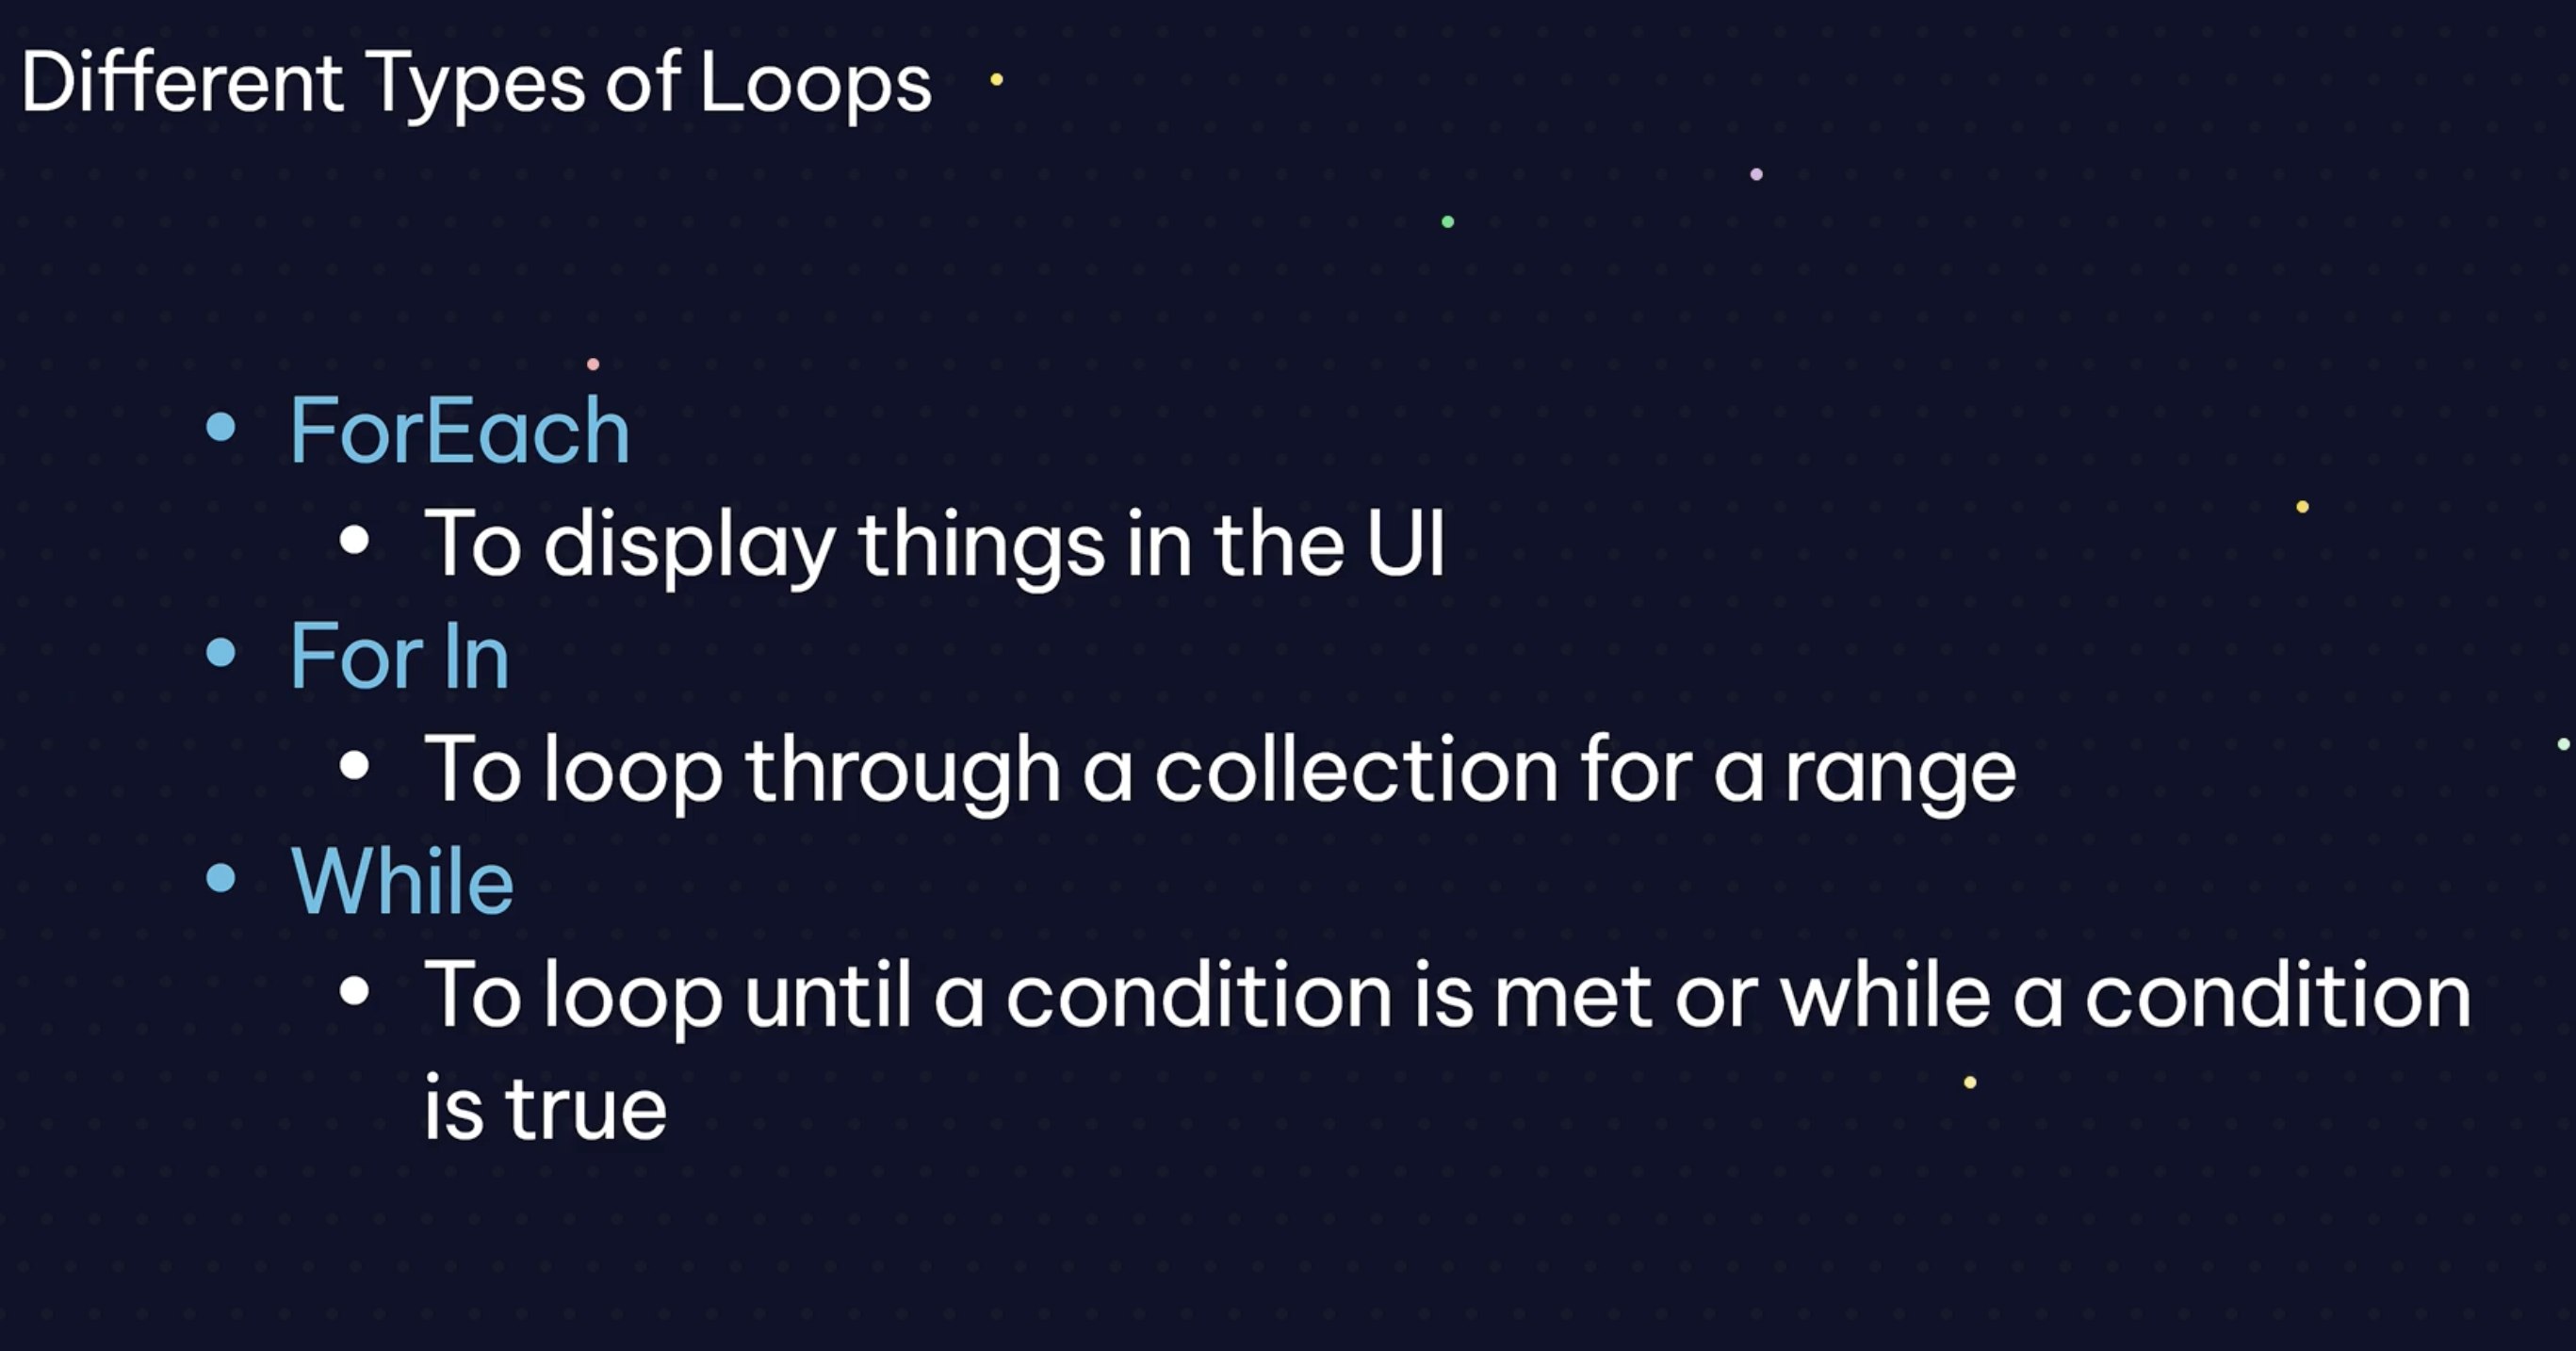
For In
var myArray: [String] = ["Orange", "Apple","Banana"] // Array
var myDictionary: [String:String] = ["OR":"Orange", "AP":"Apple", "BA":"Banana"] //Dictionary

for item in myArray { // going through an array
    print(item)
}


for k in myDictionary.keys { // going through the dictionary and prints out the keys
    print(k)
}


for v in myDictionary.values { // going through the dictionary and prints out the values
    print(v)
}

for (k, v) in myDictionary {//  going through the dictionary and prints out the values and keys.
                            // (k,v) -> is called a tuple, a group of variables
    print(k)
    print(v)
}
While
import UIKit var myArray: [String] = ["Orange", "Apple","Banana"] // Array var myDictionary: [String:String] = ["OR":"Orange", "AP":"Apple", "BA":"Banana"] //Dictionary var flag = false while flag == false { // checks initially and may not run even once print("Hello") flag = true } repeat { // run guaranteed once, and checks condition afterwards print("Repeat") } while flag == false -
Lesson 09 - JSON Data Format
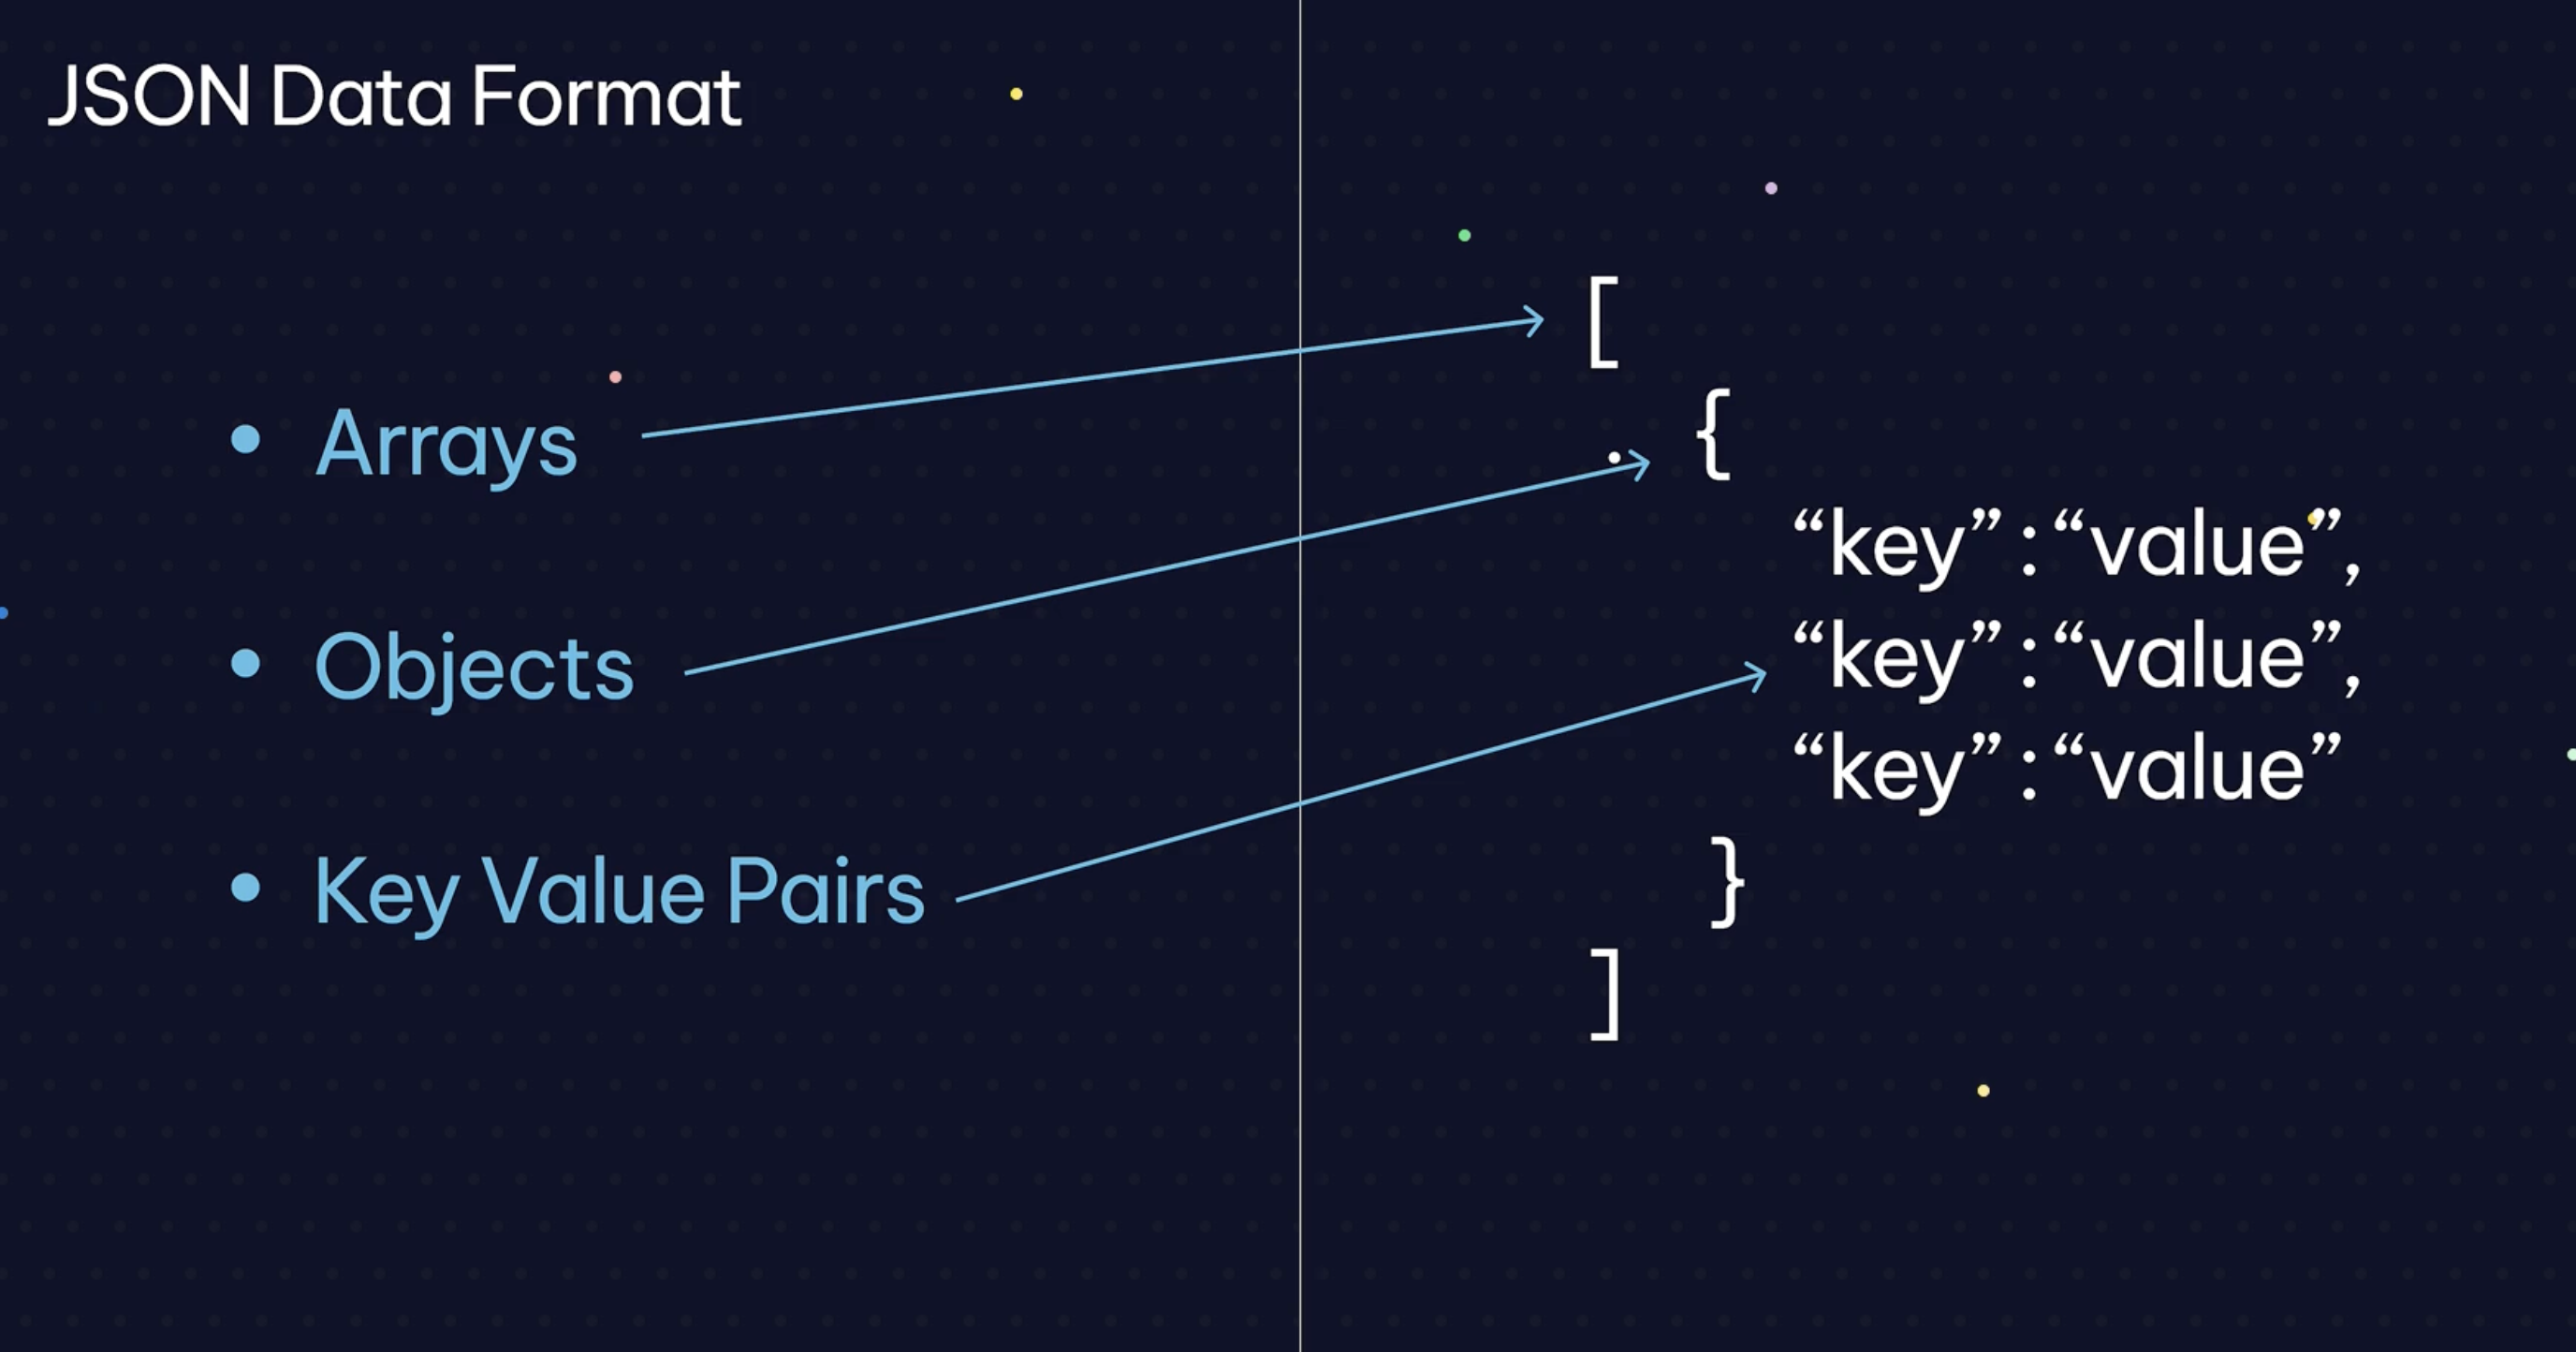
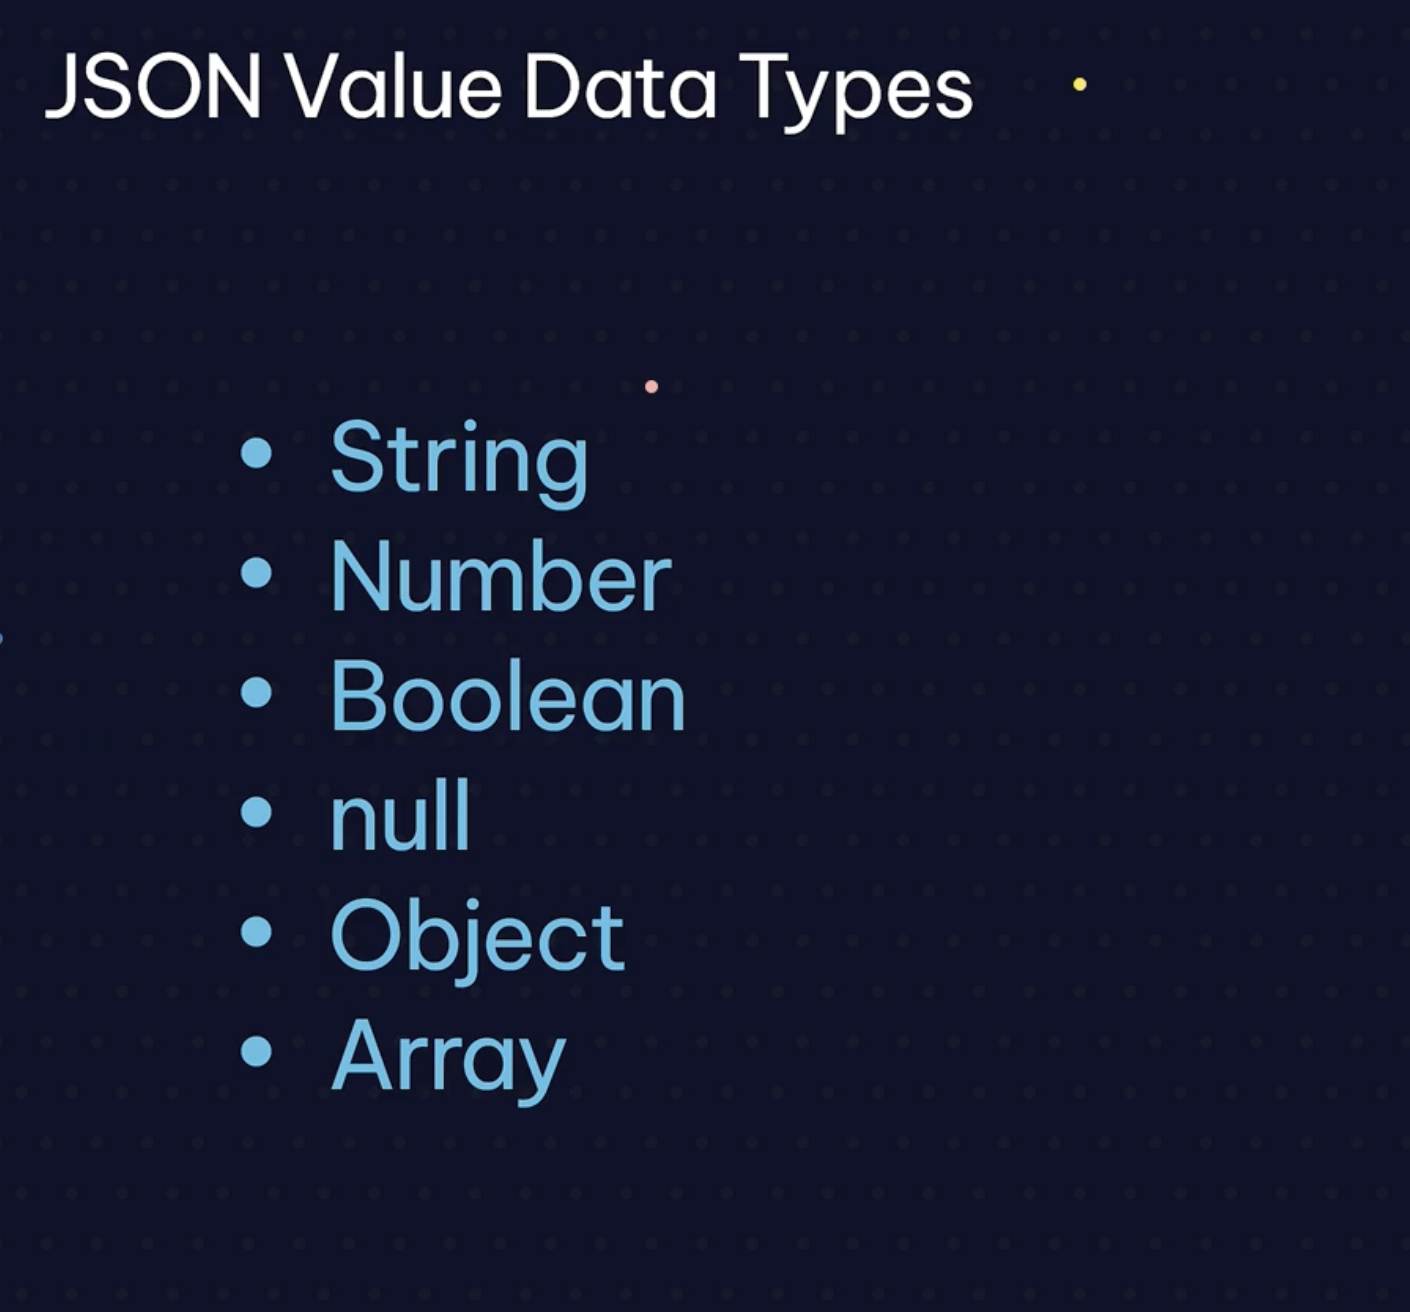
JSON Key always needs to be a String. The values can be:
to validate your JSON file:
https://github.com/dmkeks1/Guidebook/blob/main/Guidebook/DemoData.json
-
Lesson 10 - How to Parse JSON in Swift - November 12, 2024
Parse/Deserialize/Decode = translate into Swift
translate Swift into JSON = Serializing/Encode
Steps to get JSON Data into the APP:
    		// get filepath to DemoData.json

        // Read the file and turn into Data

        // parse Data into Swift Instances
Code of working JSON import for the Guidebook App (DataService file, rest is in the GitHub)
Info
func getFileData() -> [City] { // get filepath to DemoData.json if let url = Bundle.main.url(forResource: "DemoData", withExtension: "json") { do { // Read the file and turn into Data let data = try Data(contentsOf: url) // try if it throws an error // parse Data into Swift Instances let decoder = JSONDecoder() do { let cities = try decoder.decode([City].self, from: data) //.self means that we try to create the type of City data and not an array or sth. return cities } catch { print("Couldn't parse the JSON: \(error.localizedDescription)") } } catch { print("Couldn't read file: \(error.localizedDescription)") } } return [City]() } -
Lesson 11 - Opening other Apps November 13, 2024
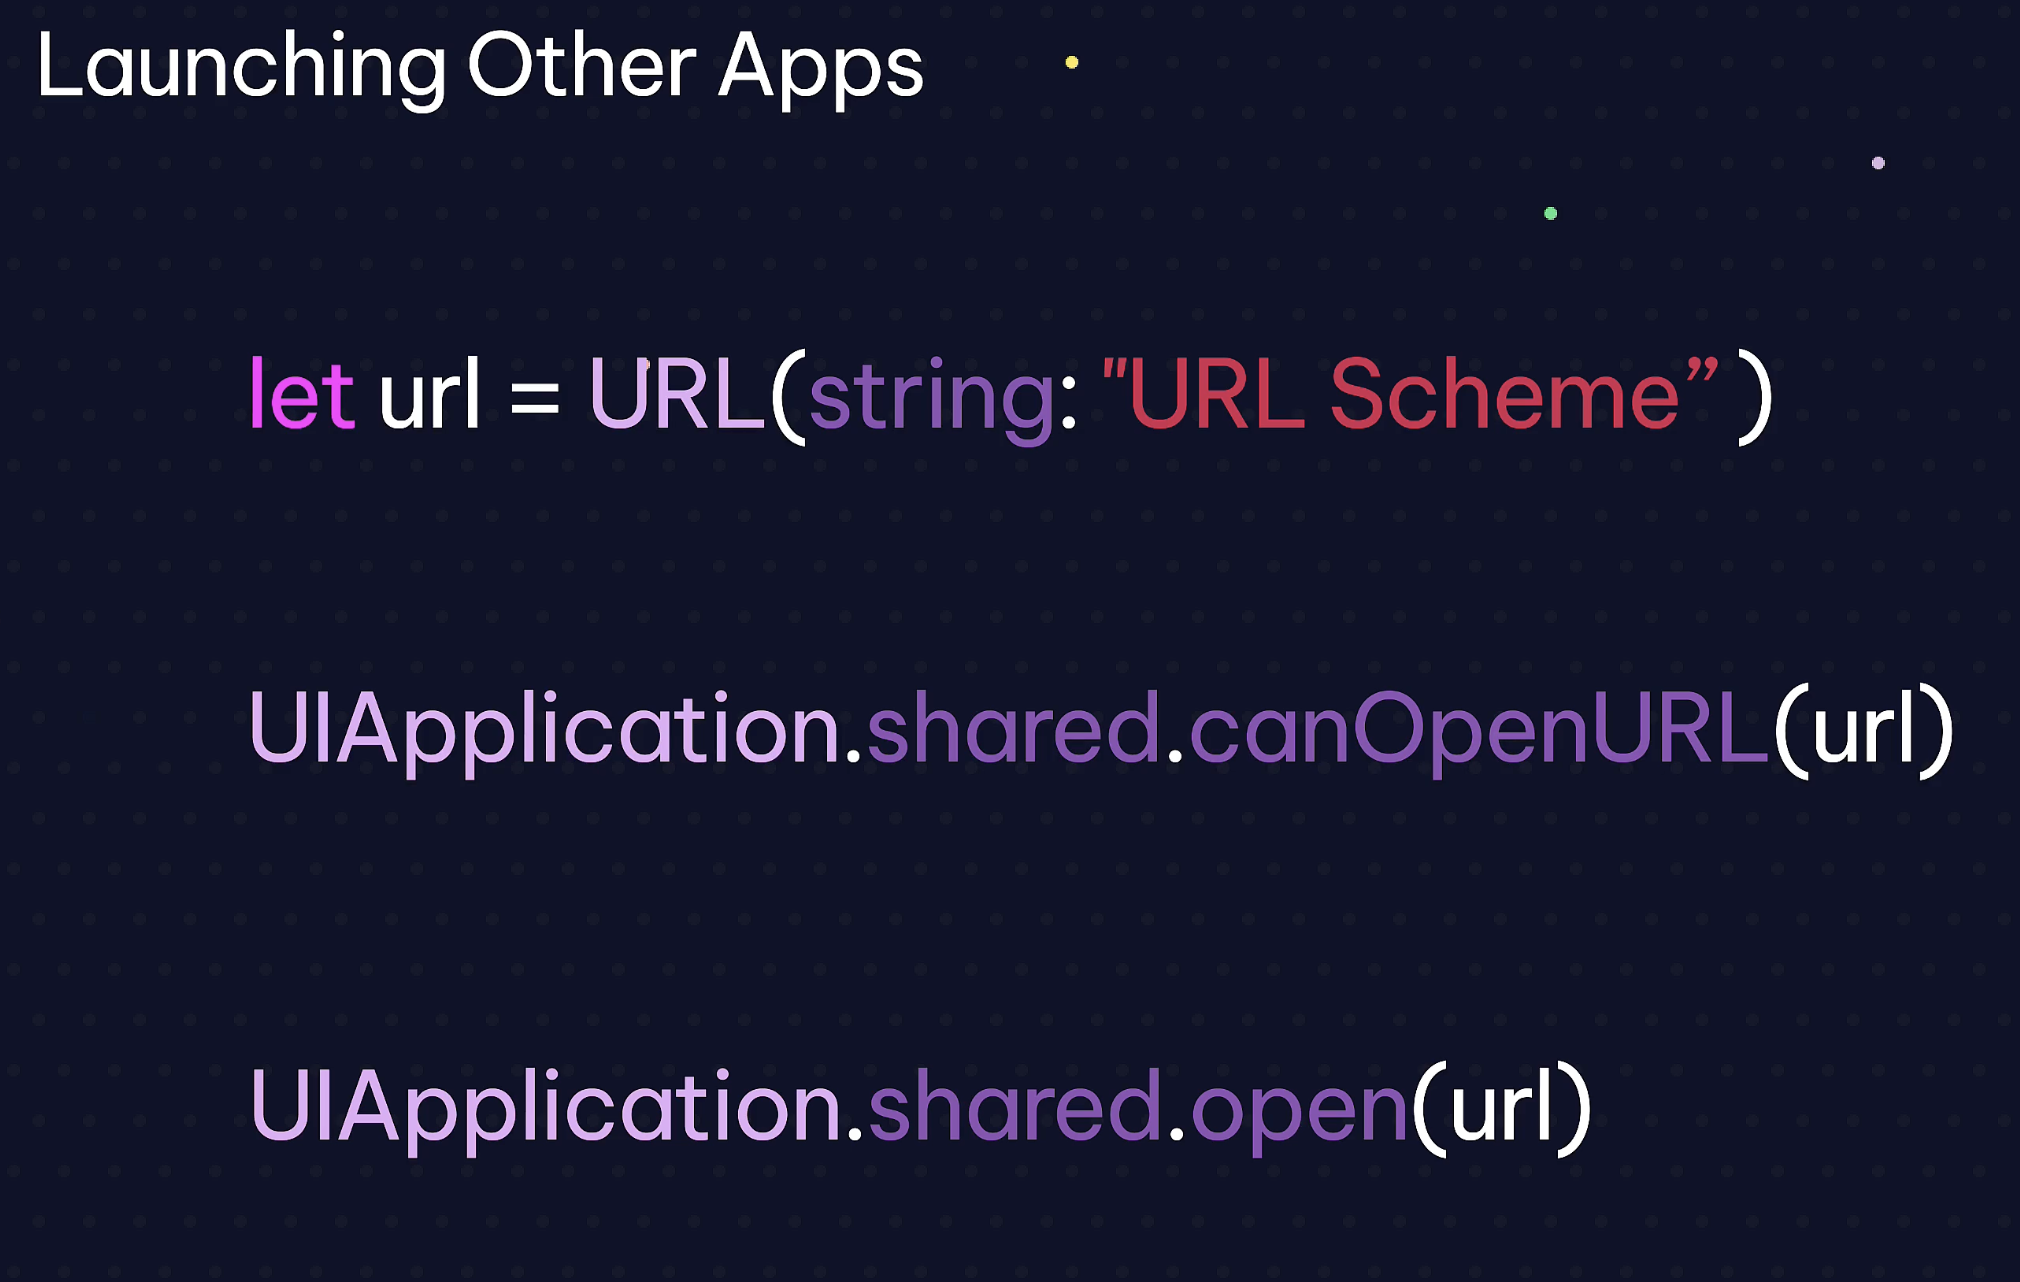
Url Schemes
Map Links
Describes the URL schemes used to communicate with standard iPhone applications.
https://developer.apple.com/library/archive/featuredarticles/iPhoneURLScheme_Reference/MapLinks/MapLinks.html#//apple_ref/doc/uid/TP40007899-CH5-SW1Complete List of iOS URL Schemes for Apple Apps and Services (Always-Updated)
The most exhaustive list of Apple iOS app schemes on the web
https://medium.com/@contact.jmeyers/complete-list-of-ios-url-schemes-for-apple-apps-and-services-always-updated-800c64f450fButton { // CReate URL Instance vbased on URL Scheme if let url = URL(string: "maps://?q=\(attraction.name.replacingOccurrences(of: " ", with: "+"))&s11=\(attraction.latLong)&z=10&t=s") { // Test if url can be opened, is an app present? if UIApplication.shared.canOpenURL(url) { // open url UIApplication.shared.open(url) } } } label: { ZStack { RoundedRectangle(cornerRadius: 15) .foregroundColor(.blue) .frame(height: 40) Text("Get Directions") .foregroundColor(.white) } }https://github.com/dmkeks1/Guidebook/blob/main/Guidebook/DetailView.swift
leerzeichen müssen mit
replacingOccurrences(of: " ", with: "+")ersetzt werden. -
Challenge - Pokemon Guide November 13, 2024
-
Assignment for Certificate November 13, 2024
iOS Networking November 13, 2024
https://www.dropbox.com/scl/fo/3snpkc49at92dl1yg5lmi/h?rlkey=2o0510ofjl9cqke91wixhq364&e=1&dl=0
Module 1 - What is Networking? November 13, 2024
-
Lesson 02 - Finding and Using APIs
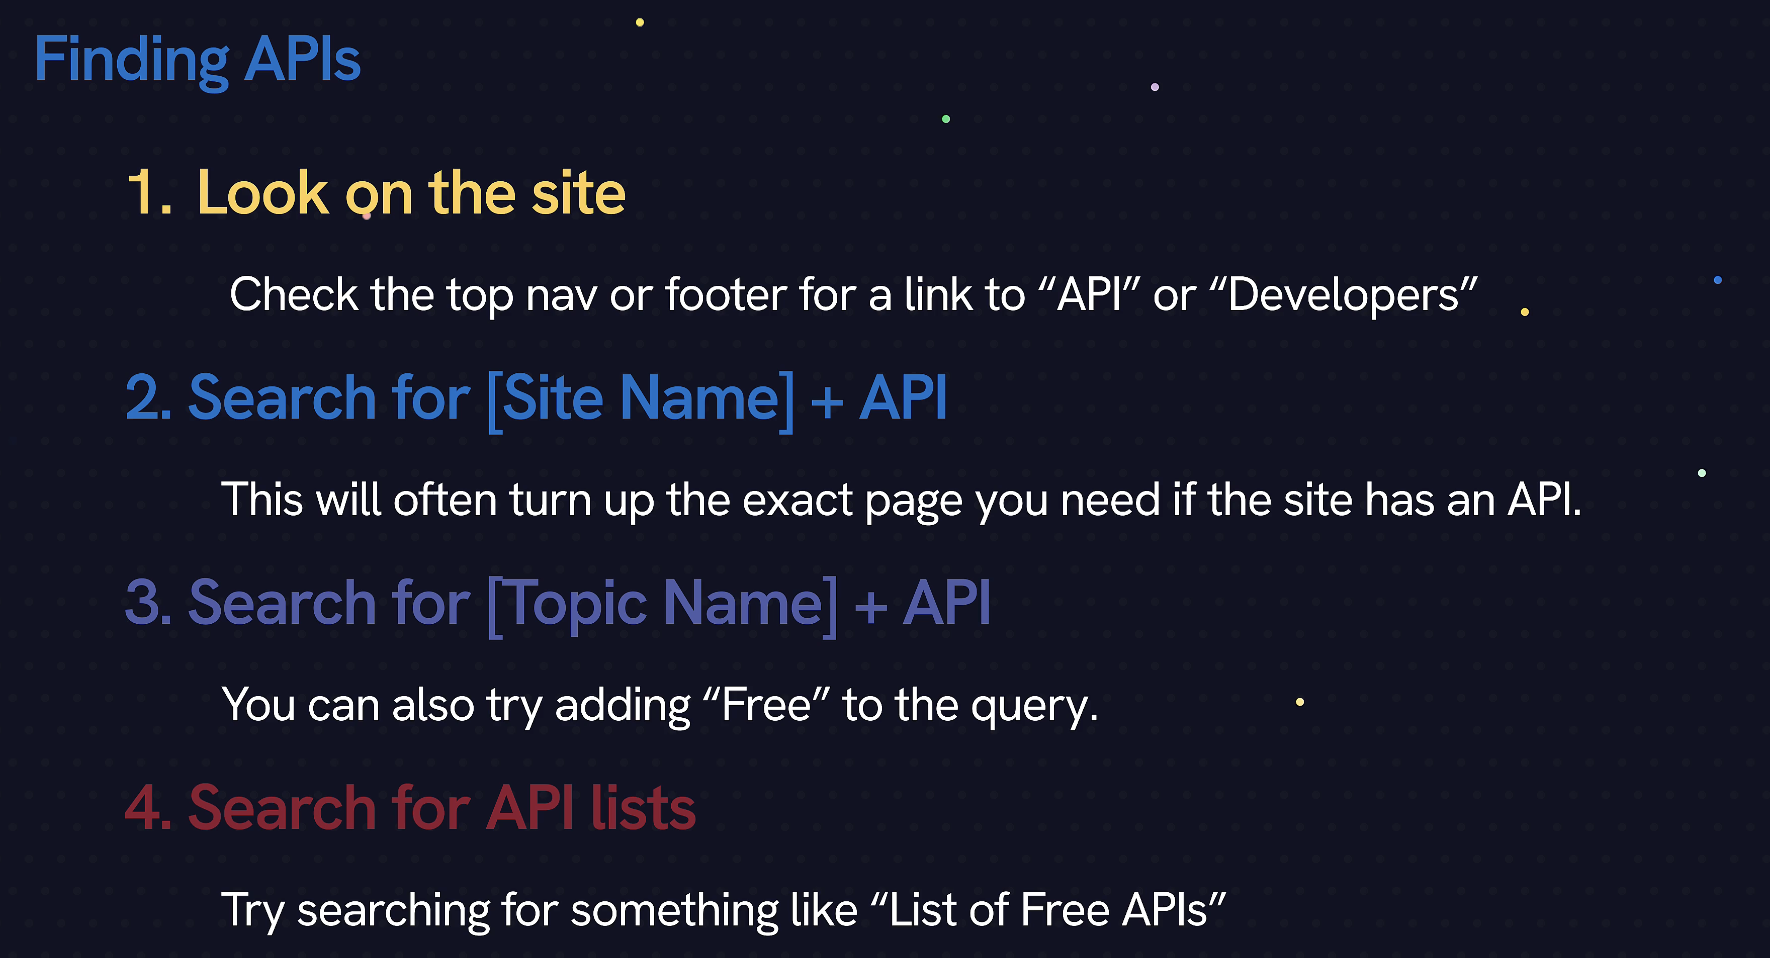
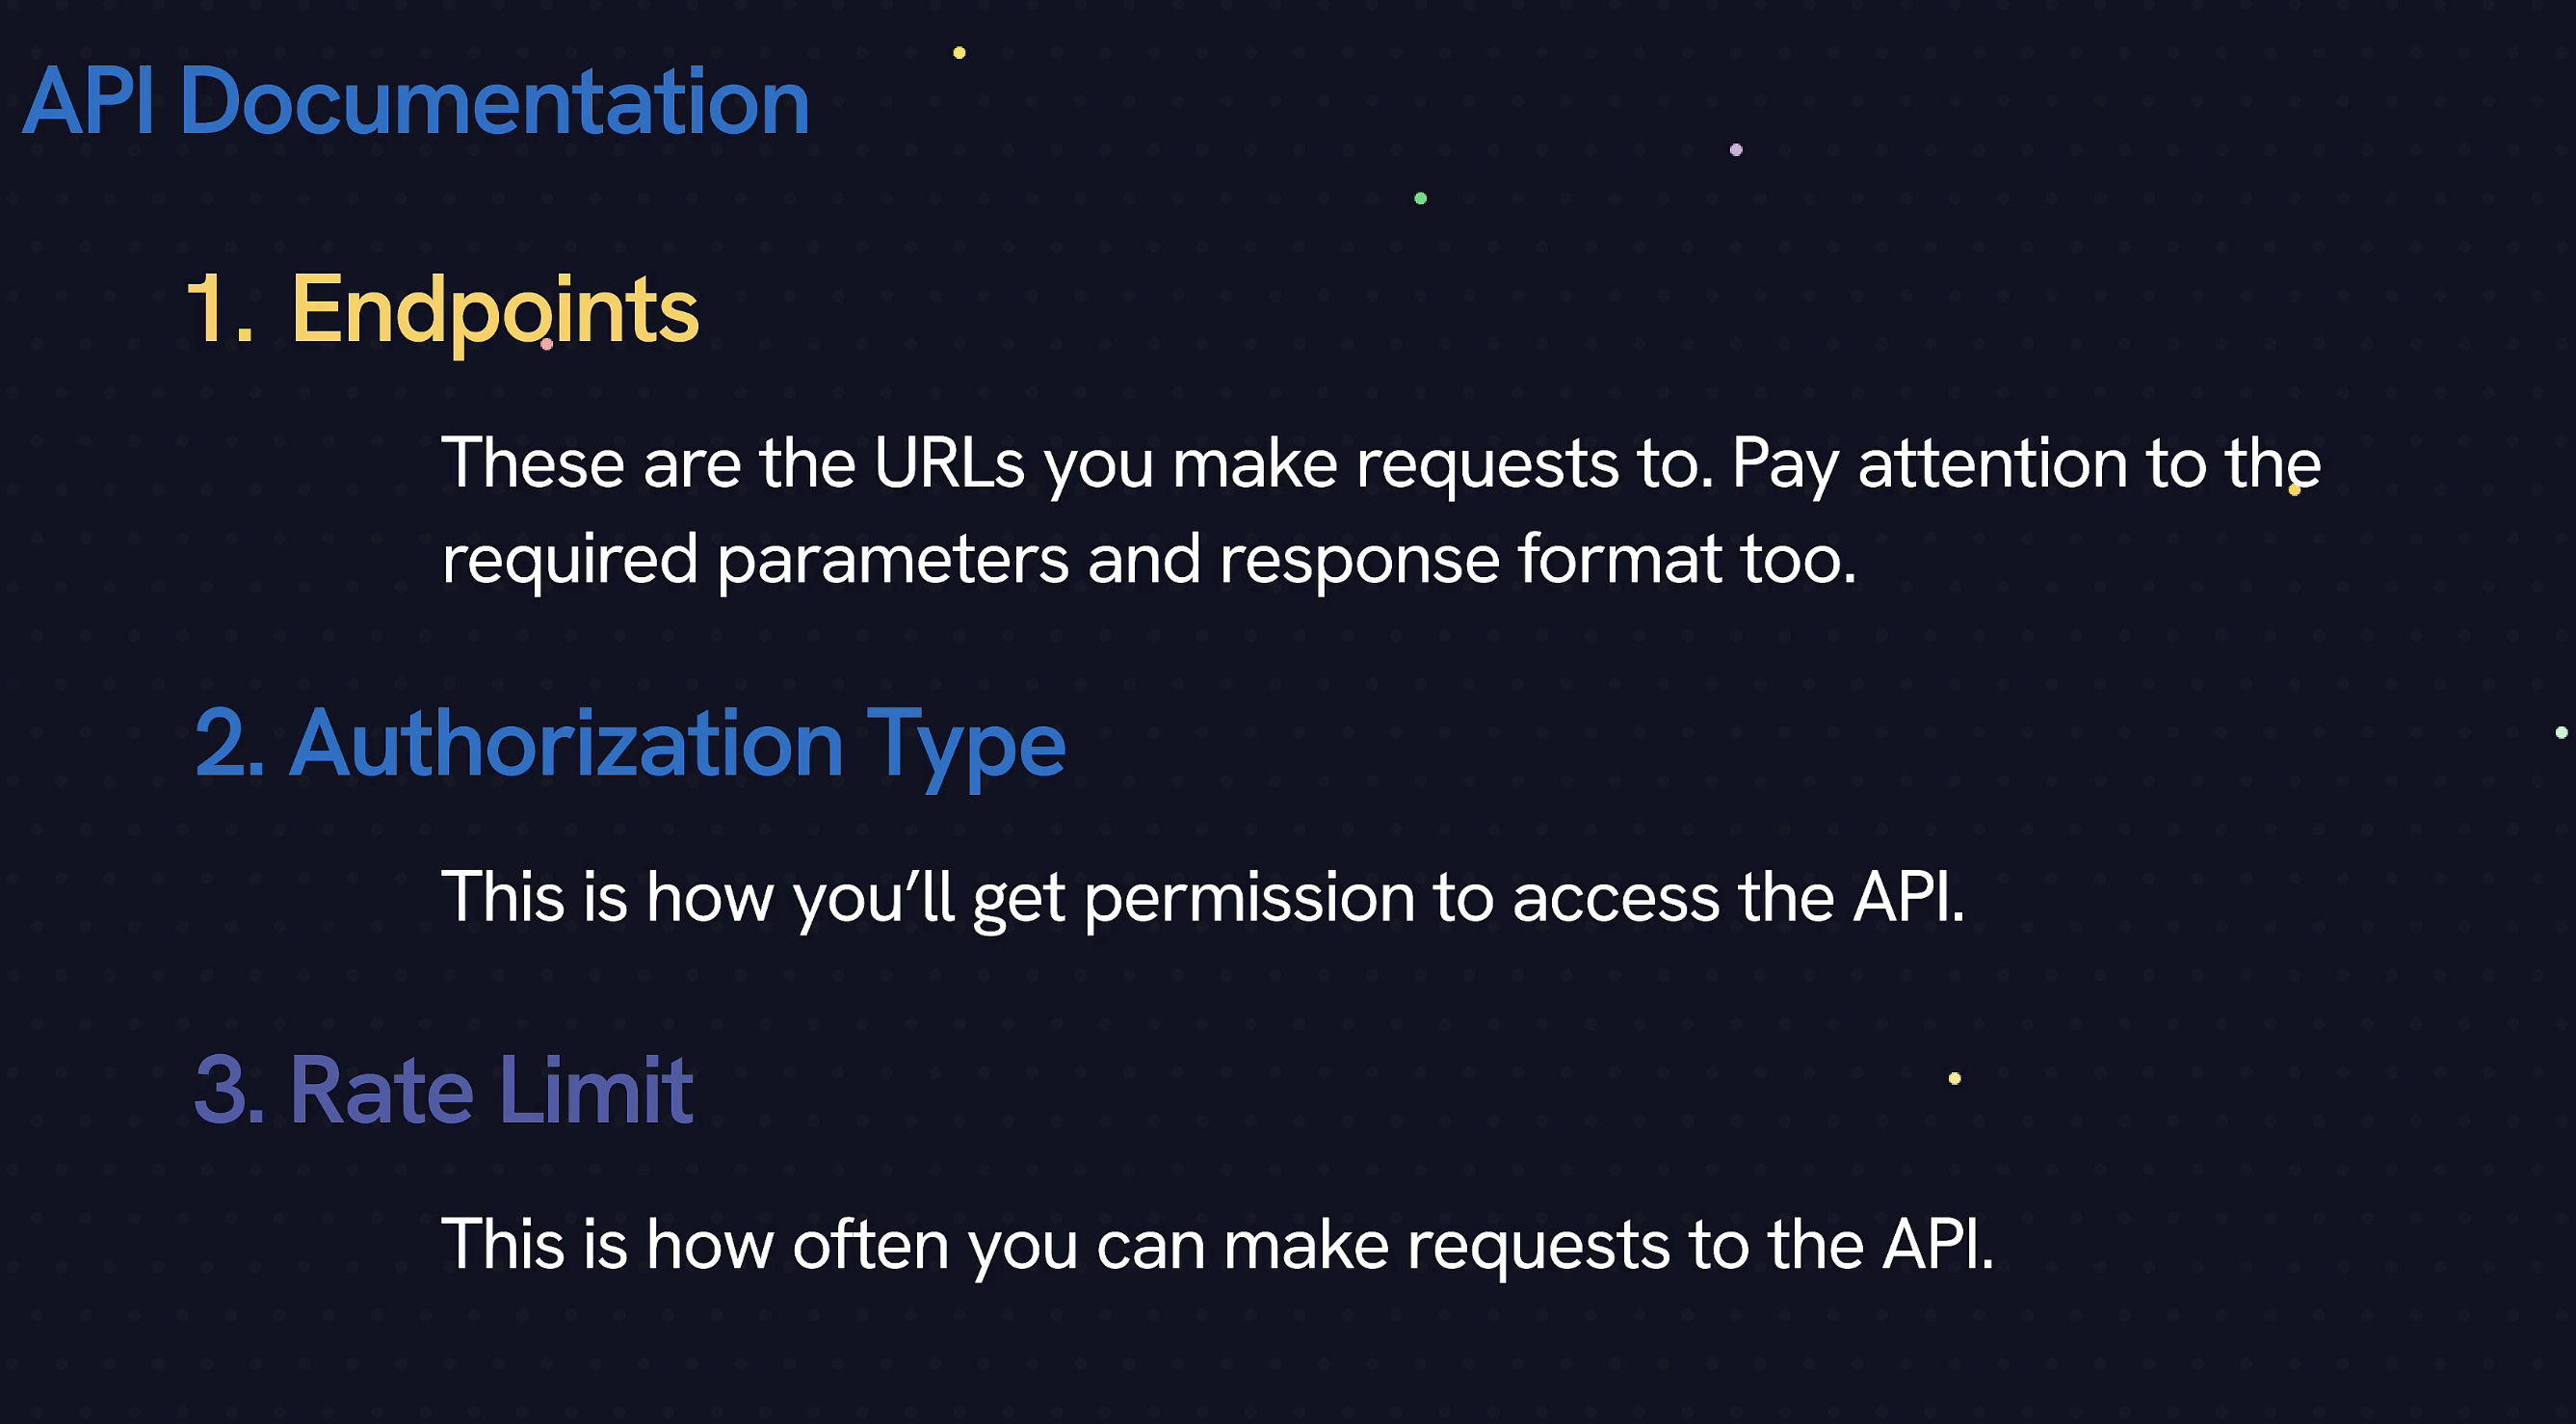
There are OAuth and API_KEY authorizations.
OAuth sends a login request first, then you get a token, then you can send the data request.
With the API_KEY you can directly request data.
-
Lesson 03 - How to use API endpoints in Swift
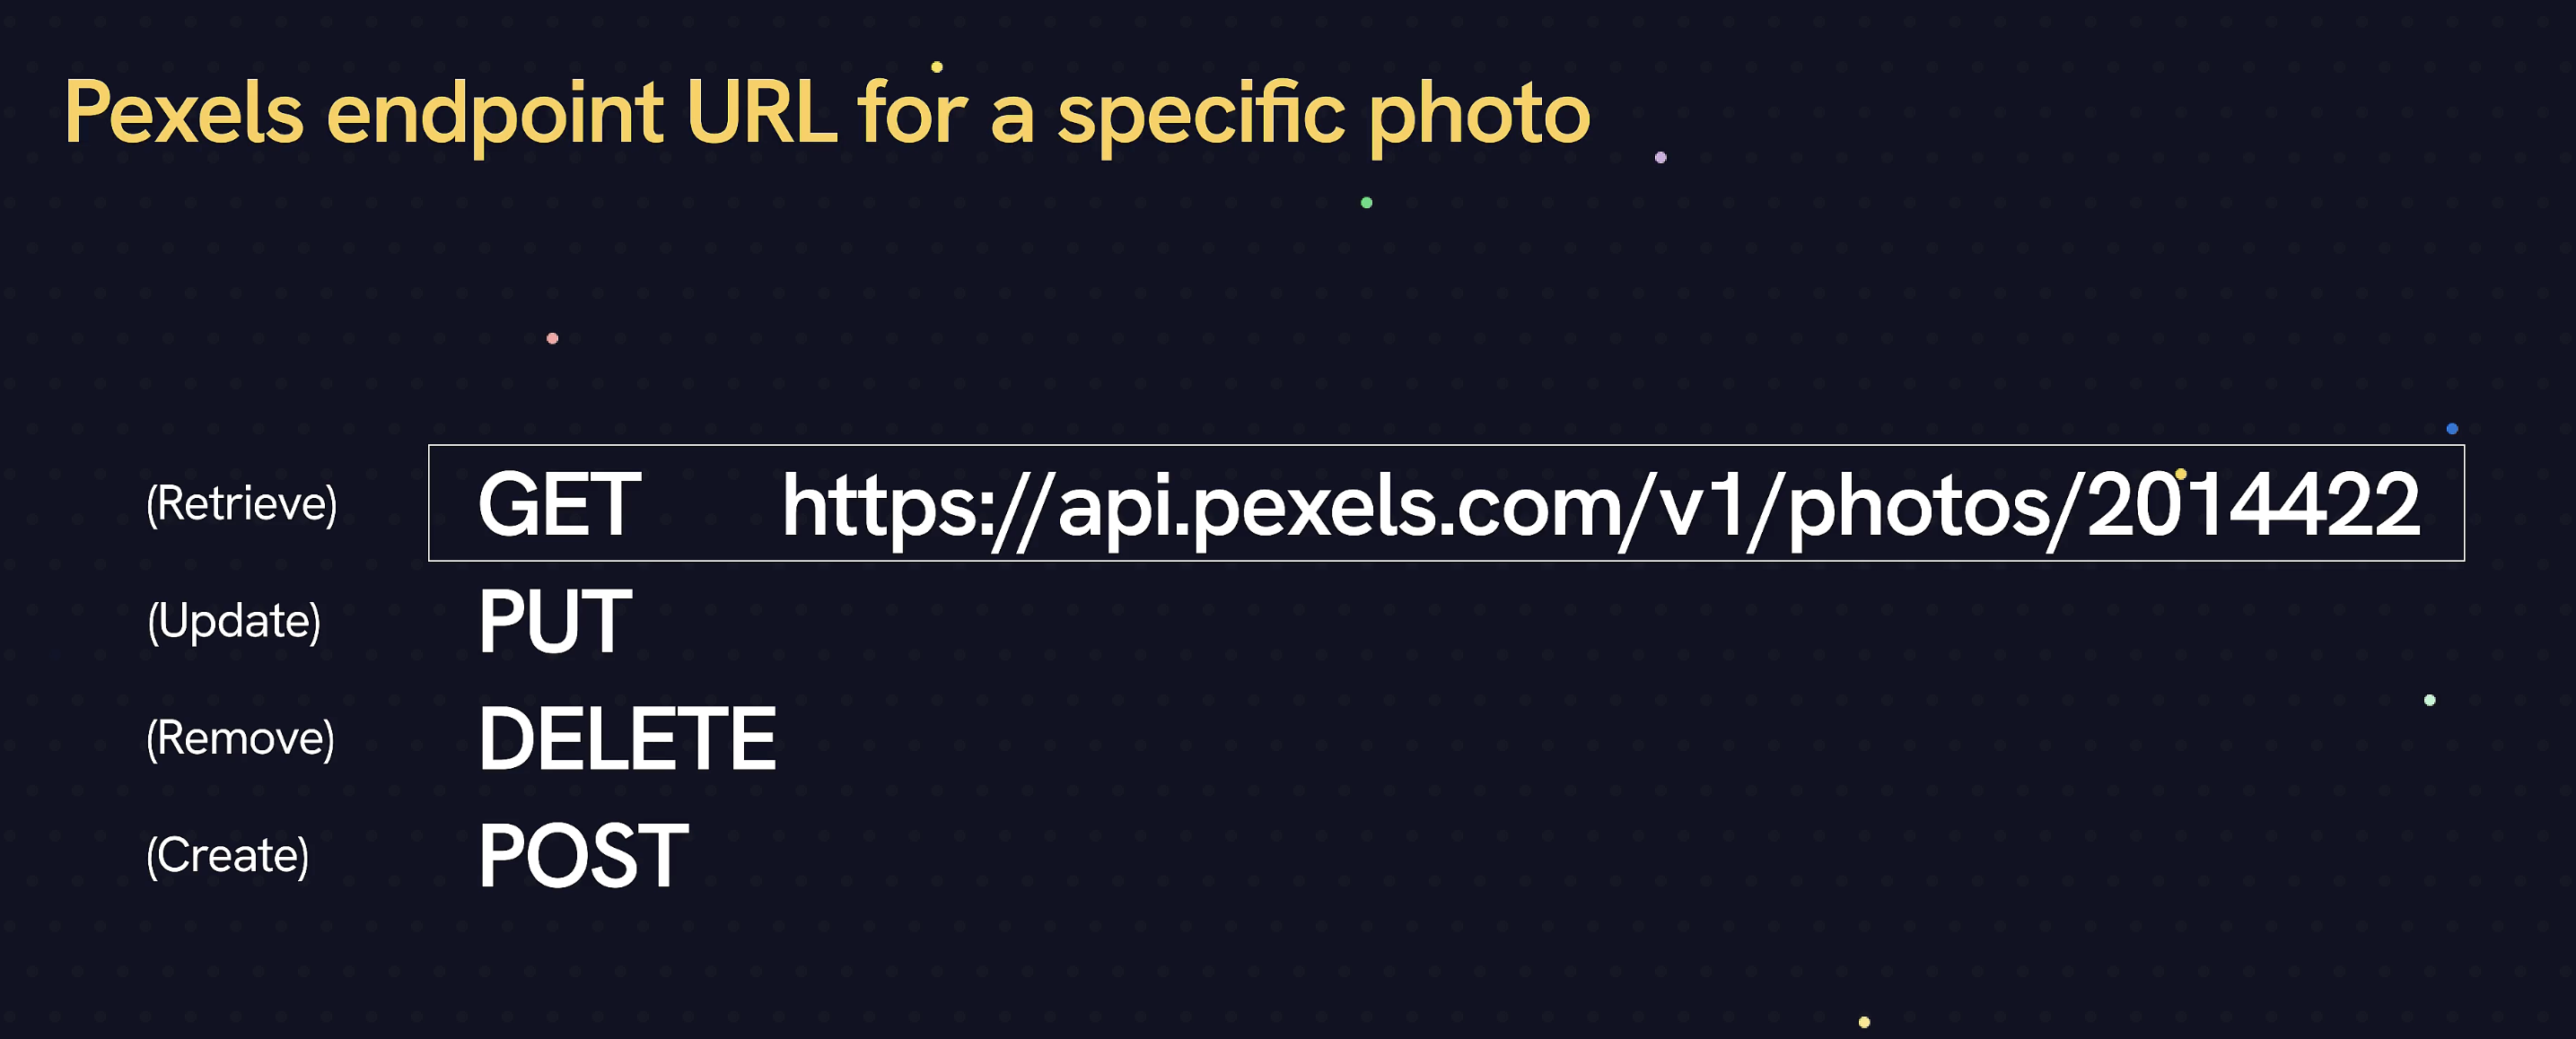
in this course we are using the pexels api.
-
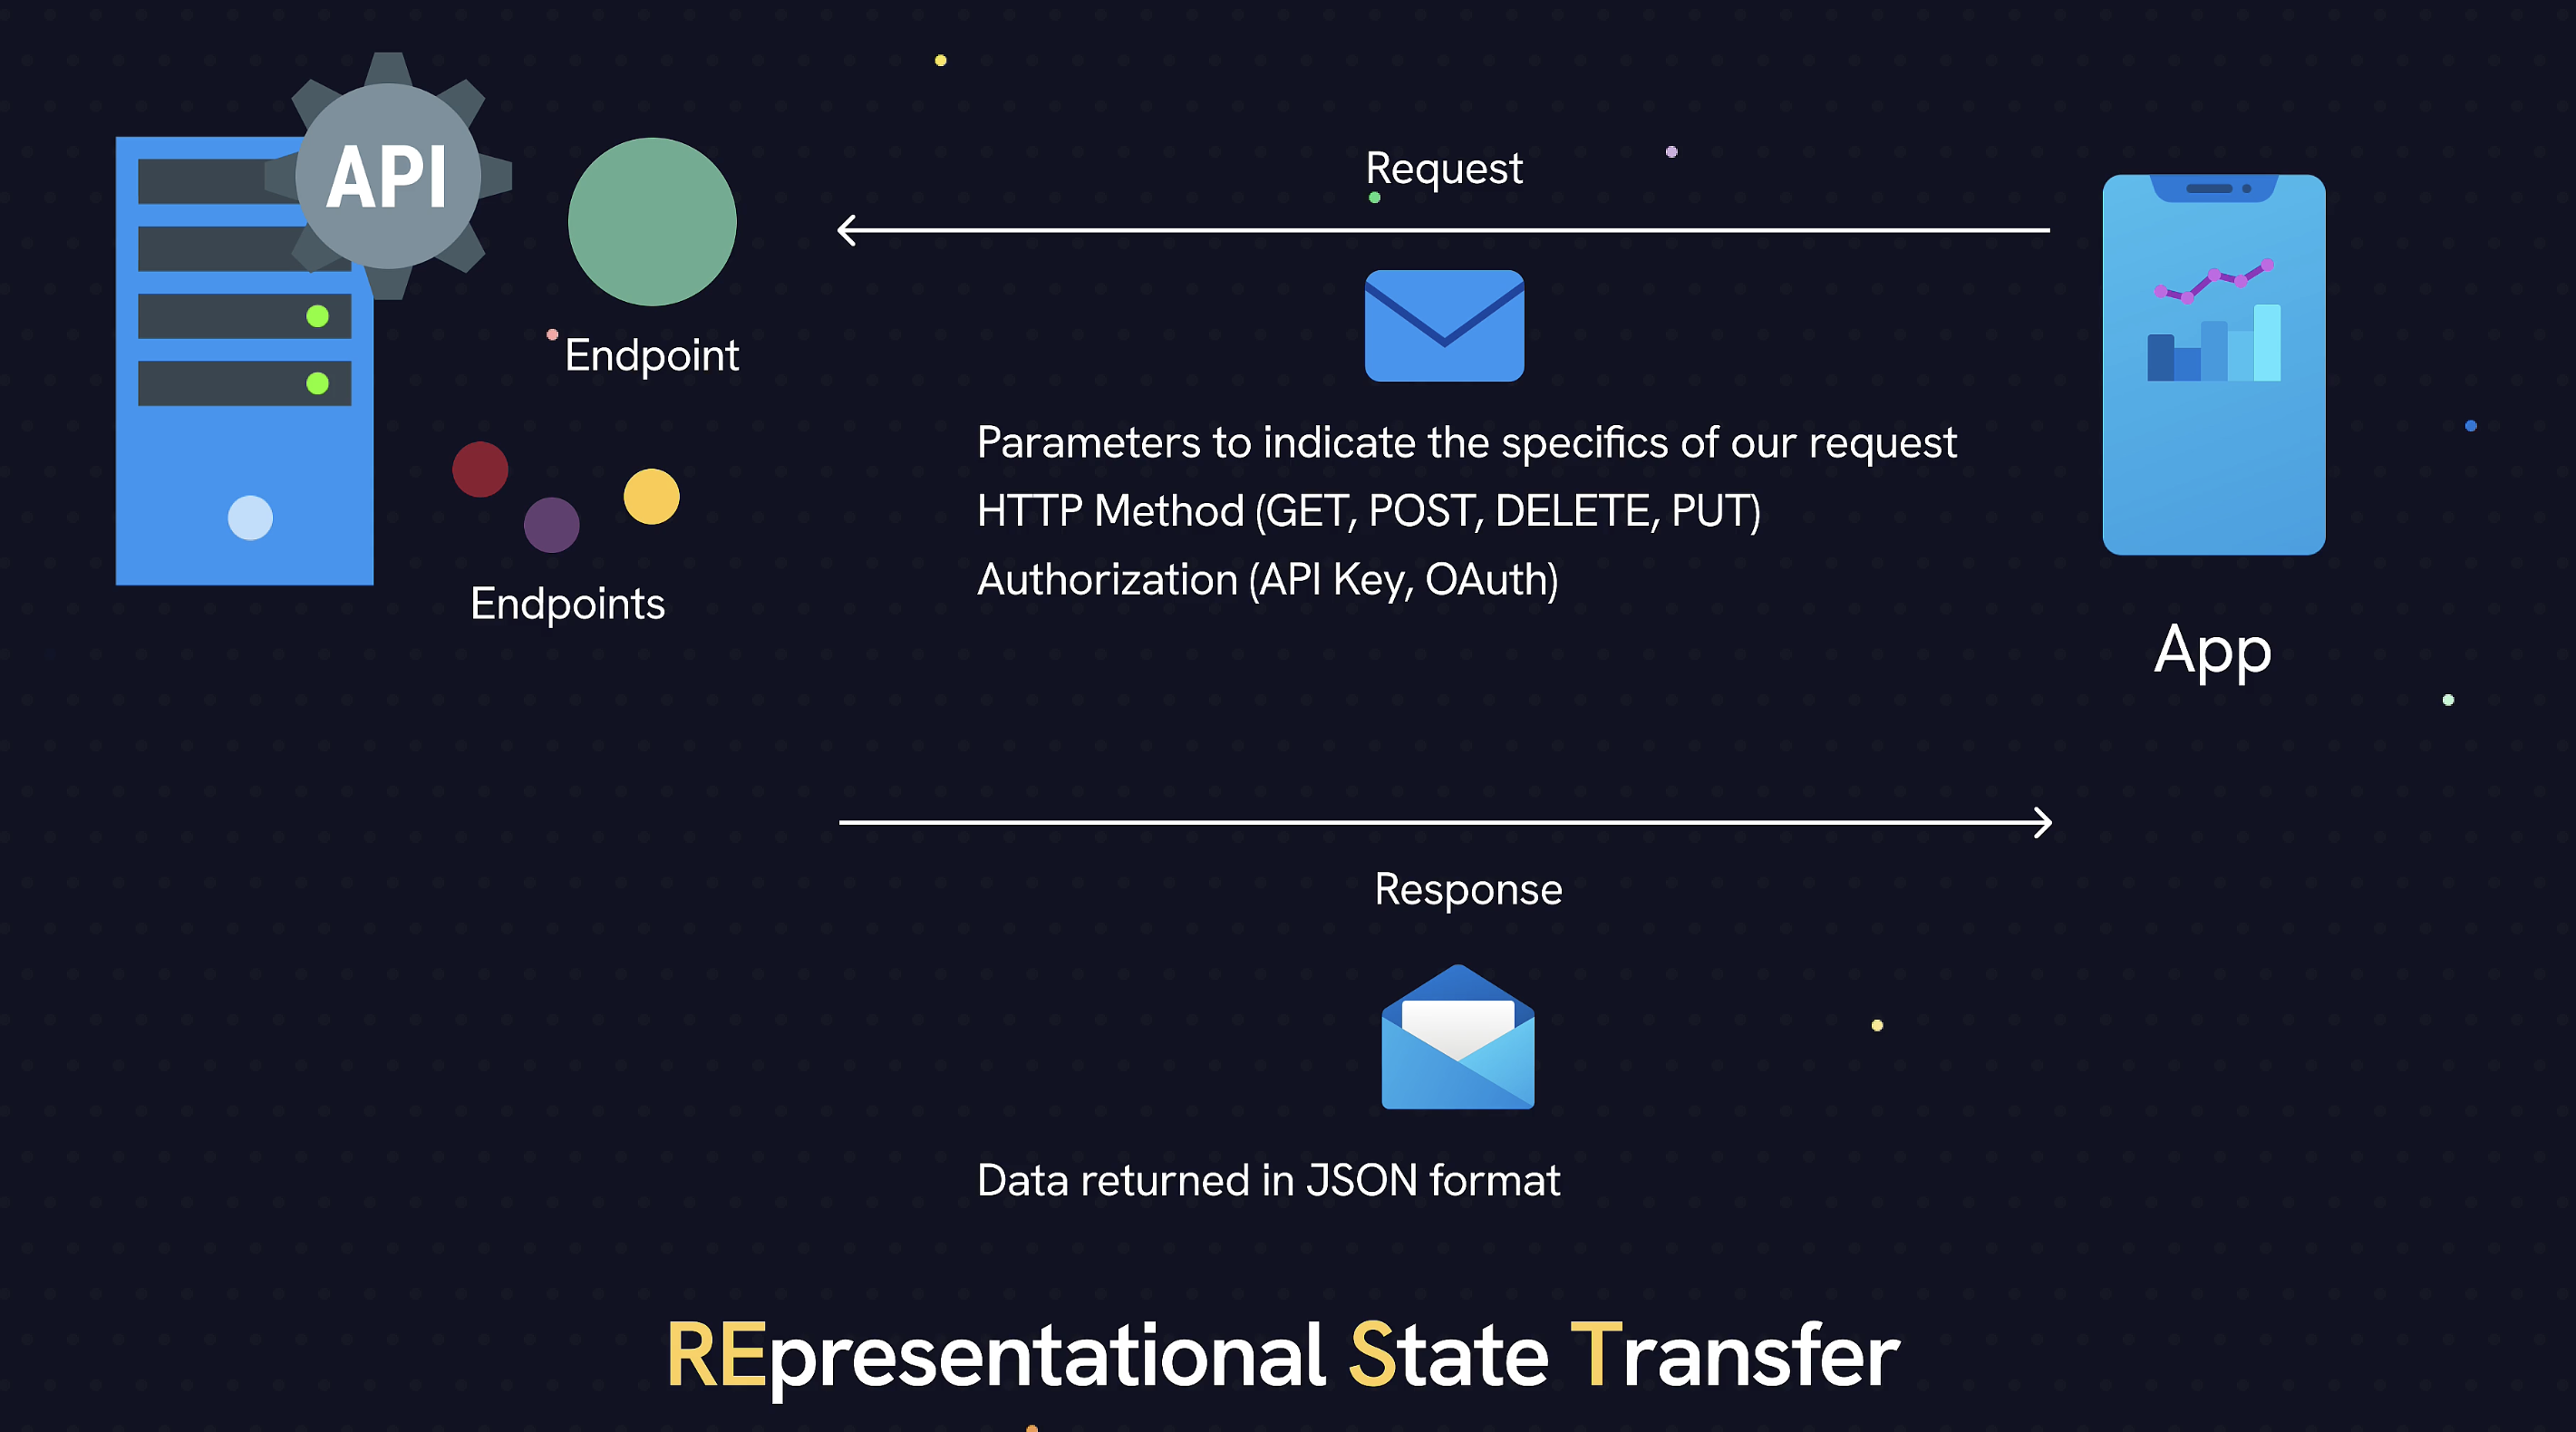
Lesson 04 - What is a REST API
-
Lesson 05 - iOS Concurrency, Await and Async
Concurrency - several Threads to work on things
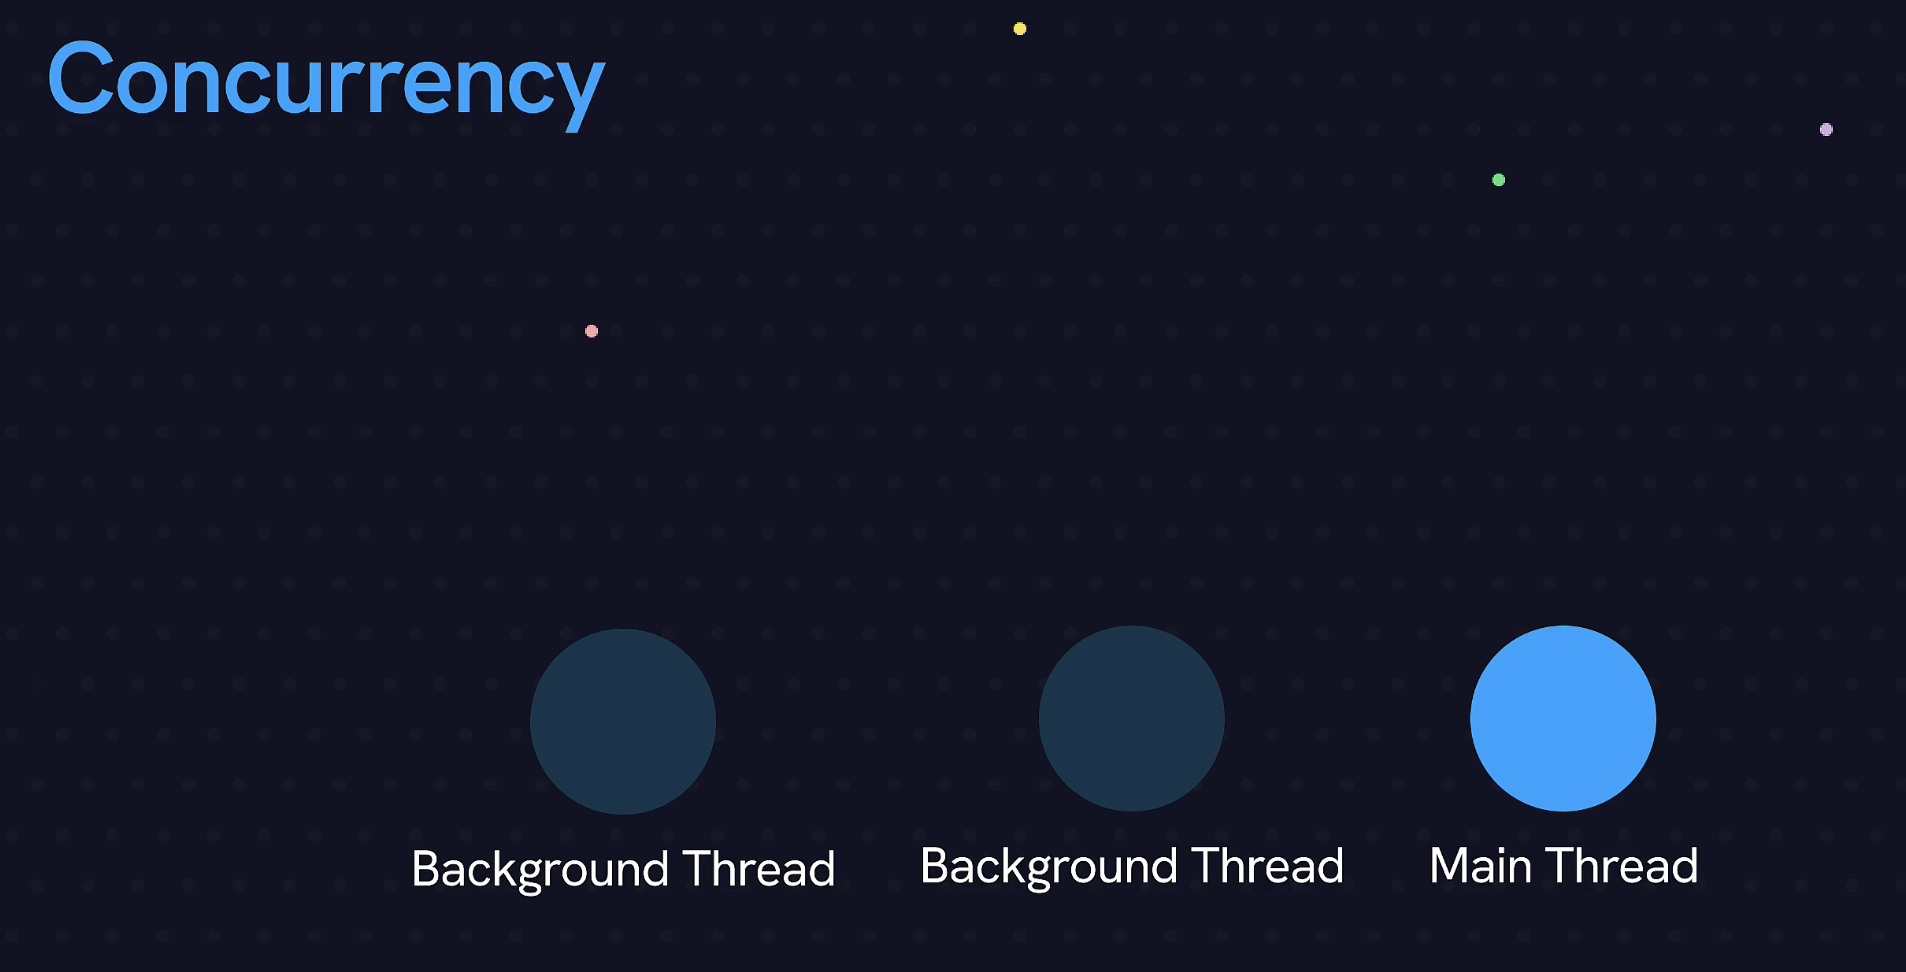
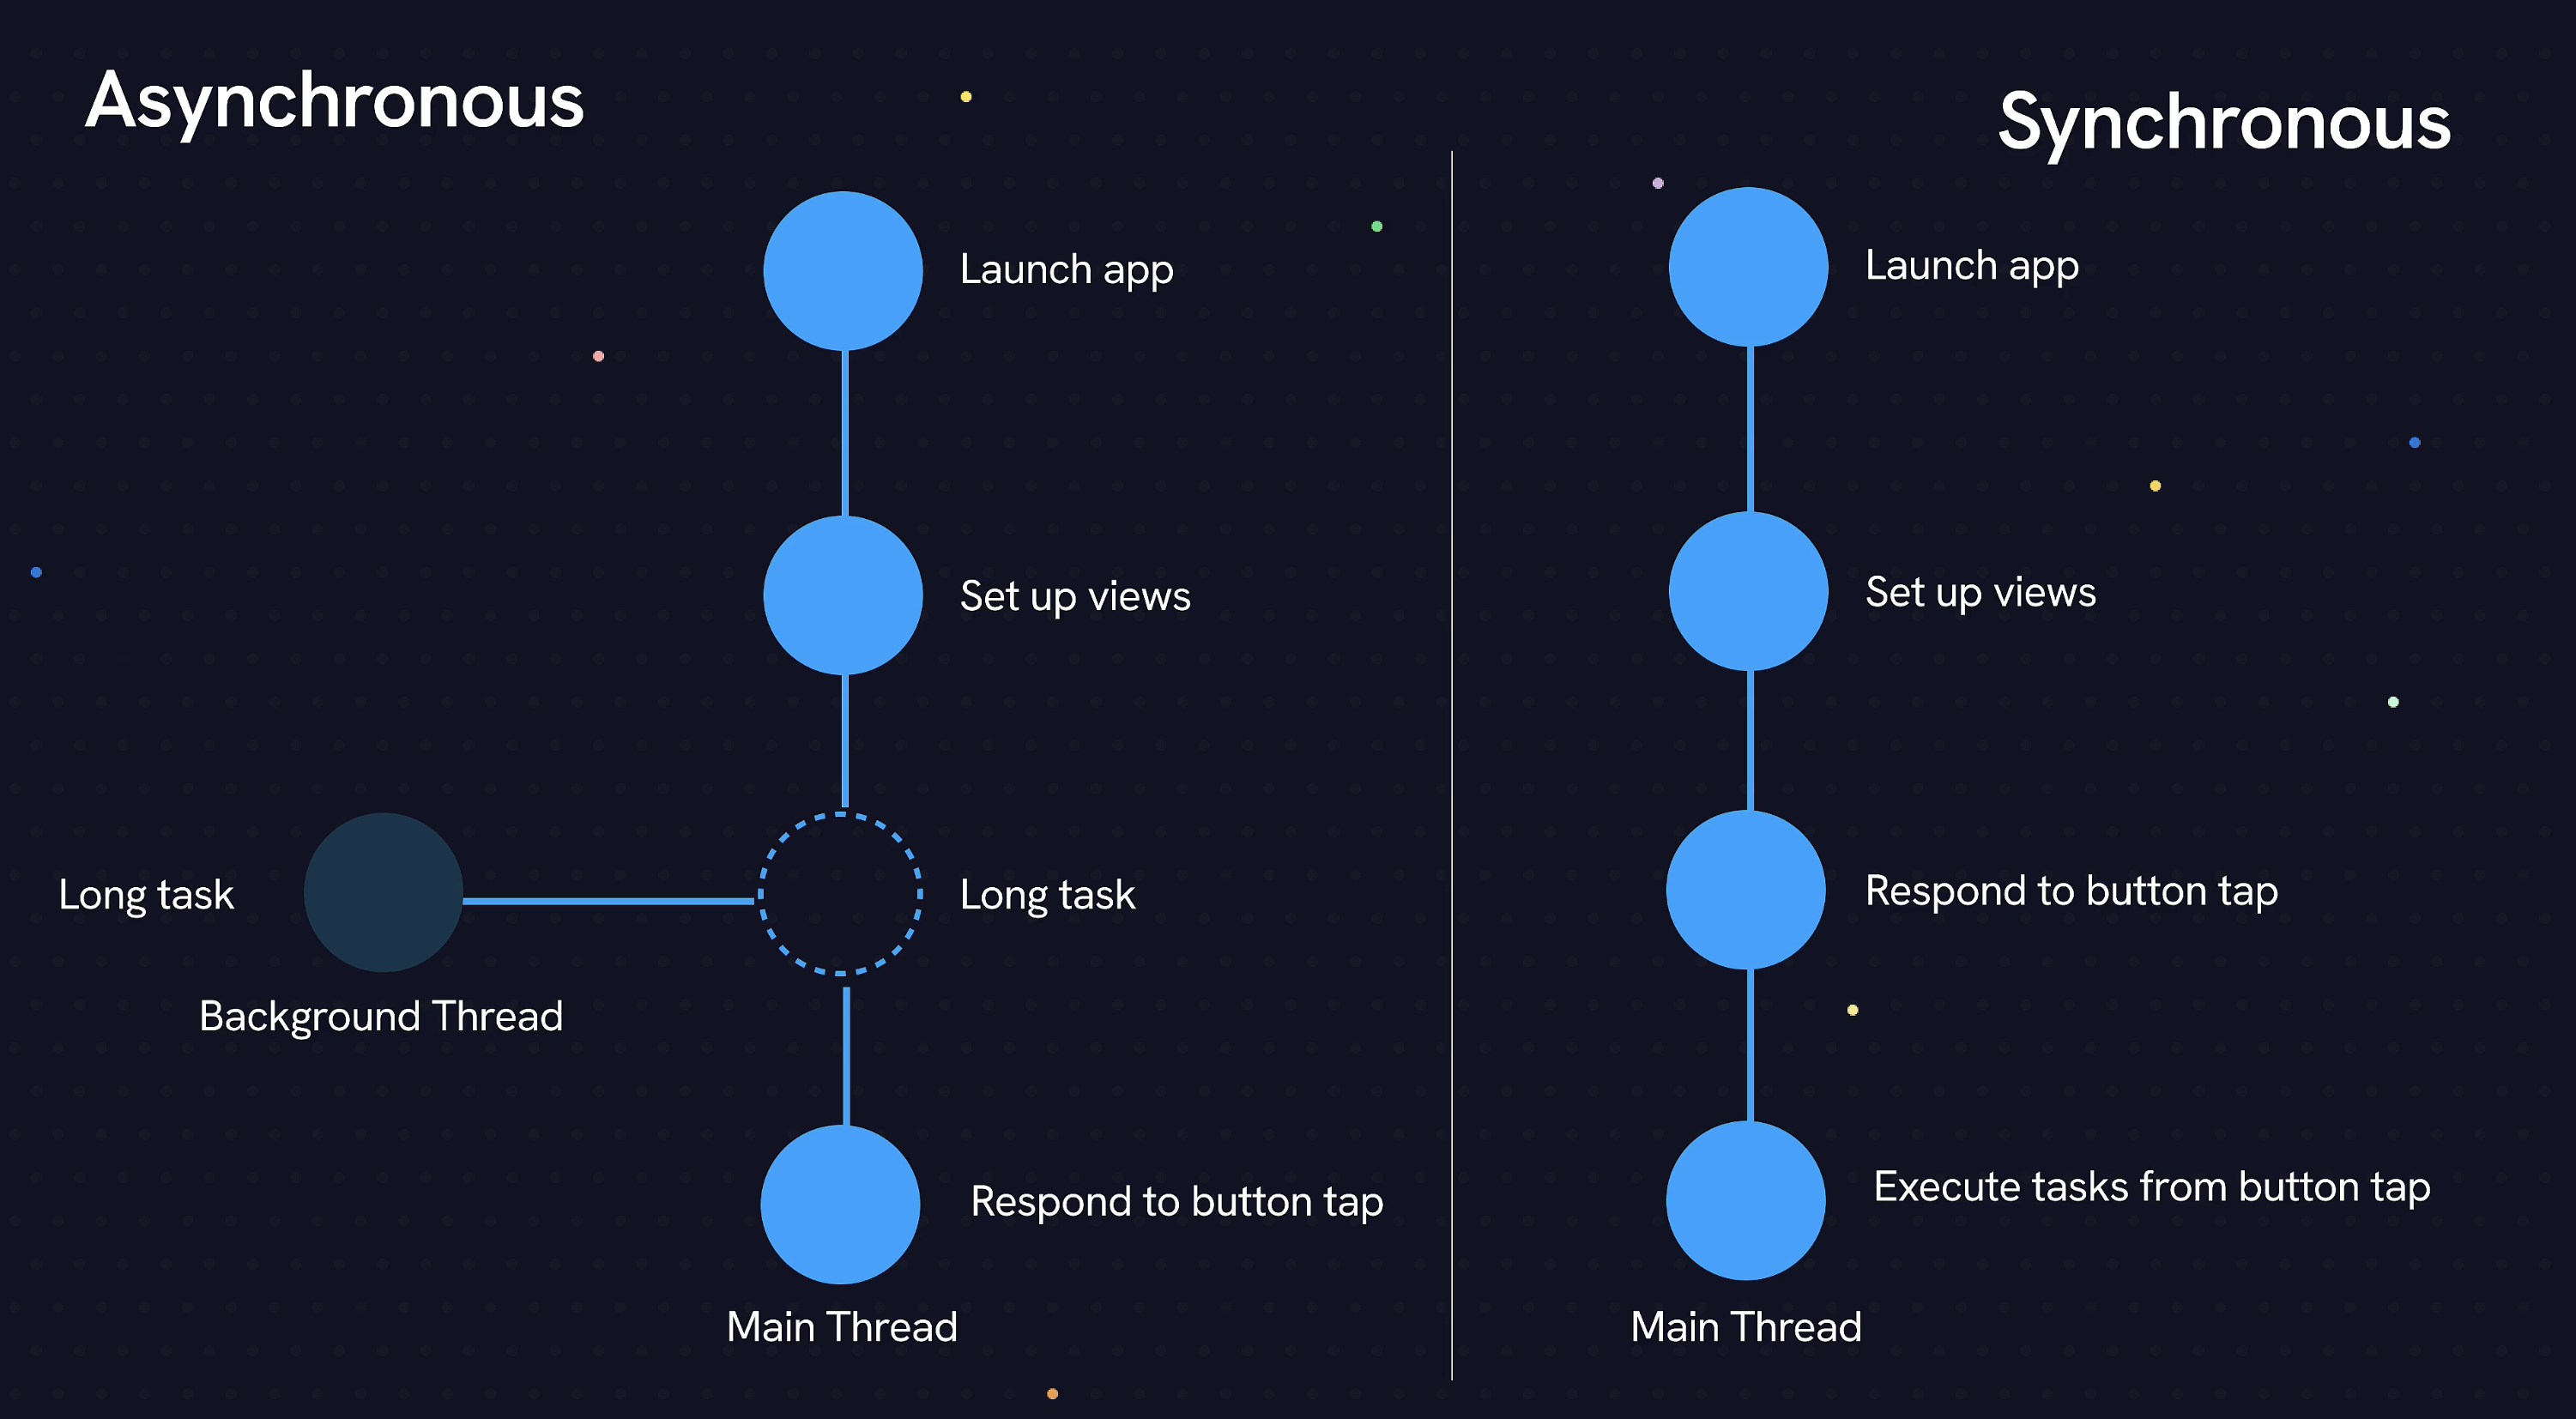
asynckeyword lets the system know, run this in the background if you need to.func longTask() async { print("Long Task" }to call the function we need to use the
Task{}block now and use the keywordawait.Await will wait for a task to complete before continue executing.
Task {
	await longTask()
}
to check which thread is beeing used you can use
print(Thread.current)UI work should always be done by the main thread. You can used the statement
Mainactor.run {print(”Display UI work”} -
Lesson 06 - How to make a Network request in Swift
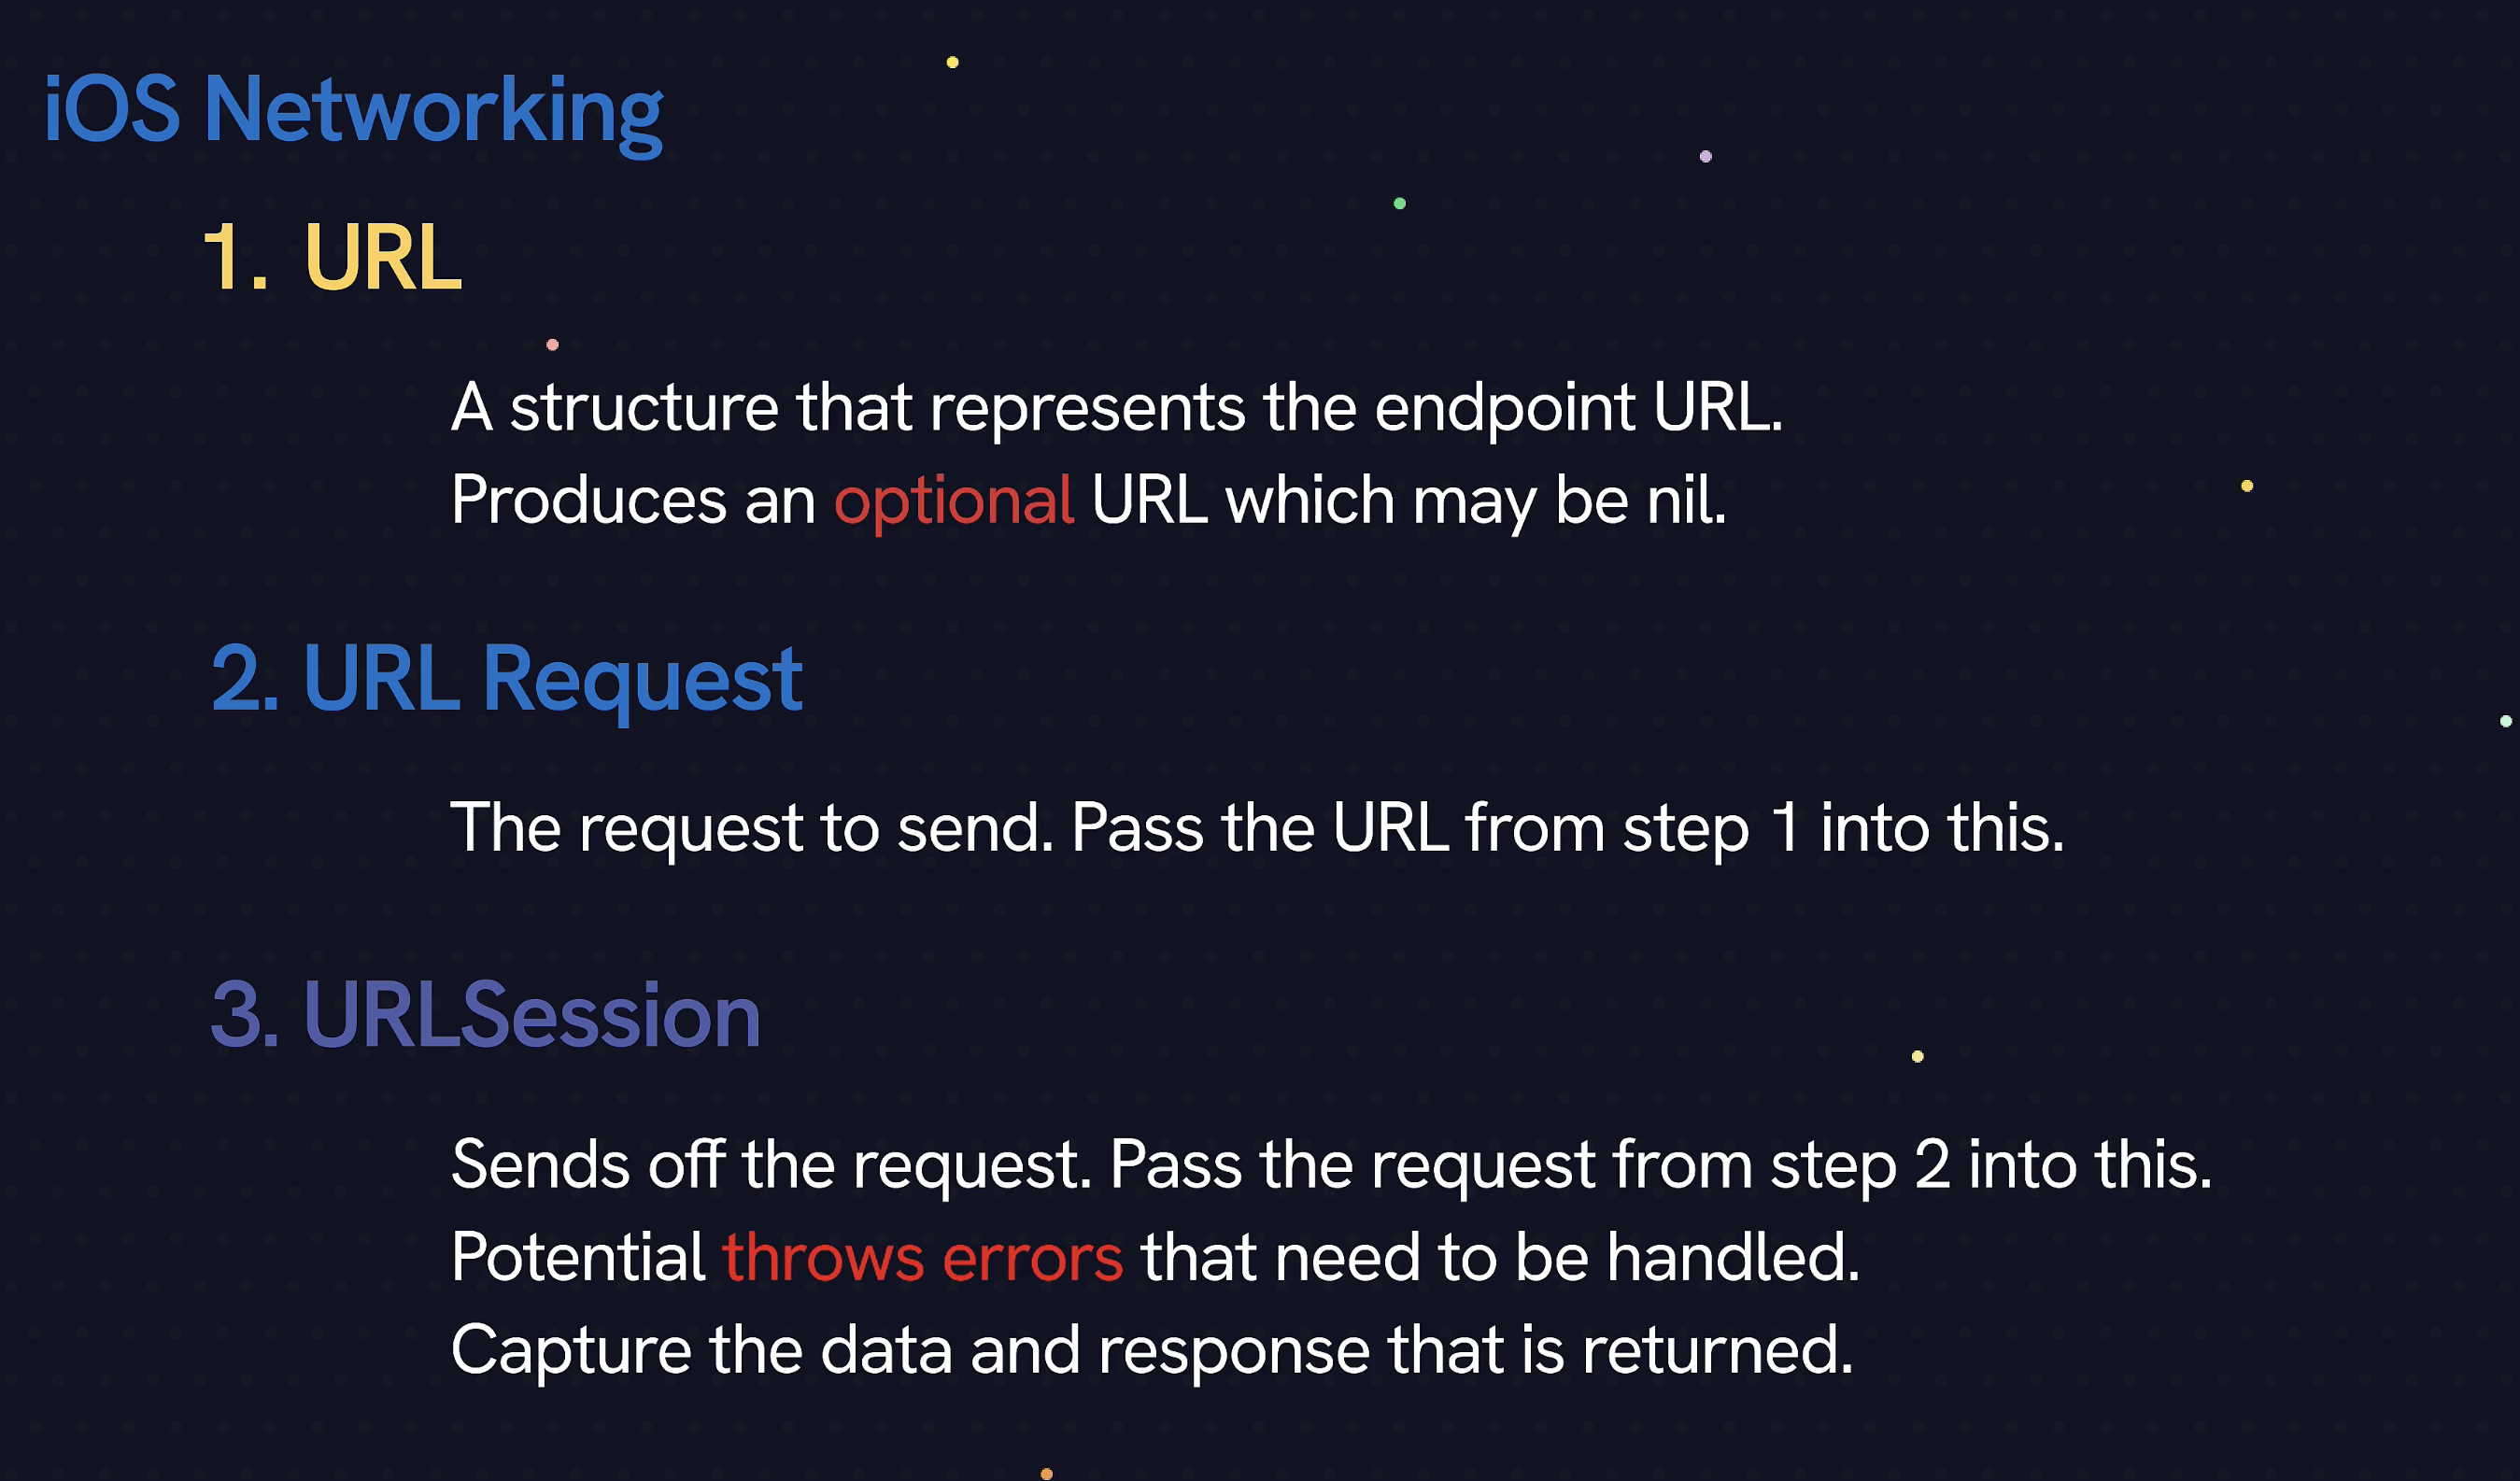
// the following line of code already takes care of the optinal check.
// if the url is nil, it skips it.
if let actualUrl = URL(string: "https://api.pexels.com/v1/search?query=nature") {

	// create url request and pass in actualUrl

}
error handling:
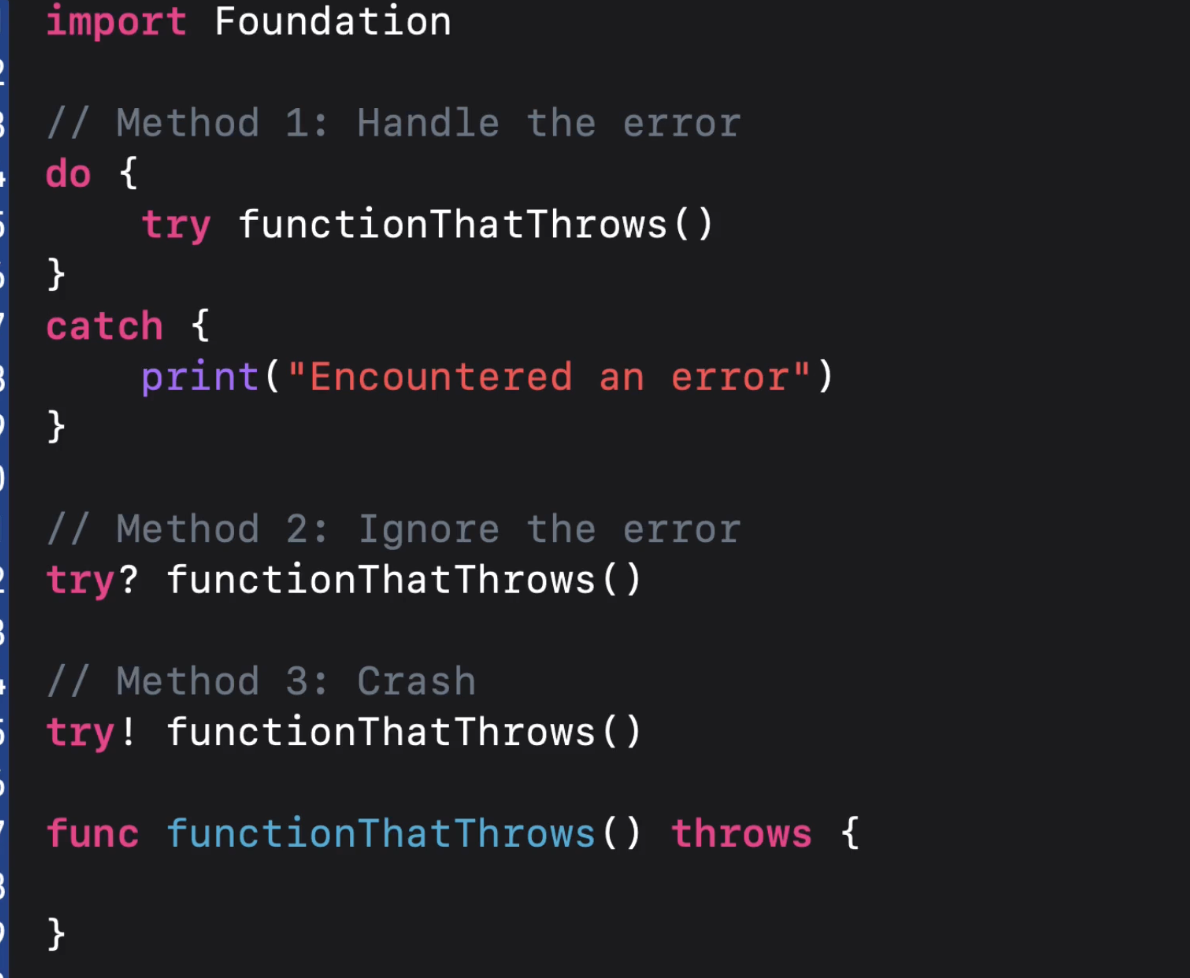
Request
... .onAppear { Task { await apiCall() } } ... func apiCall() async{ // 1. URL if let url = URL(string: "https://api.pexels.com/v1/search?query=nature&per_page=1") { // 2. URL request var request = URLRequest(url: url) request.addValue("\(api_key)", forHTTPHeaderField: "Authorization") // adds key to request // 3. URLSession do { // we dont ne a task block here because the function in the code is called // in a task block already let (data, response) = try await URLSession.shared.data(for: request) // returns in a tuple, so we need to put the answer in a tuple aswell print(data) // actual requested data print(response) // status code, other info } catch { print(error) } } } -
Lesson 07 - Debugging Network Requests
- install certs
- enabled domain
- remove app and reinstall
-
Lesson 08 - Parsing Network Repsonses
Complete call with response and parsing:
structs are created in advance from the response template of the api documentation.
func apiCall() async{ // 1. URL if let url = URL(string: "https://api.pexels.com/v1/search?query=nature&per_page=1") { // 2. URL request var request = URLRequest(url: url) request.addValue("\(api_key)", forHTTPHeaderField: "Authorization") // adds key to request // 3. URLSession do { // we dont ne a task block here because the function in the code is called // in a task block already let (data, response) = try await URLSession.shared.data(for: request) // returns in a tuple, so we need to put the answer in a tuple aswell // 4. Parse the JSON let decoder = JSONDecoder() do { let searchResponse = try decoder.decode(SearchResponse.self, from: data) for photo in searchResponse.photos { print(photo) } } catch { print(error) } } catch { print(error) } } } -
Challenge - Jokes App
https://github.com/dmkeks1/ChallengeJokesApp
-
Instructions
In this challenge, I'd like you to try doing the same thing, except with a different API.As usual, to get the most out of this challenge, try to complete it by reviewing the training in this module before looking at the solution or asking for help.Getting stuck, looking things up, reviewing previous lessons.. these are all steps in the skill building process!**Setup:**API:[https://jokeapi.dev/](https://jokeapi.dev/)Authentication: NoneEndpoint: https://v2.jokeapi.dev/joke/Any?type=single
**Challenge:**Build a UI that has a Text label in the center of the screen. At the bottom, put a button.When the button is tapped, it sends the API requestWhen the response returns, parse the data and display the joke in the Text labelYou should be able to keep tapping the button to show a different joke in the Text labelMake sure you use "async" and "await" as you learned in Lesson 5.
**Getting Help:**Check the project that you worked on in this module which is very similar.Dedicated discussion thread for this challenge[here](https://codecrew.codewithchris.com/t/ios-networking-module-1-jokes-app-challenge/25336)``. (If you need access to the CWC+ students section of the community, fill out[this form](https://codewithchris.typeform.com/to/NlKfo8FS)``)Reach out to one of our coaches with the chat widget in the lower right corner.Check out the solution below.
**Solution:**Solution can be found[here](https://www.dropbox.com/scl/fi/xopy0eu436bplb2w4cp0u/Networking-Module-1-Challenge-1-Project.zip?rlkey=9ggl7pudef796v3sik5qu7id4&dl=1)``.
-
Module 2 - The Citysights App November 16, 2024
-
Module 01 - Source Control
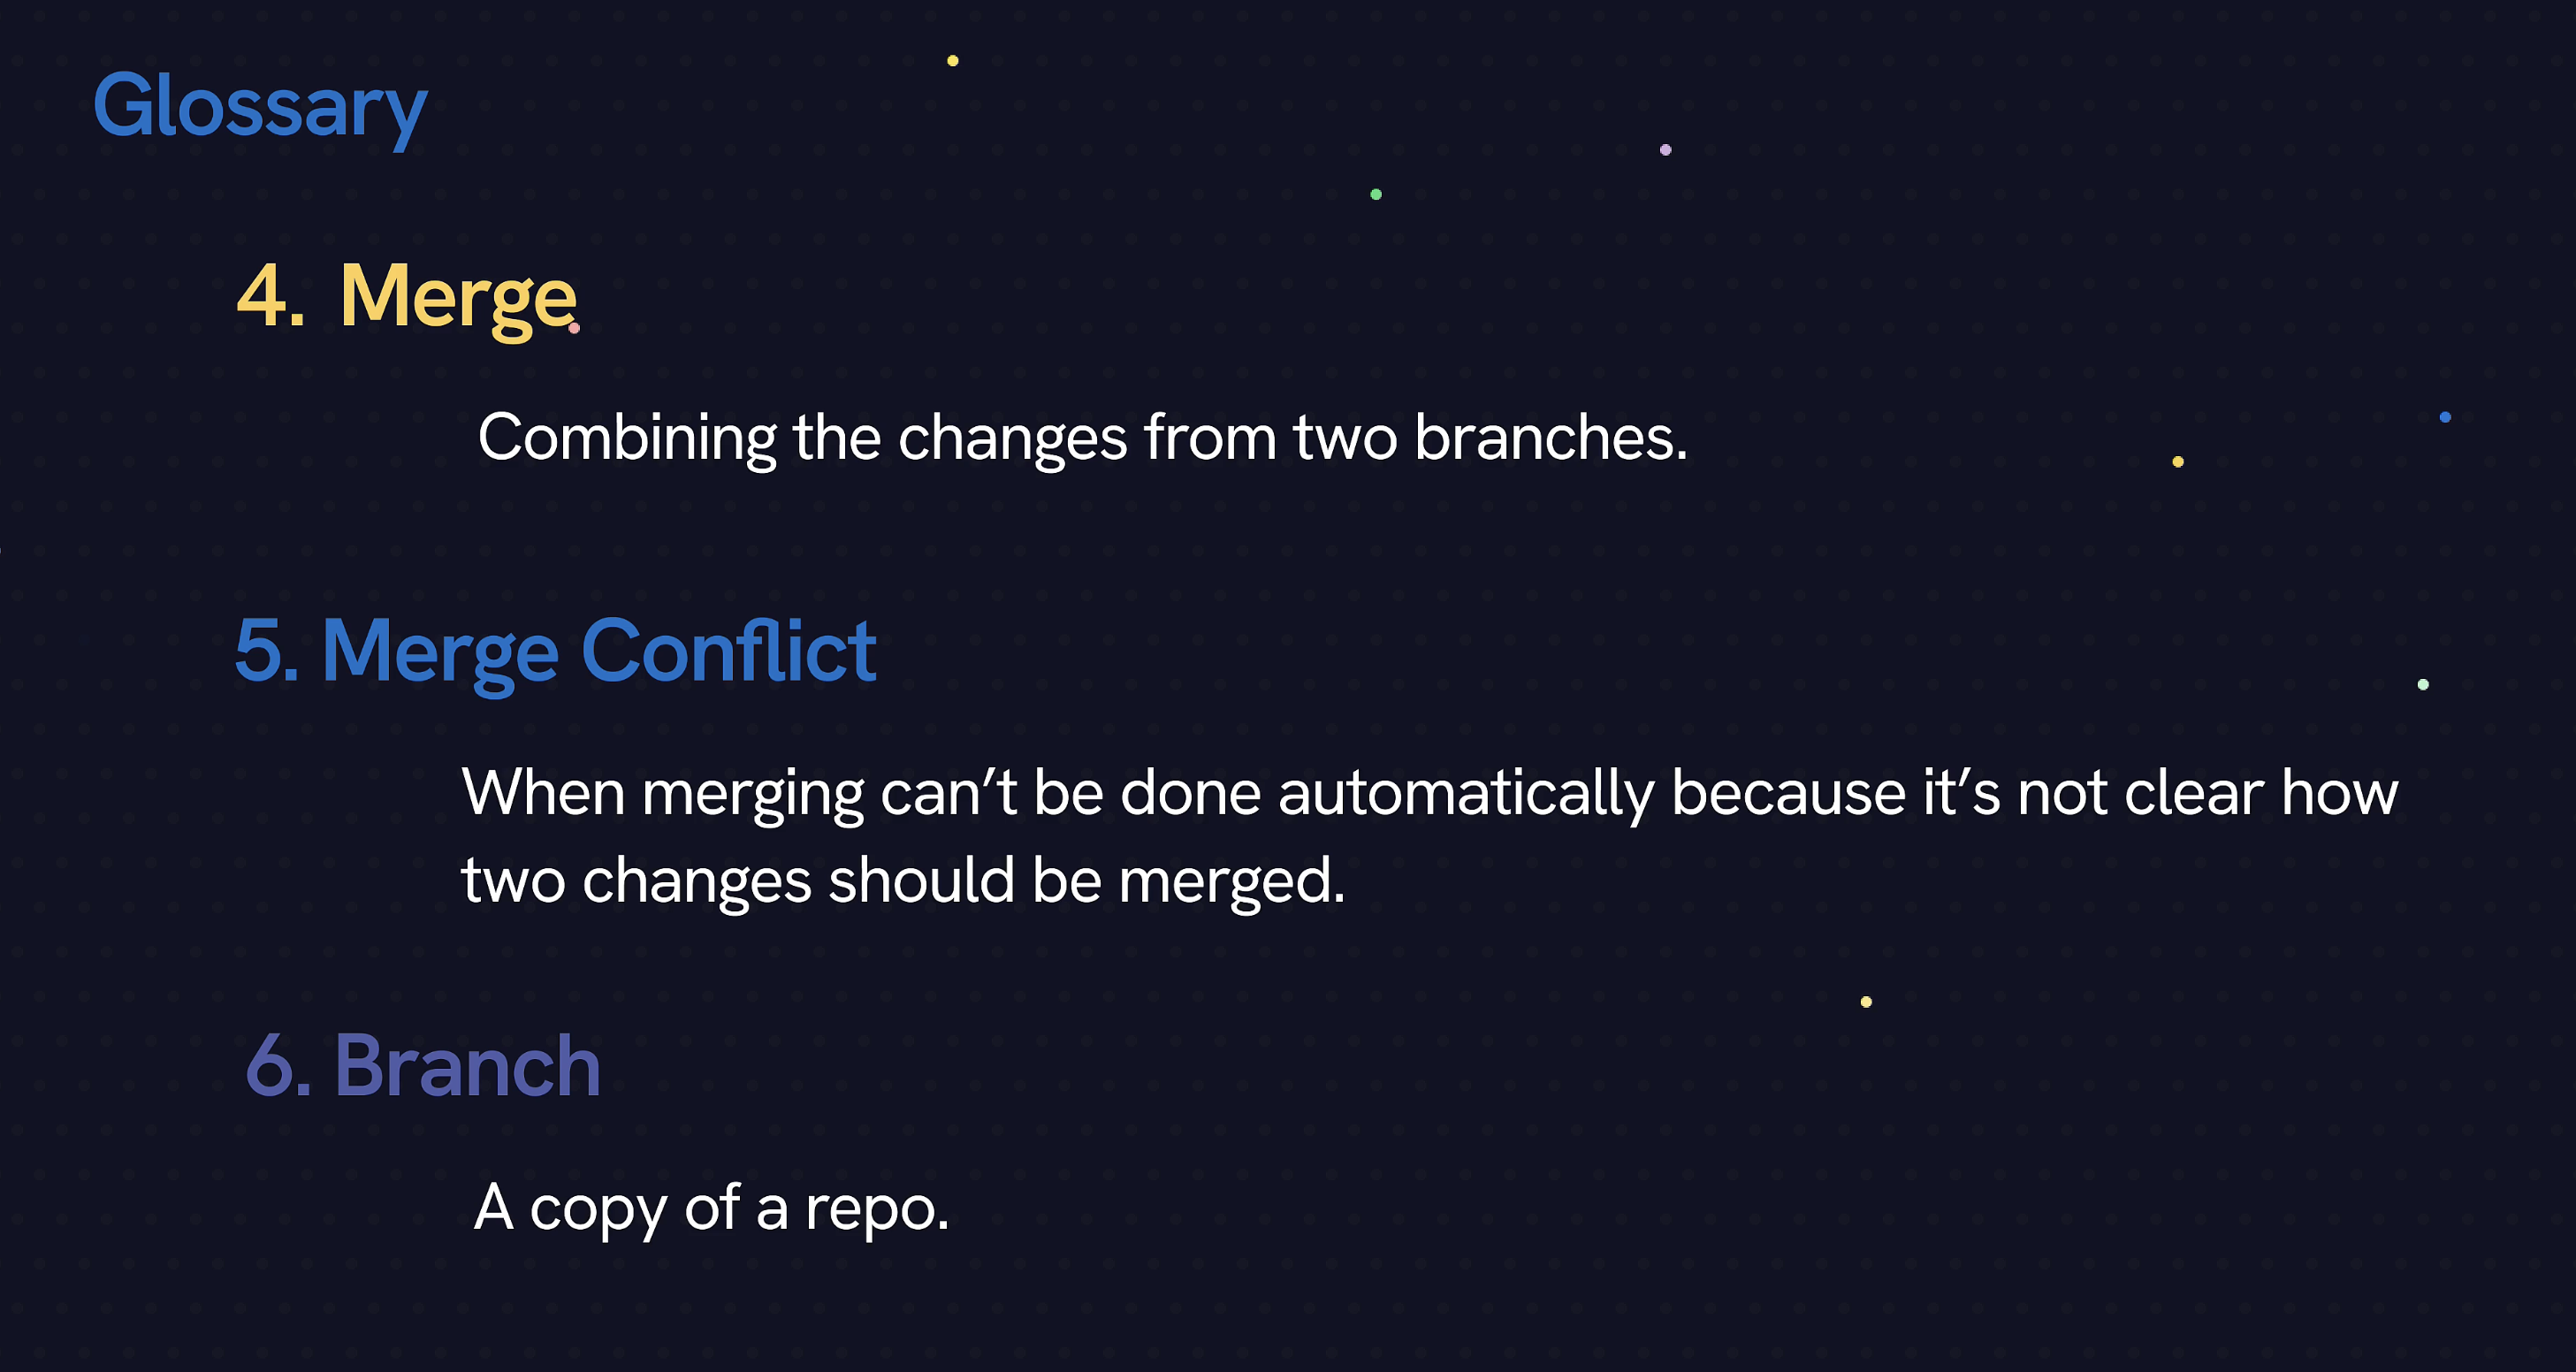
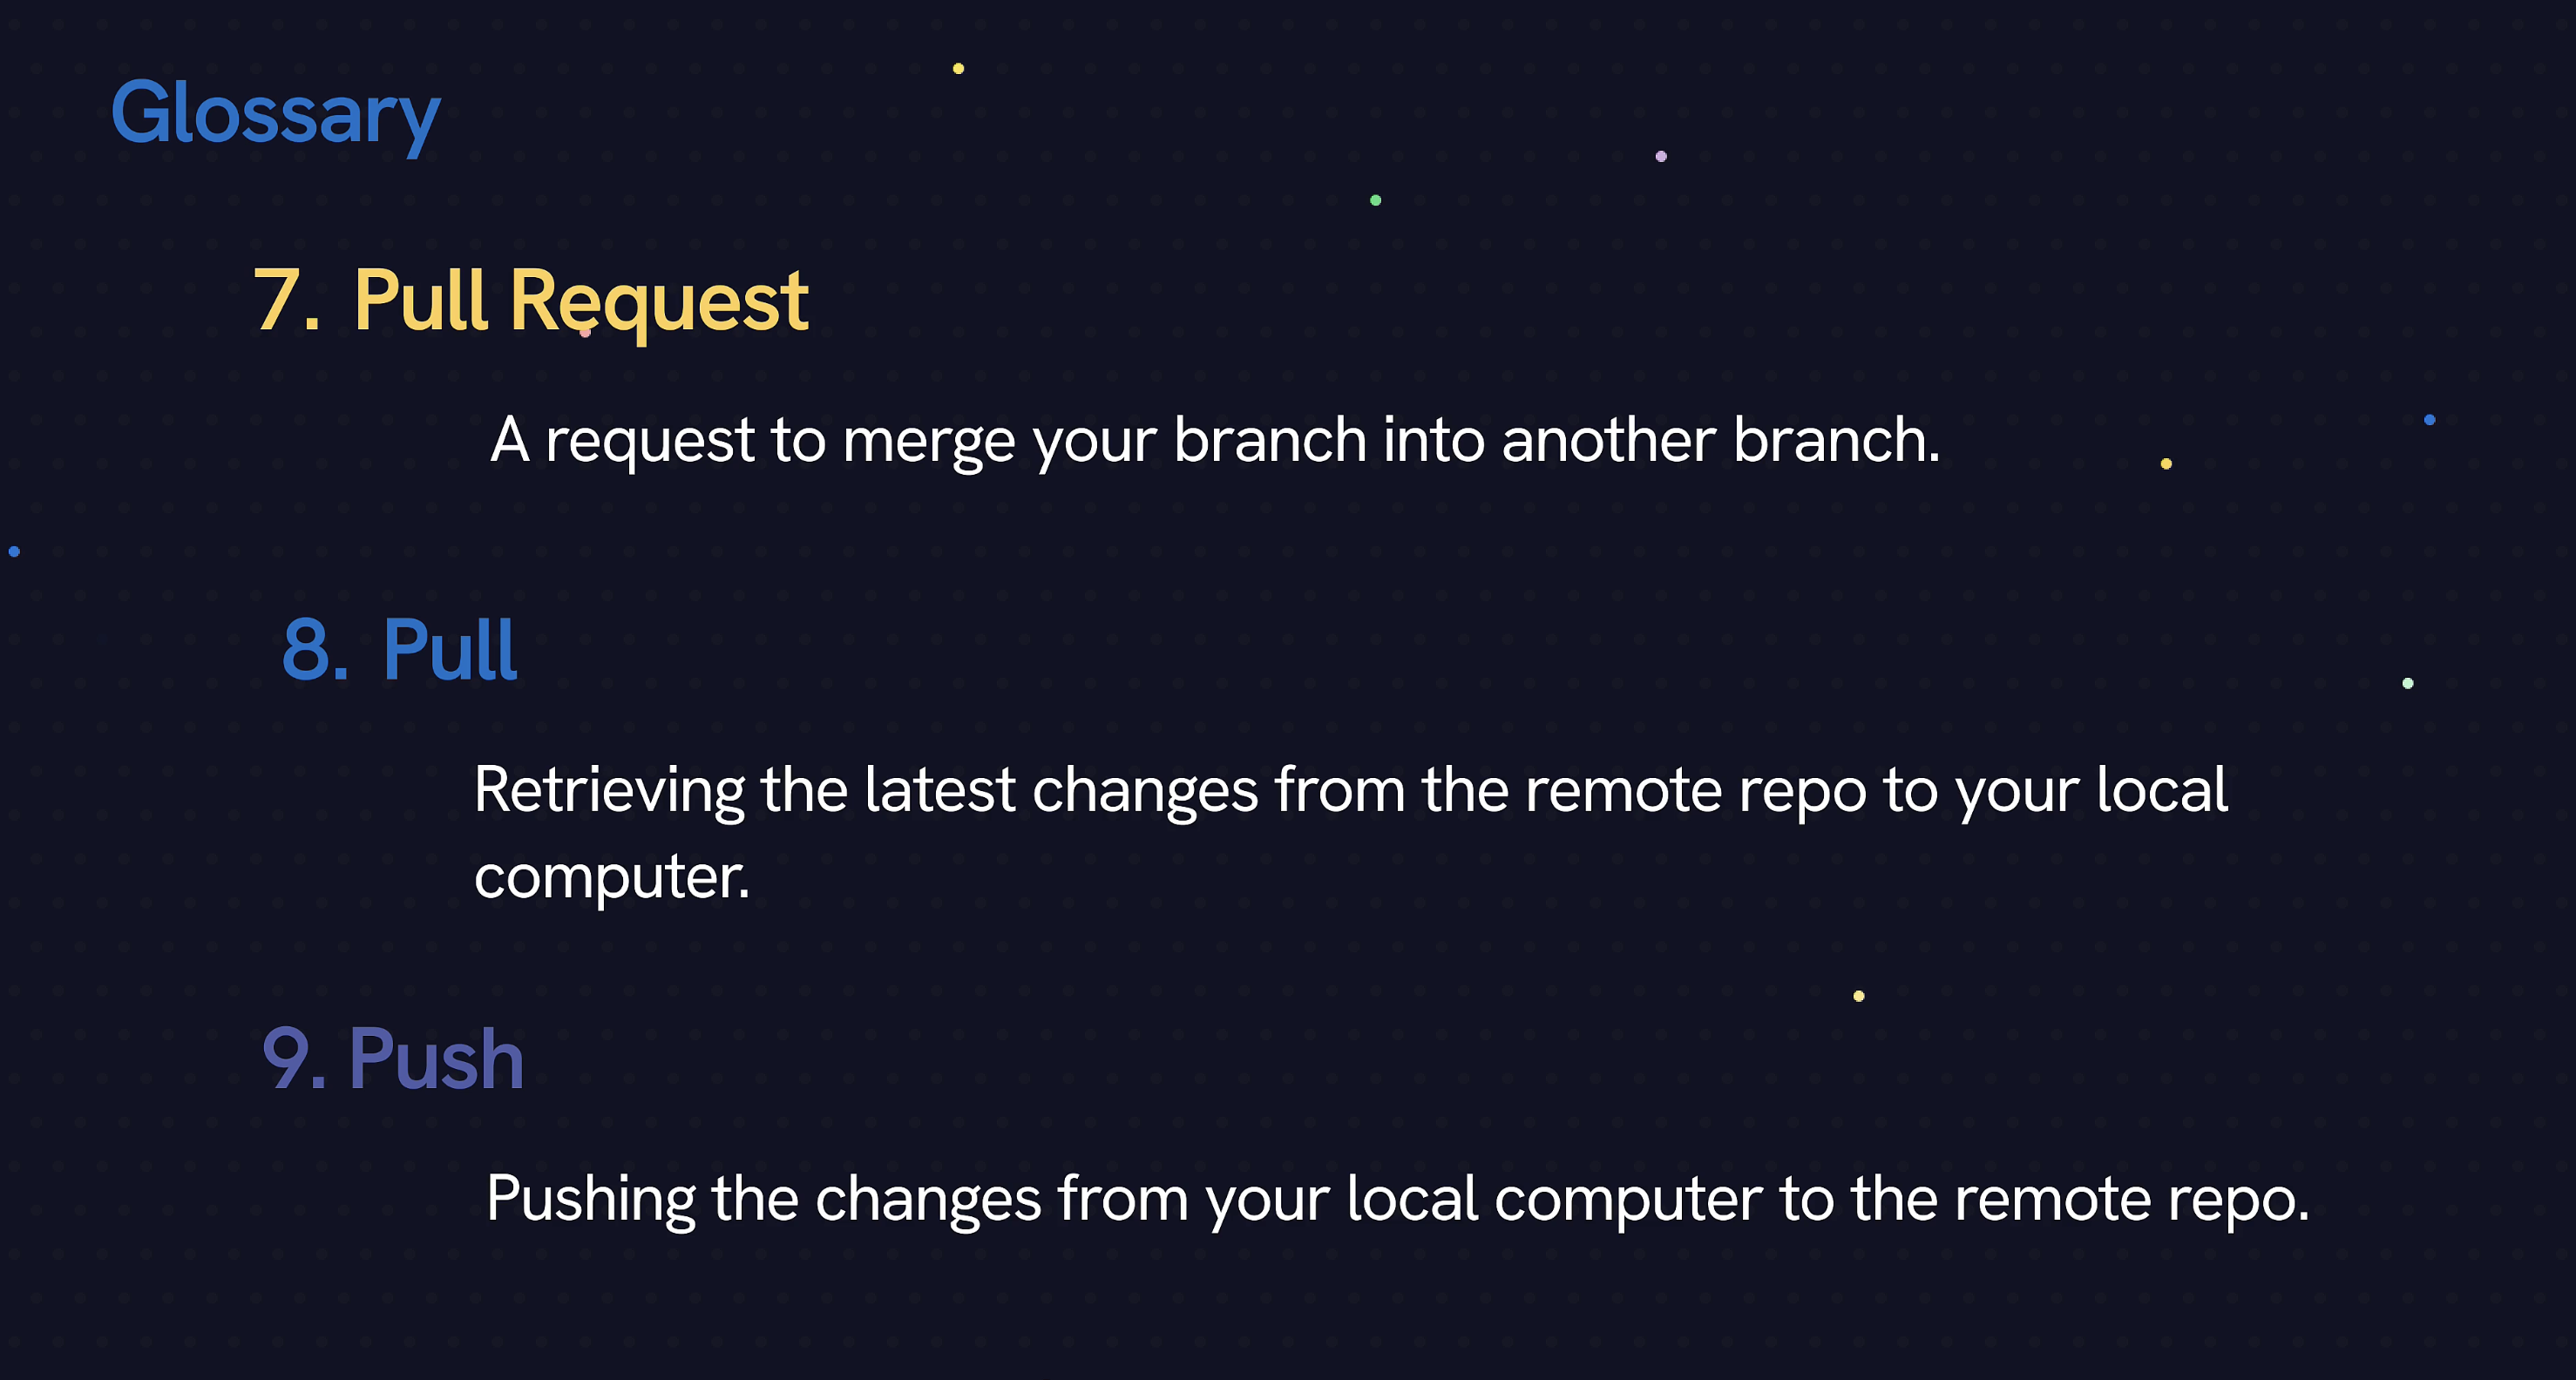
-
Module 05 - Adding the API key to Xcode Securely
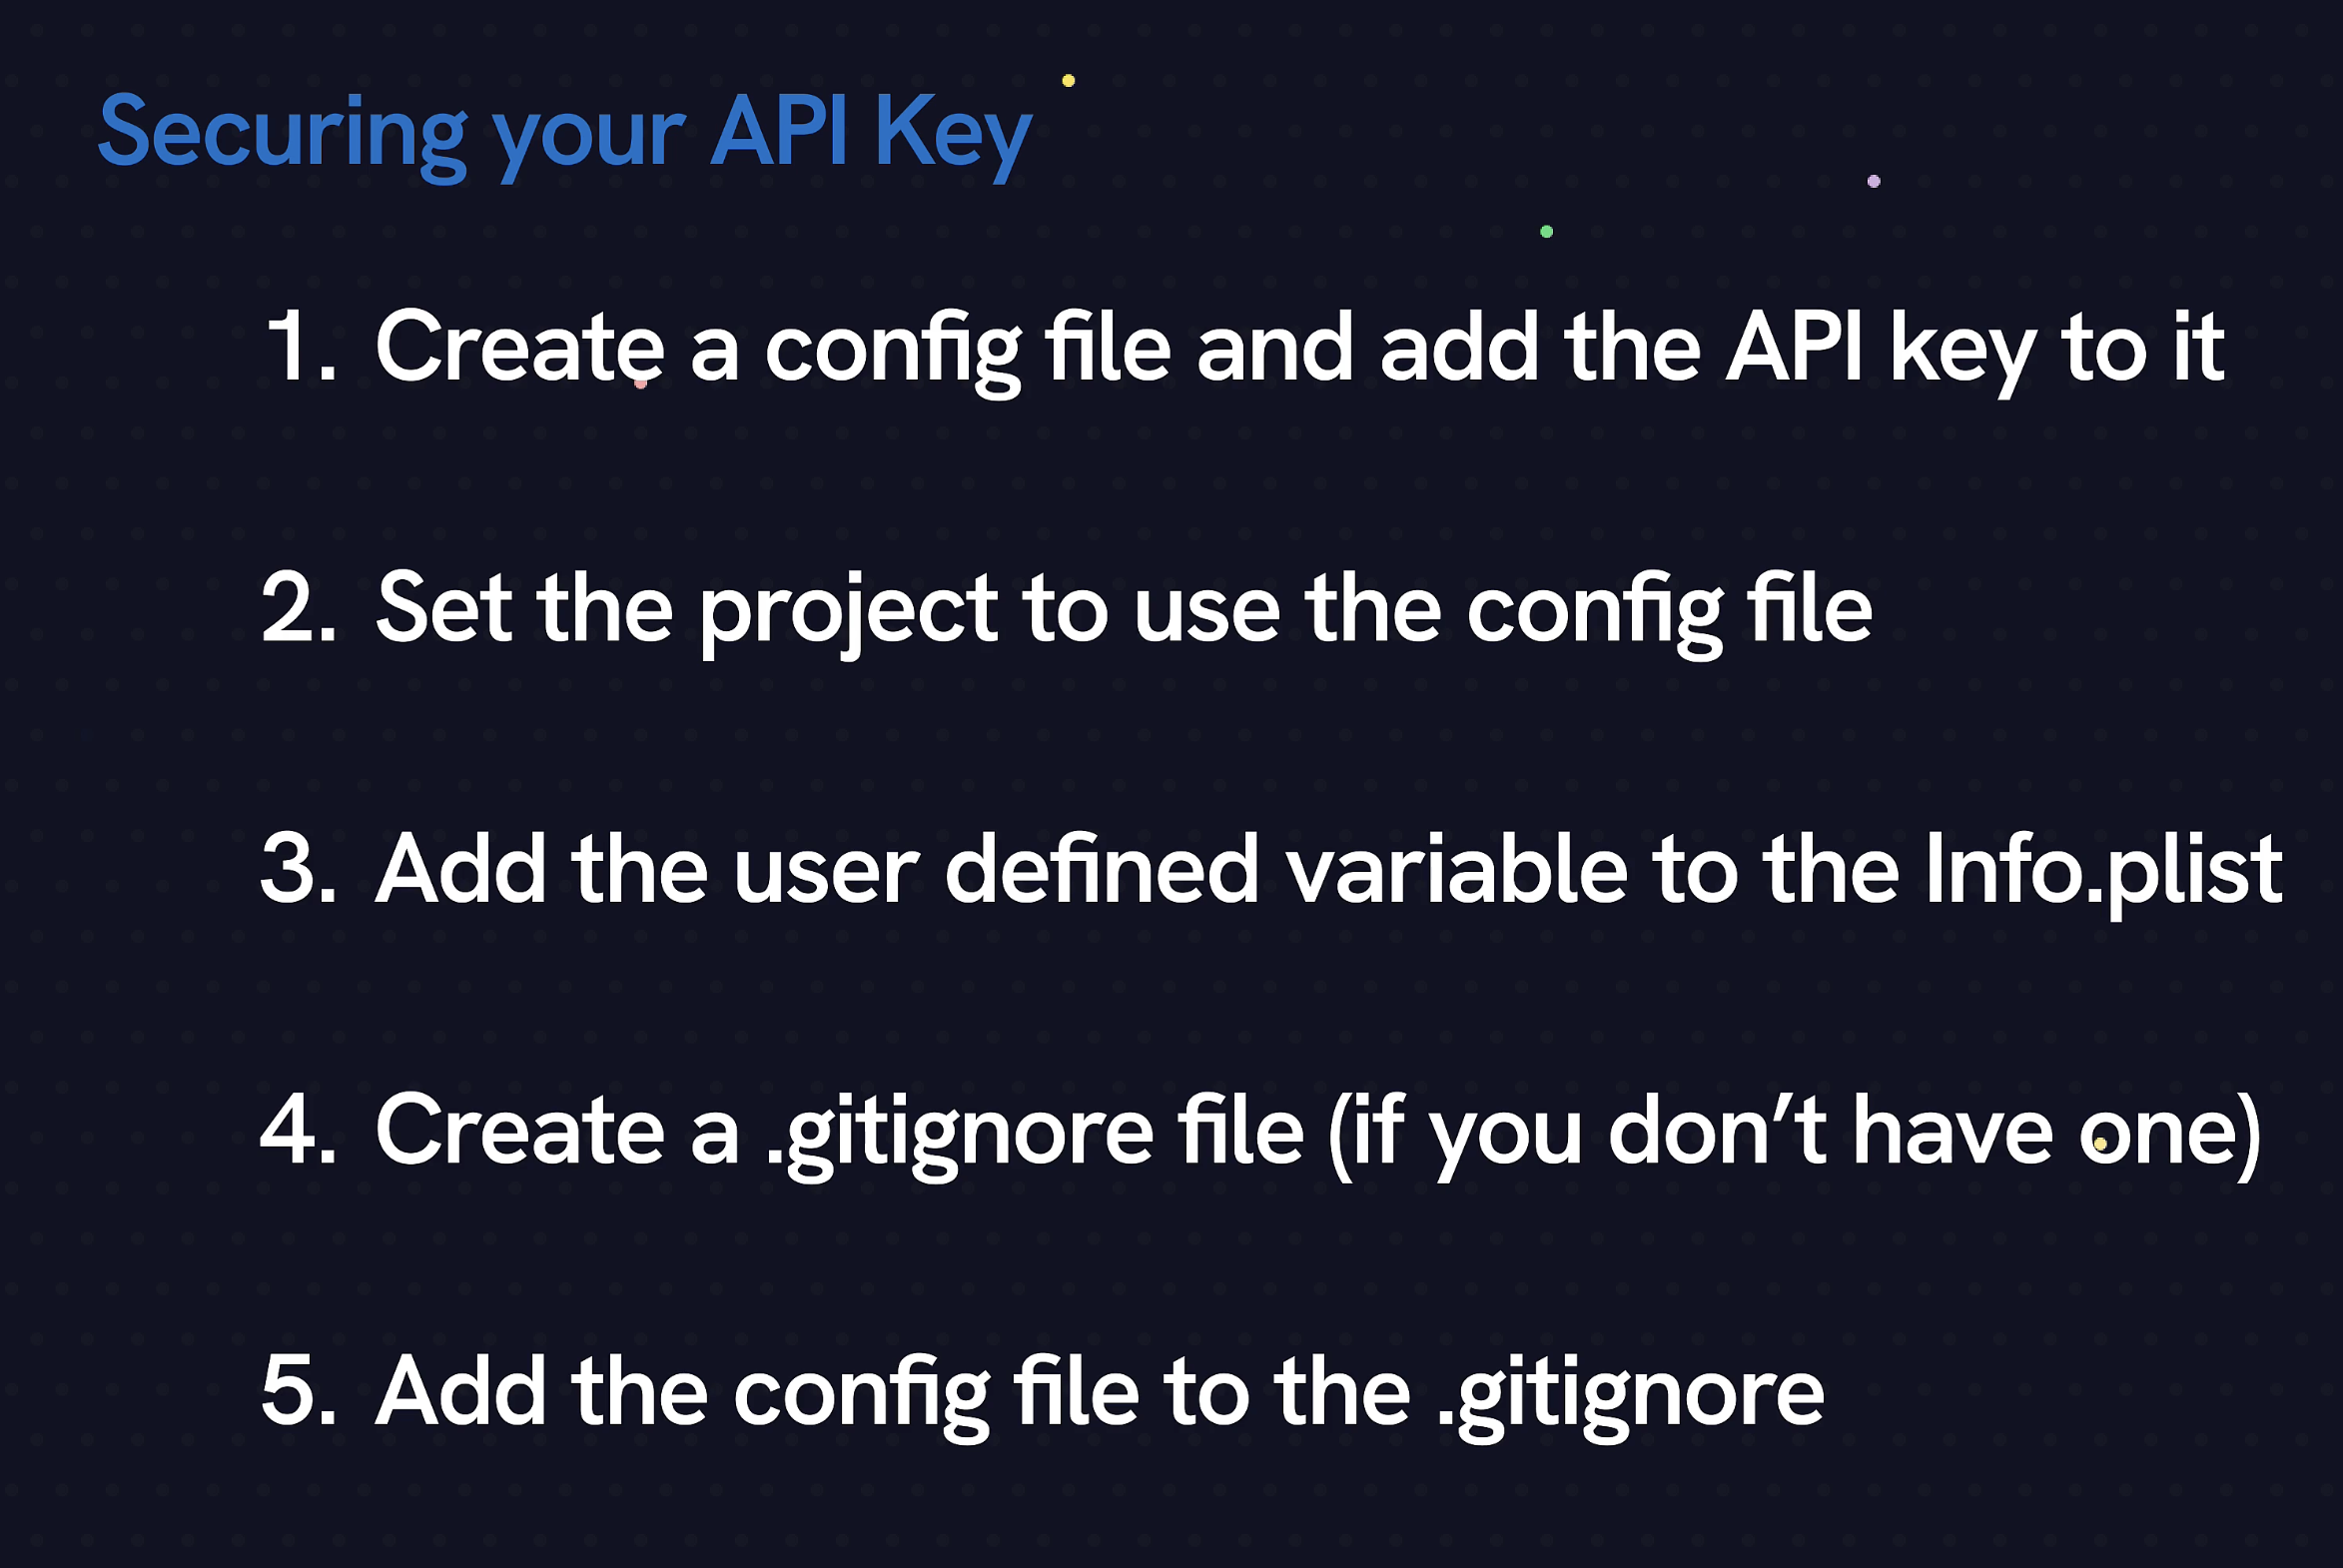
-
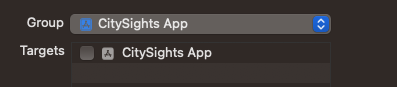
create config file from template in xcode
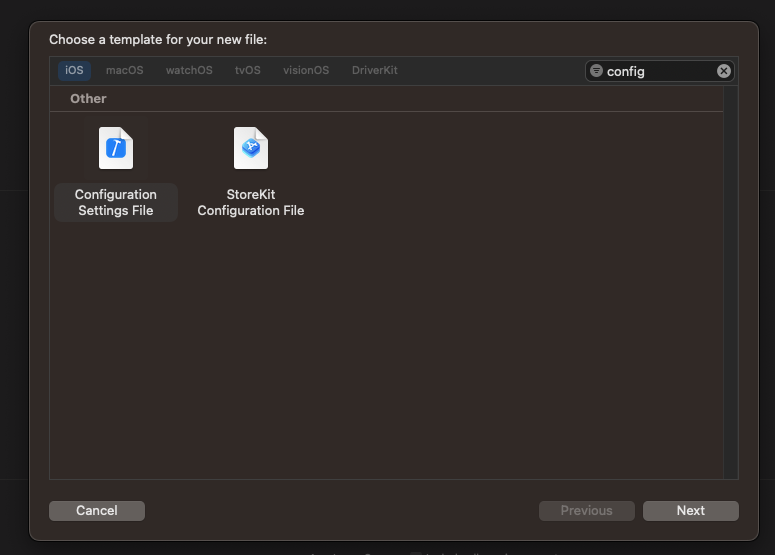
target needs to be unchecked
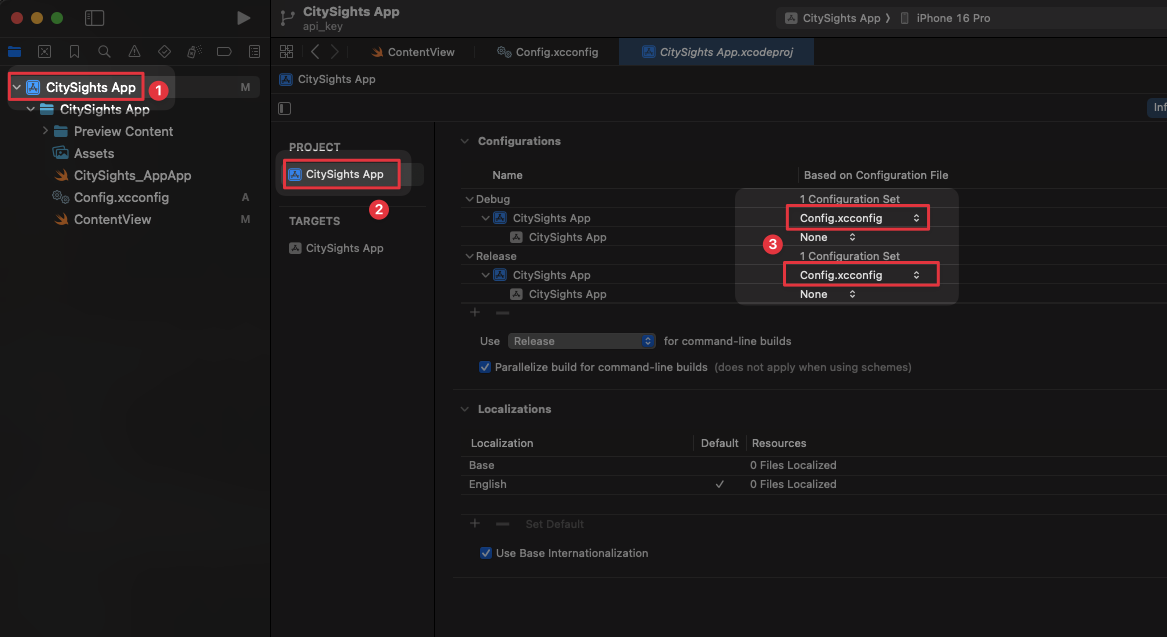
choose created config file in xcode project for it to be used
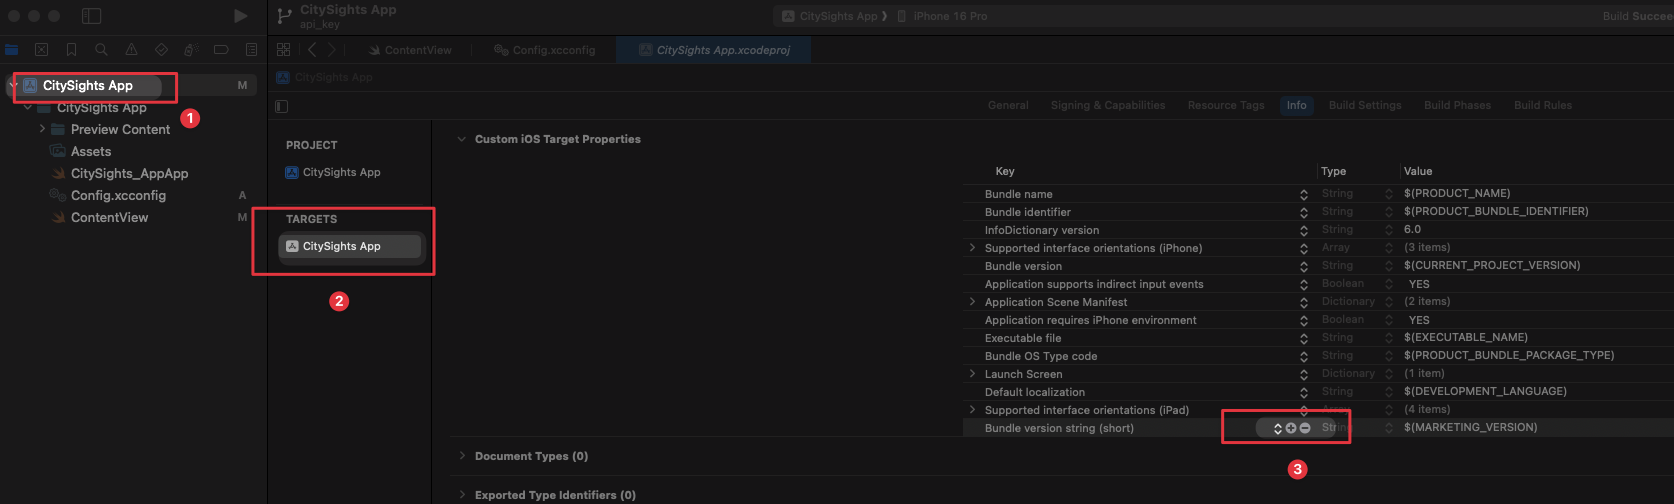
add api_key to info.plist

To test if the app can access the key you can print
.onAppear {
            print(Bundle.main.infoDictionary?["API_KEY"] as? String)
            }
create .gitignore file to ignore the config file
navigate to the project folder an press SHIFT + COMMAND + . to reveal invis folders like .git
open terminal and navigate to the project folder by dragging the folder into the terminal.
in the terminal enter:
touch .gitignoretouch creates, . means hiddenfor creating gitignore we can use https://www.toptal.com/developers/gitignore
enter xcode and swift and copy the content in the .gitignore file we created.
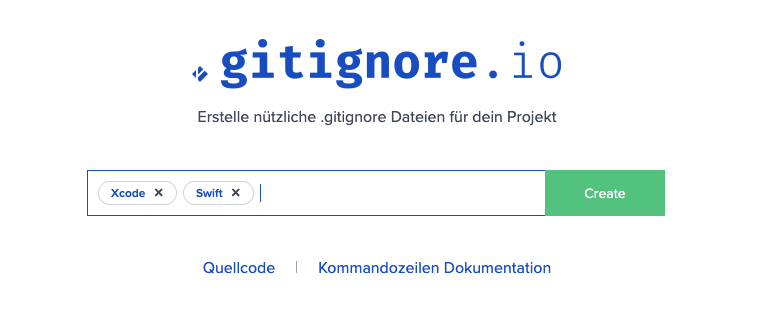
also add the config.xcconfig manually!
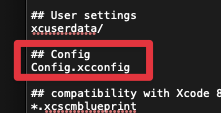
make sure to unstage config.xcconfig in xcode so it doenst commit the api_key if we created that file after settings everyhting up
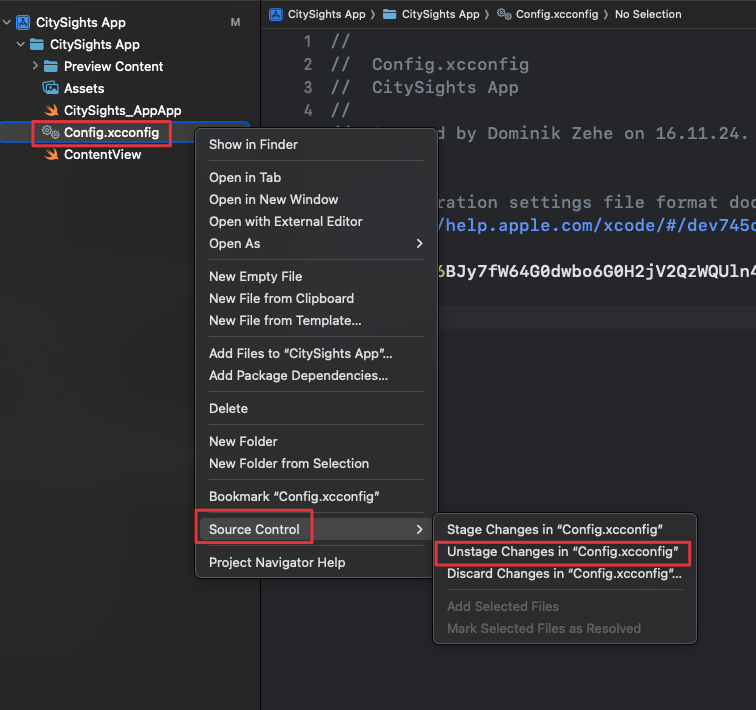
now we can commit.
if we used another branch we can merge into main after and delete the used branch (chris used that in his tutorial)
-
-
Module 06 - making API request for yelp api
import Foundation

struct DataService  {


    let api_key = Bundle.main.infoDictionary?["API_KEY"] as? String


    func businessSearch() async {


        //check if api key exists
        guard  api_key != nil  else {
            return
        }

        // 1. Create URL
        if let url = URL(string: "https://api.yelp.com/v3/businesses/search?latitude=35.665517&longitude=139.770398&categories=restaurants&limit=10") {


            // 2. Create request
            var request = URLRequest(url: url)

            request.addValue("Bearer \(api_key!)", forHTTPHeaderField: "Authorization")
            request.addValue("application/json", forHTTPHeaderField: "accept")

            // 3. Send request

            do {
                let (data, response) = try await URLSession.shared.data(for: request)

                print(data)
                print(response)
            }
            catch {
                print(error)
            }
        }
https://github.com/dmkeks1/CitySights-App/blob/main/CitySights%20App/DataService.swift
-
Module 07 - Parsing Yelp API + CodingKeys
https://github.com/dmkeks1/CitySights-App/blob/main/CitySights%20App/Model/Business.swift
struct Business: Decodable, Identifiable { var id: String? var alias: String? var categories: [Category]? var coordinates: Coordinate? var displayPhone: String? var distance: Double? var imageUrl: String? var isClosed: Bool? var location: Location? var name: String? var phone: String? var price: String? var rating: Double? var reviewCount: Int? var url: String? enum CodingKeys: String, CodingKey { //properties die geändert werden müssen weil die bezeichnung nicht swift conform ist case displayPhone = "display_phone" case isClosed = "is_closed" case imageUrl = "image_url" case reviewCount = "review_count" //wenn properties geändert werden müssen, dann müssen trotzdem alle anderen nochmal im codingkeys enum aufgezählt werden case id case alias case categories case coordinates case distance case location case name case phone case price case rating case url } } -
Module 09 - Styling the list
https://github.com/dmkeks1/CitySights-App/blob/main/CitySights%20App/ContentView.swift
struct TextHelper {

    static func distanceAwayText(meters: Double) -> String {

        if meters > 1000 {
            return "\(Int(round(meters/meters/1000))) km away"
        }
        else {
            return "\(Int(round(meters))) m away"
        }
    }
}
static func bedeutet, dass man keine instance erstellen muss um auf die Funktion zuzugreifen.
ohne func müsste man erst:
let helper = TextHelper()helper.distanceAwayTextmit static func:
TextHelper.distanceAwayTextwird dann auch Type Method / Type function genannt.
-
Module 10 - Business Detail Using SwiftUI Sheets
https://github.com/dmkeks1/CitySights-App/blob/main/CitySights%20App/BusinessDetailView.swift
sheets, lists, sf symbols,
-
Challenge - Football Stats
Module 3 - Data Flow and Map November 17, 2024
-
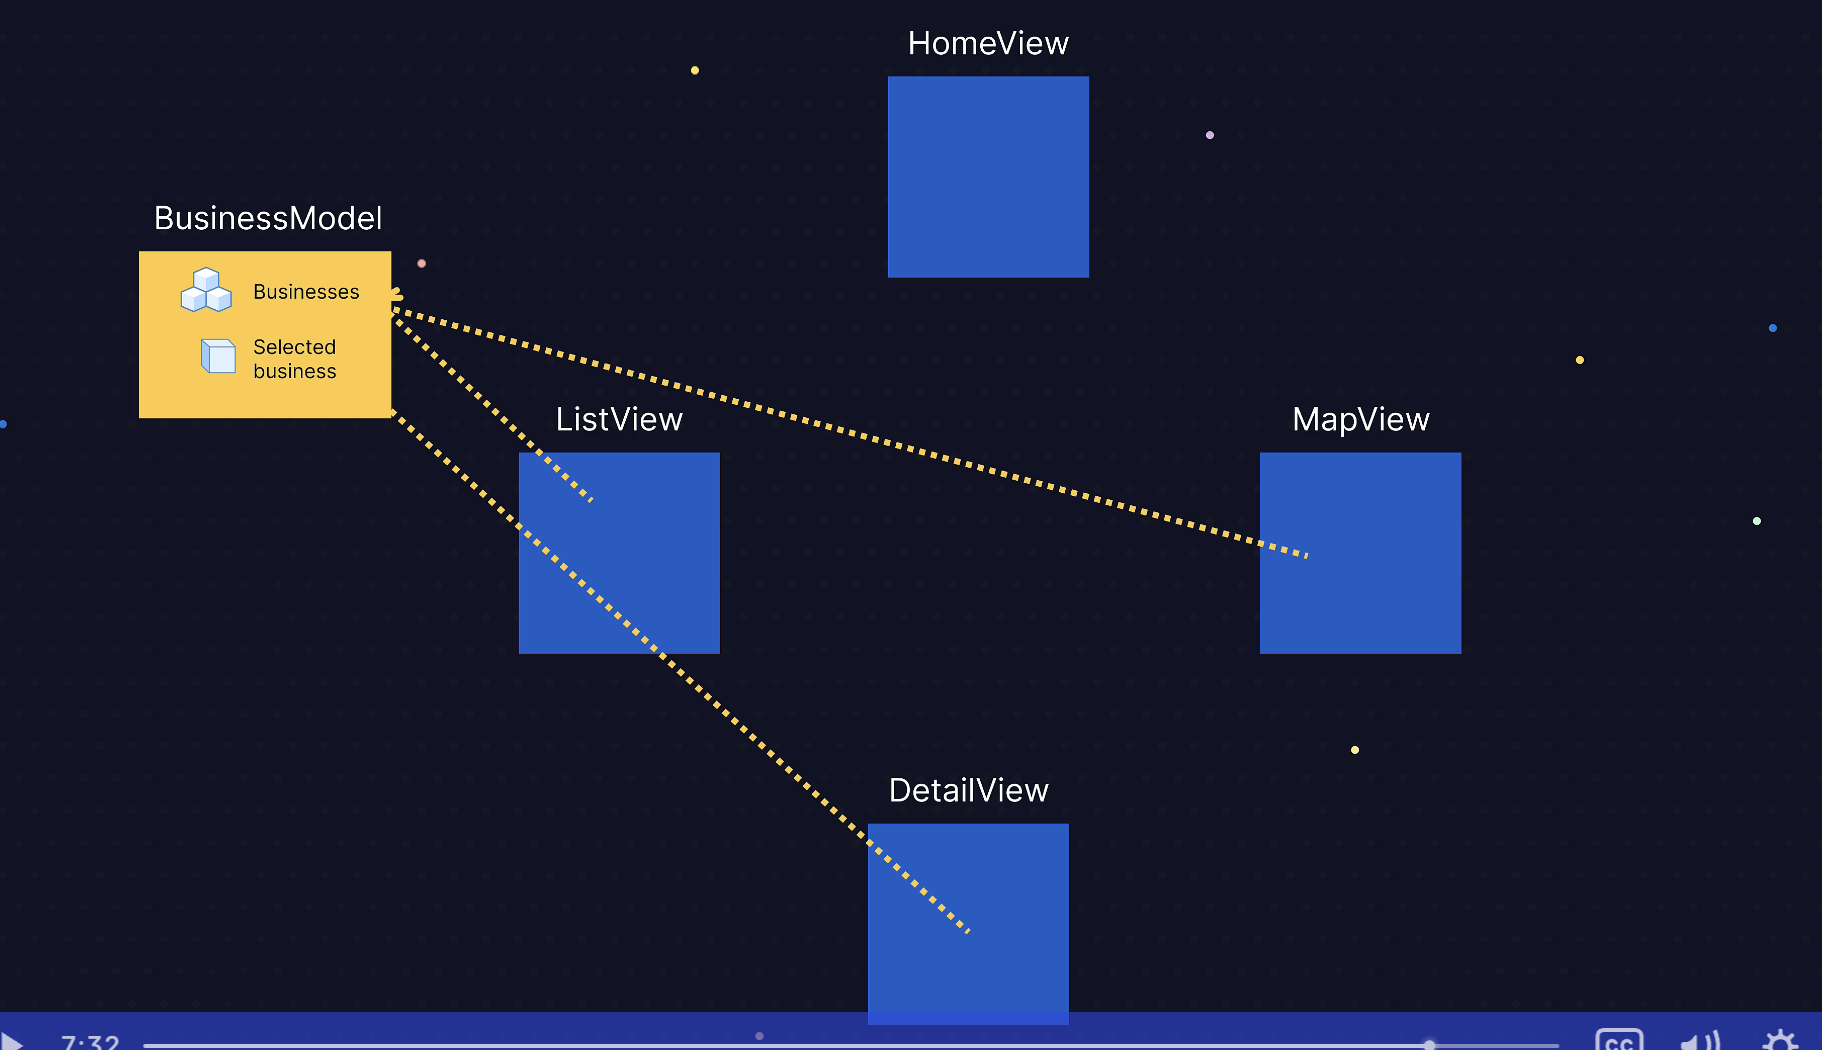
Lesson 01 - The Observation Data Flow Pattern - MVVM
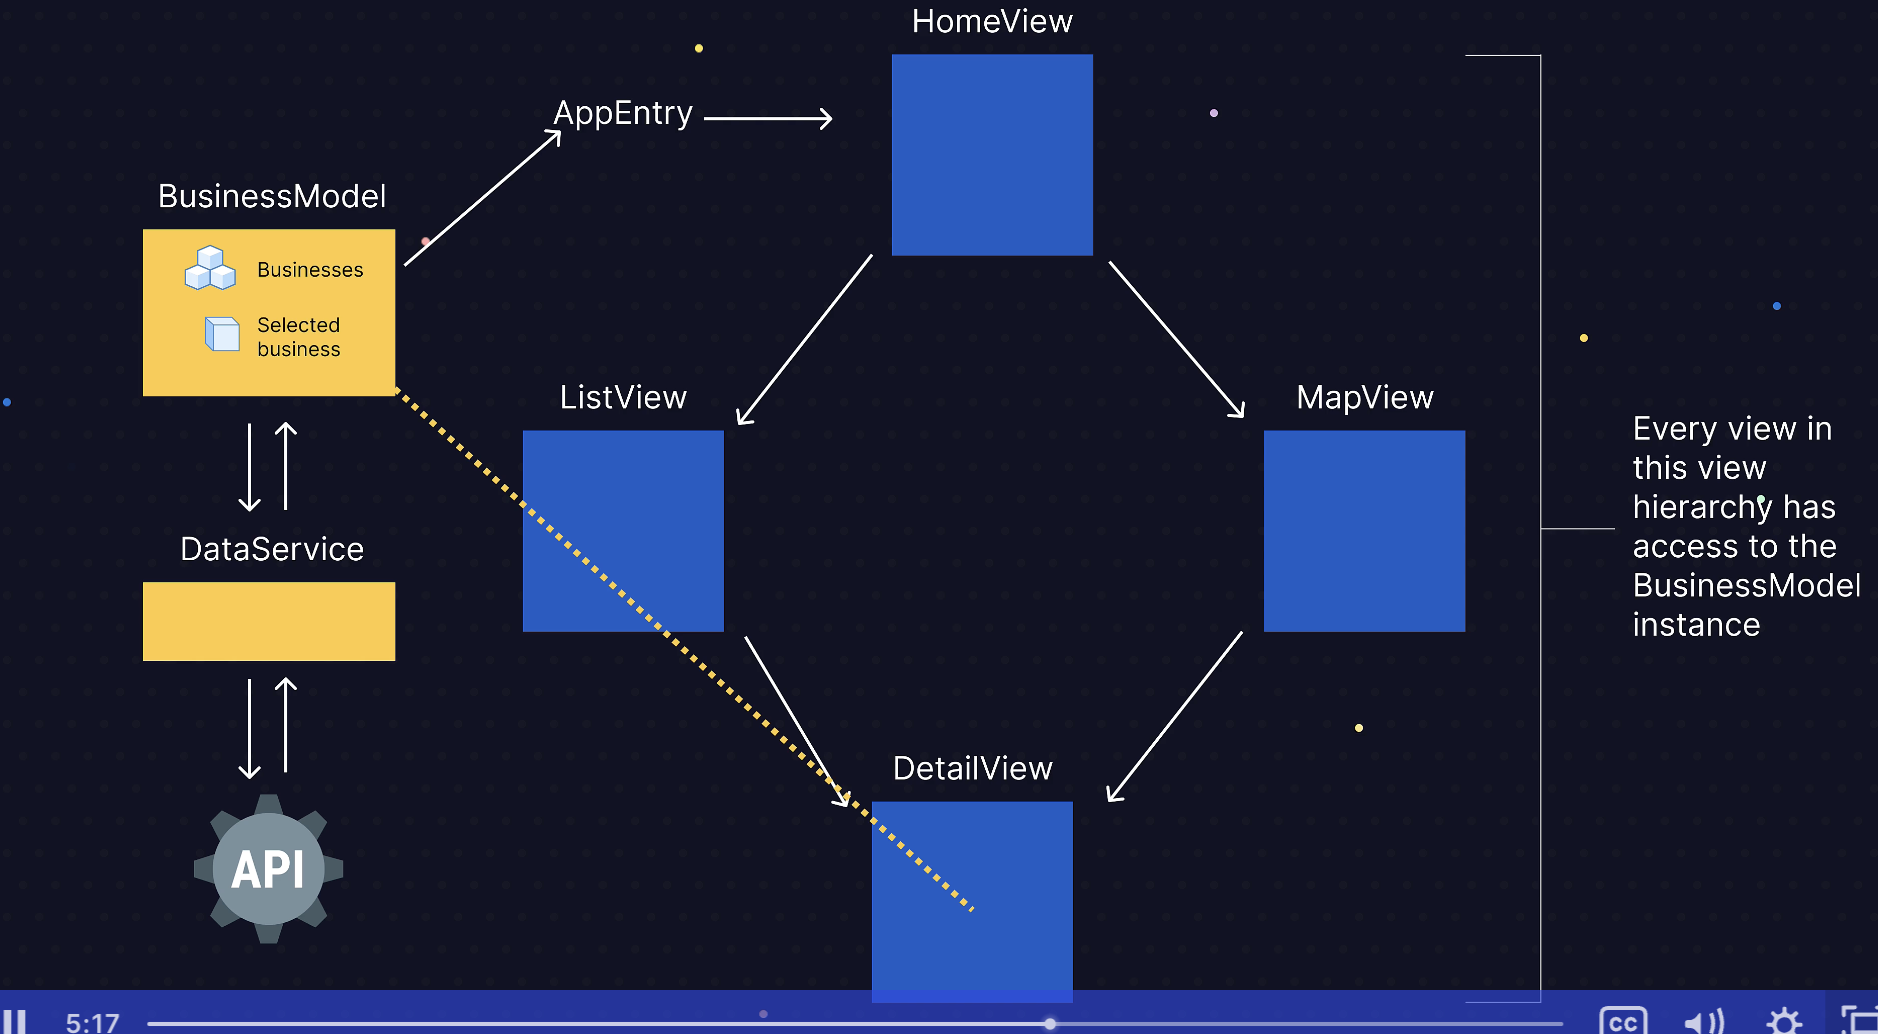
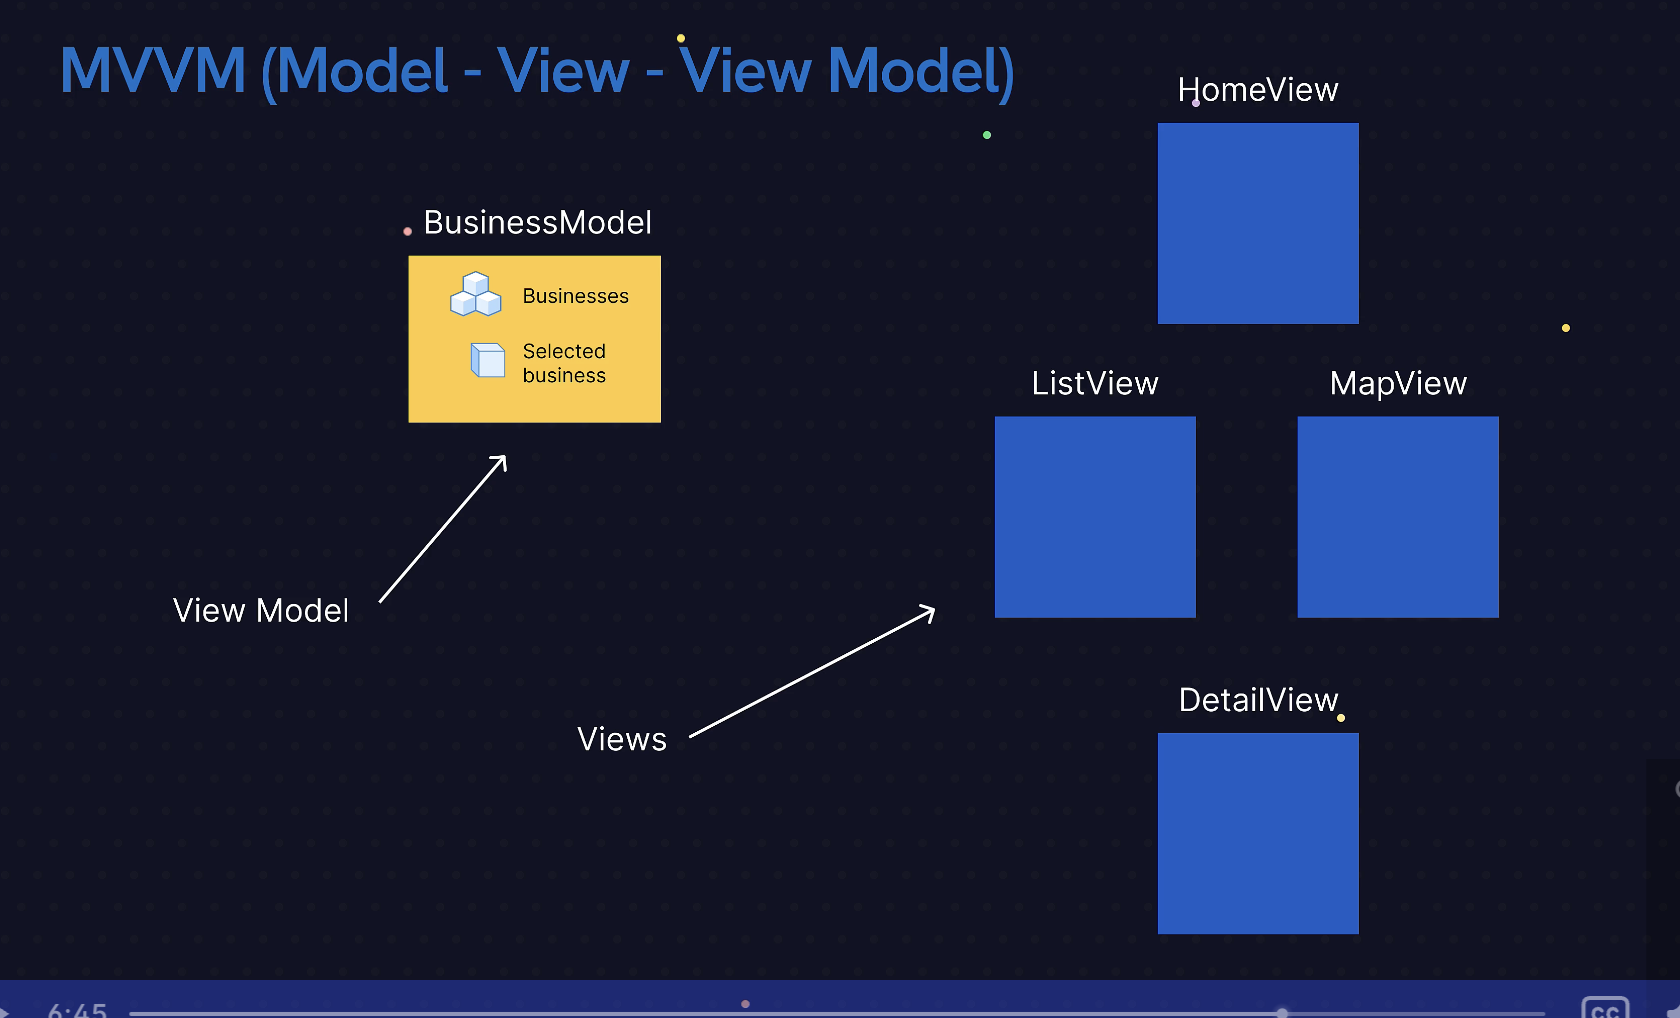
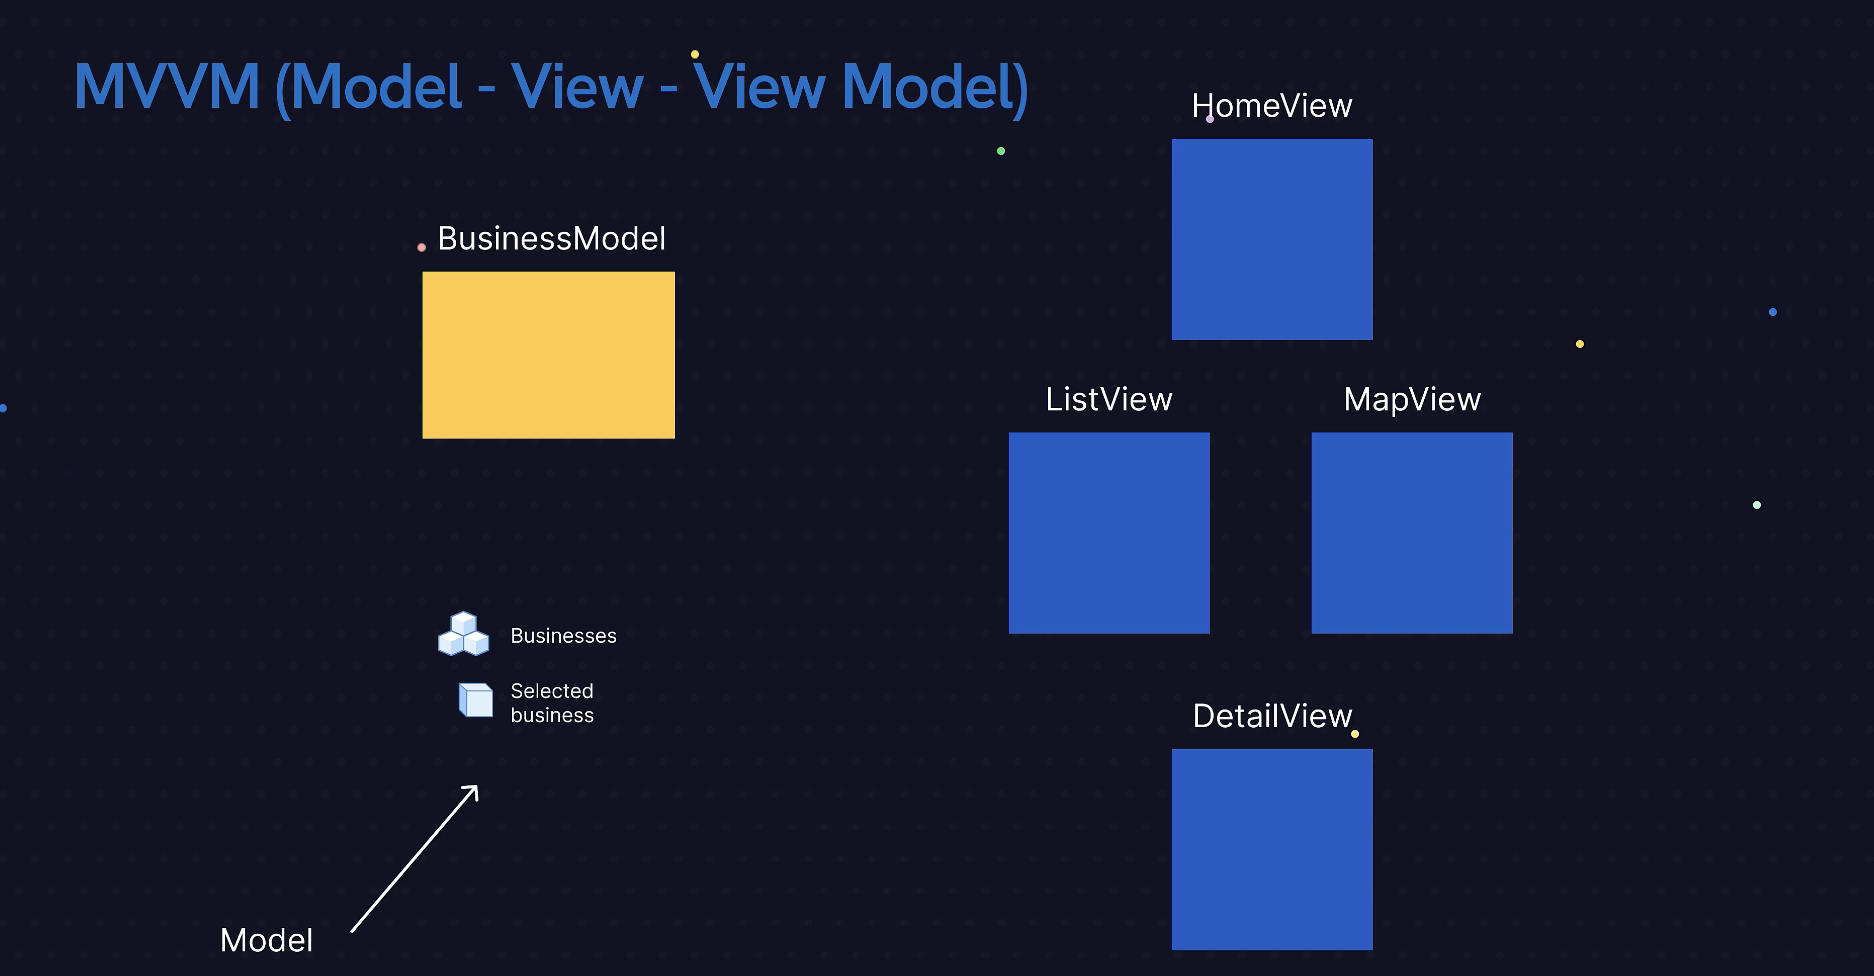
observation pATTERn enables how the data flows through the app
-
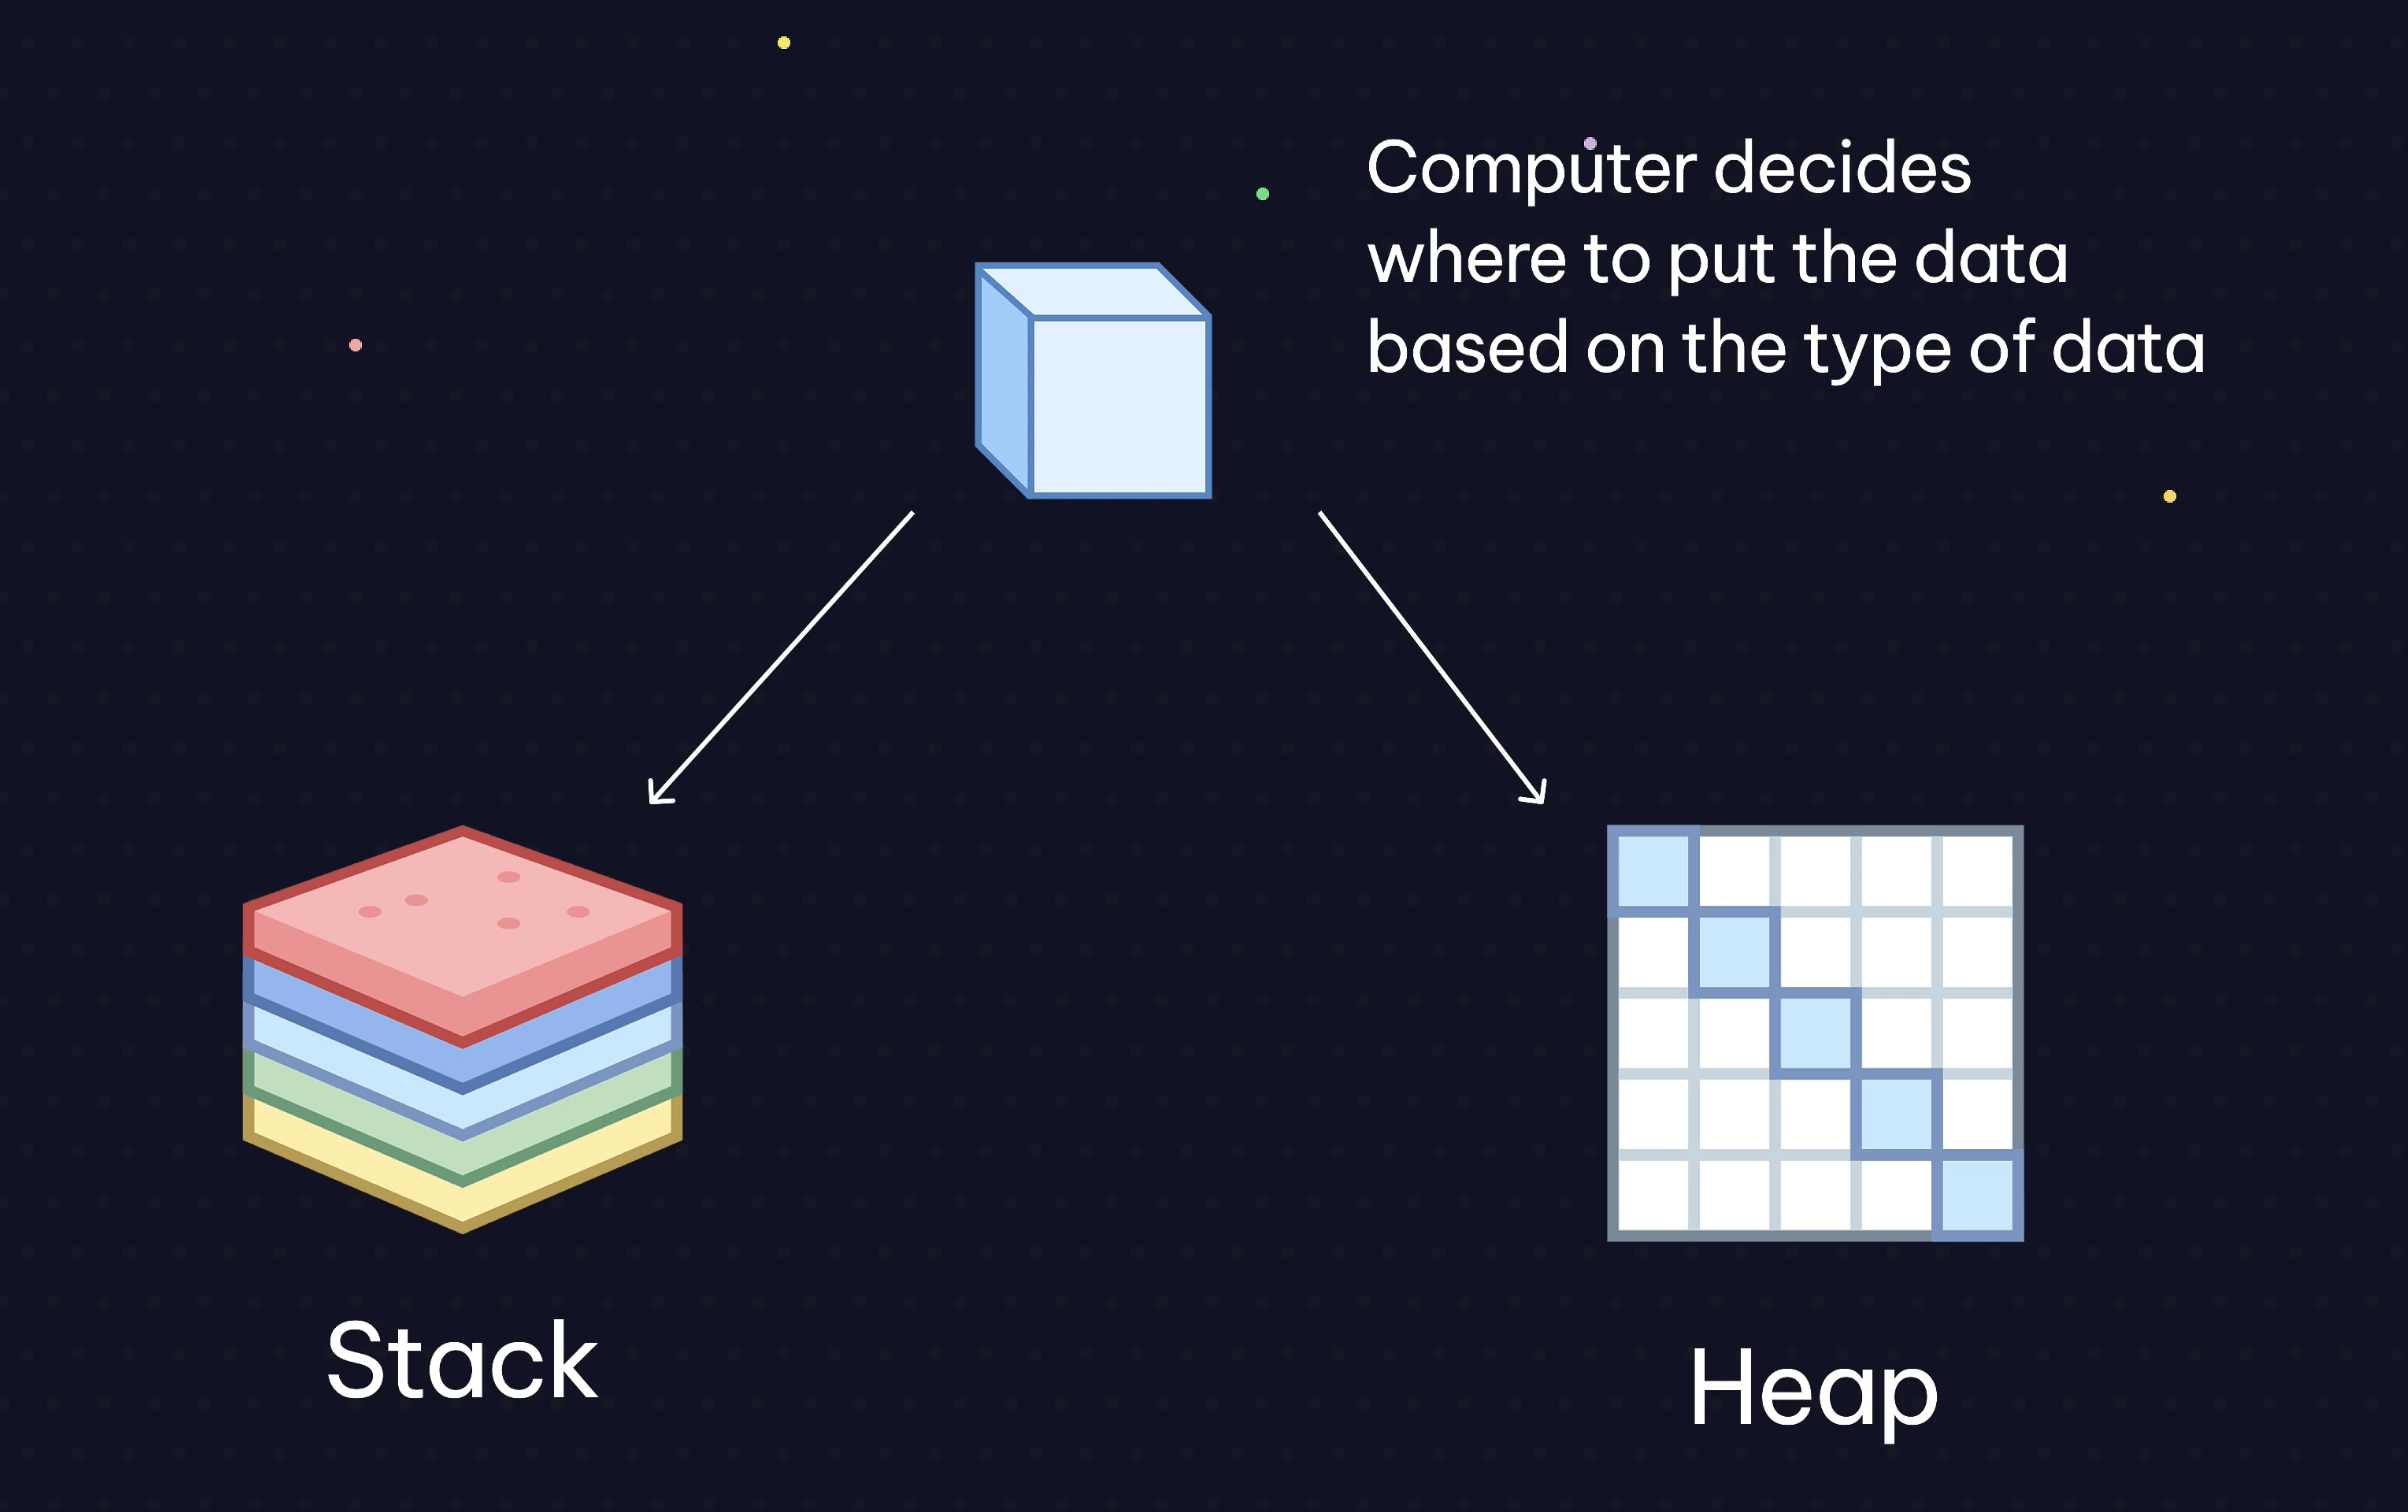
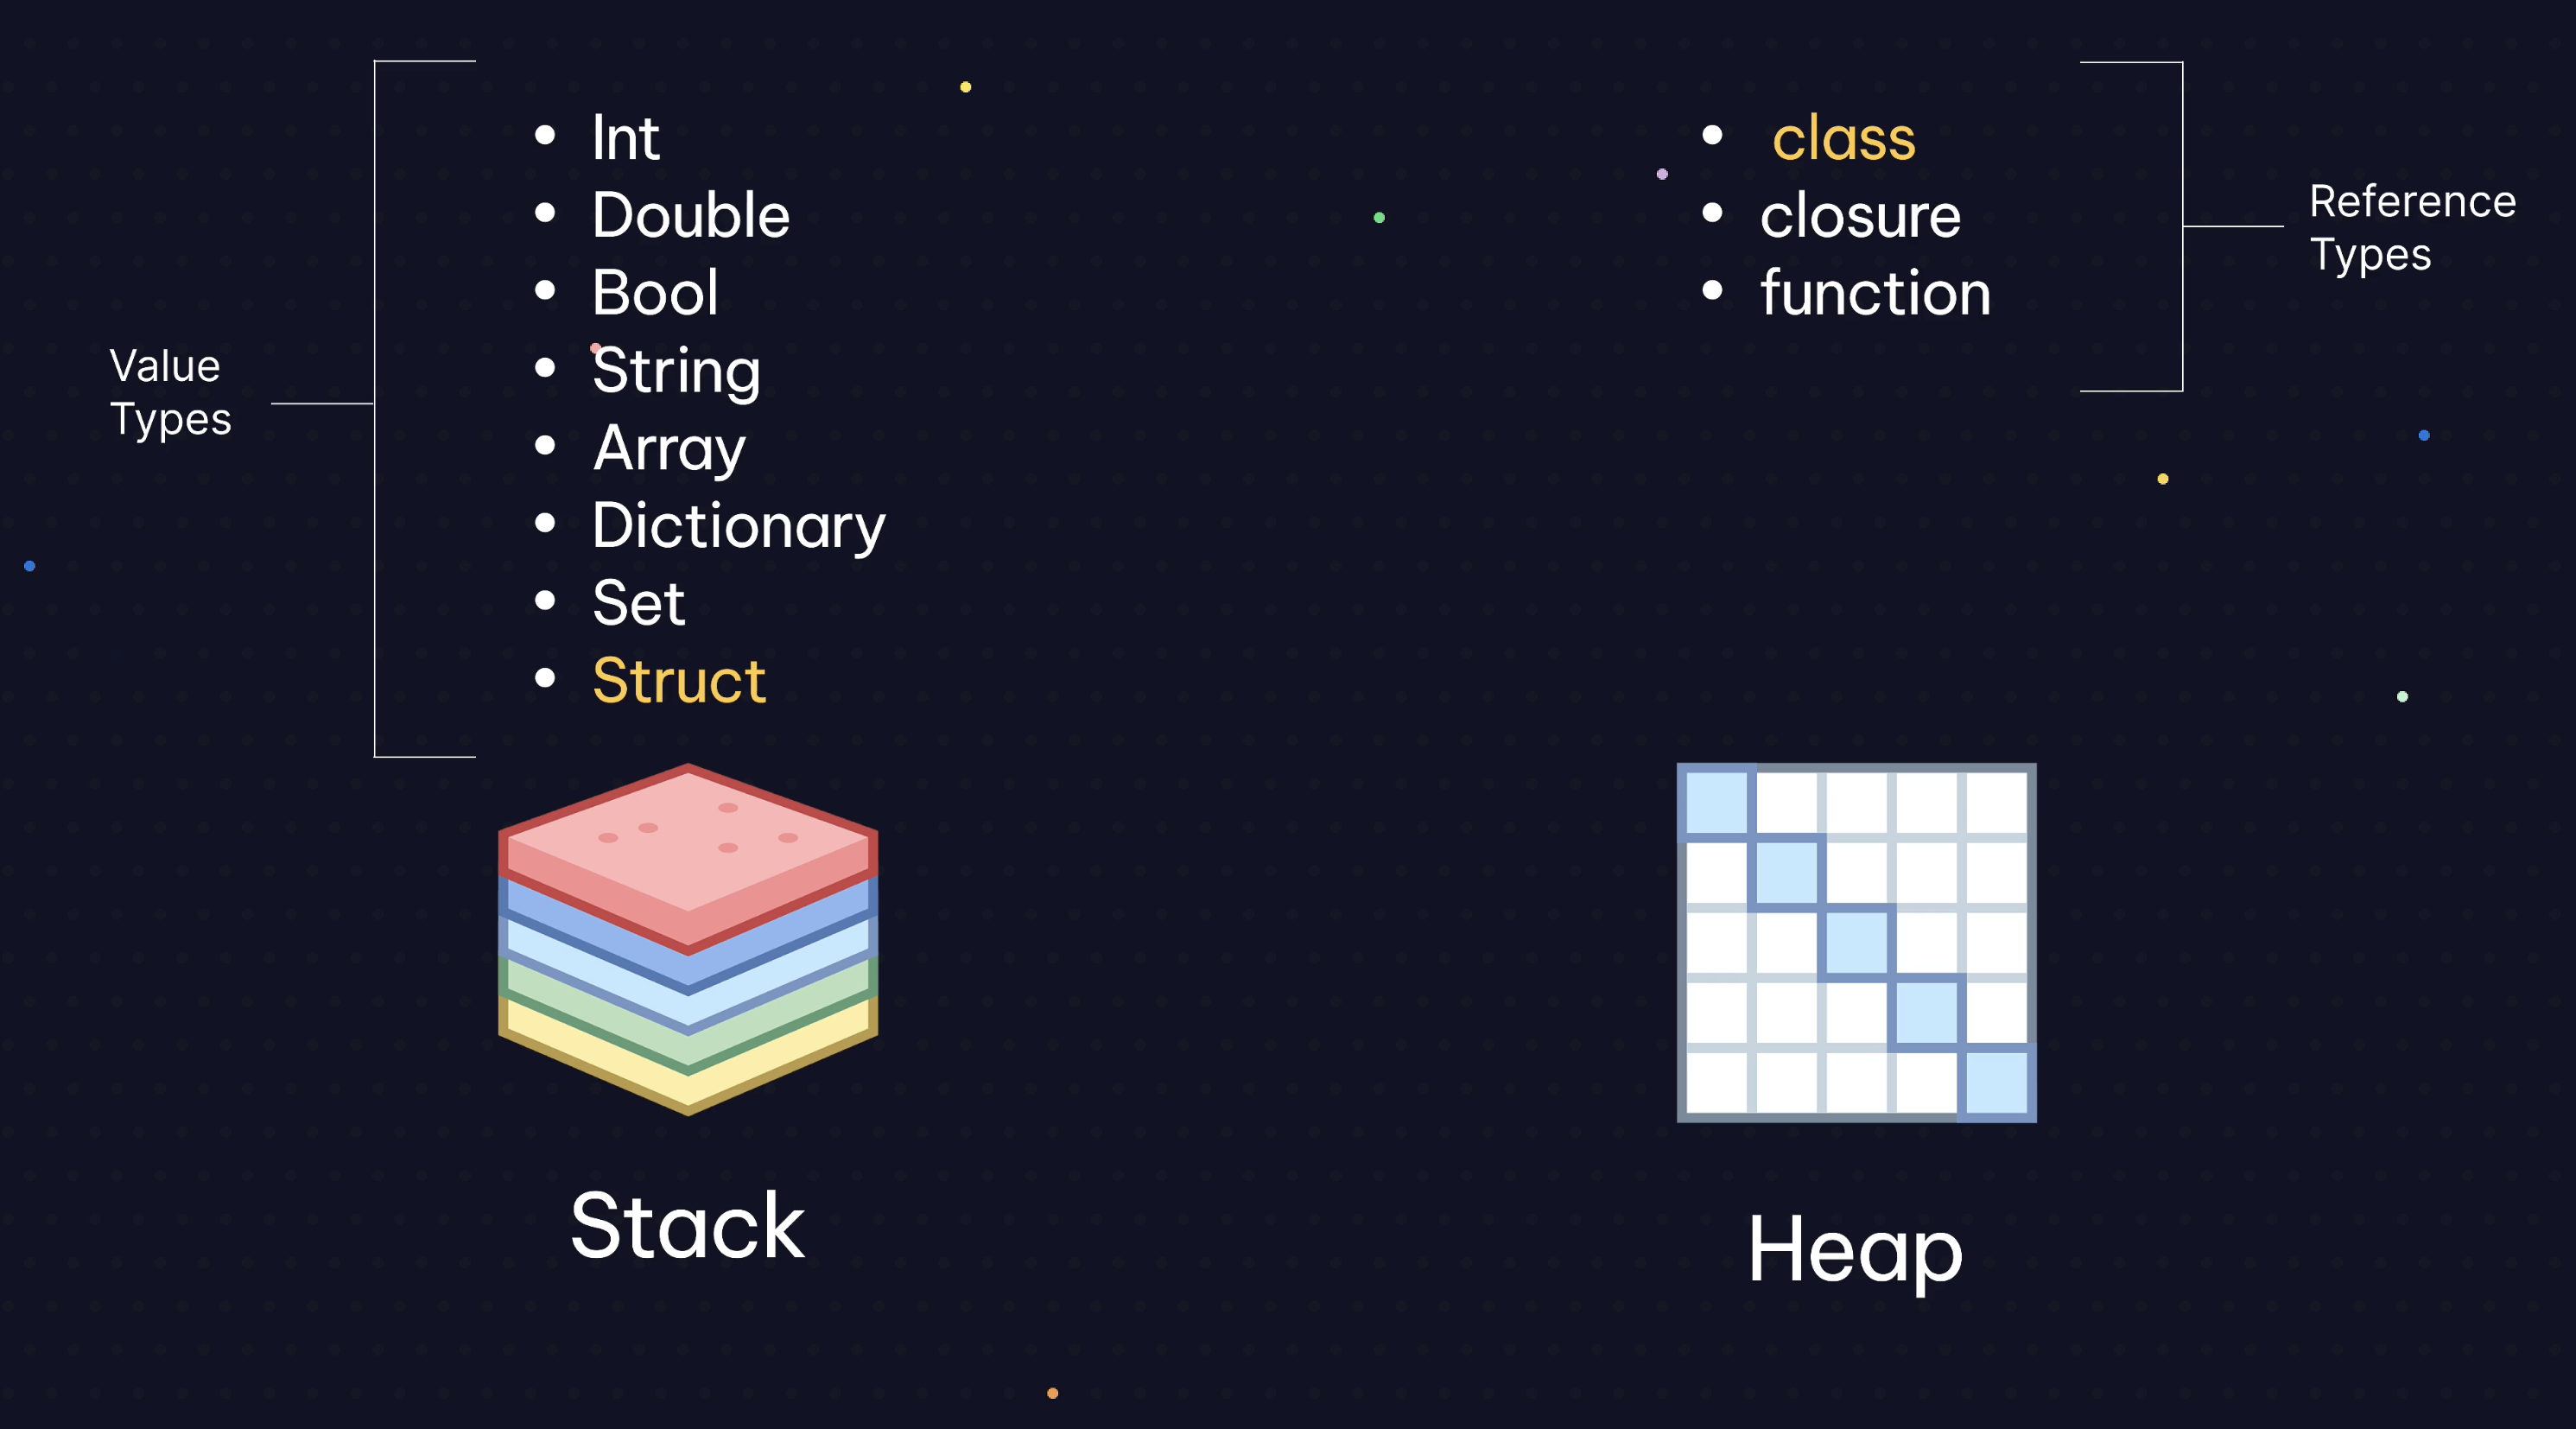
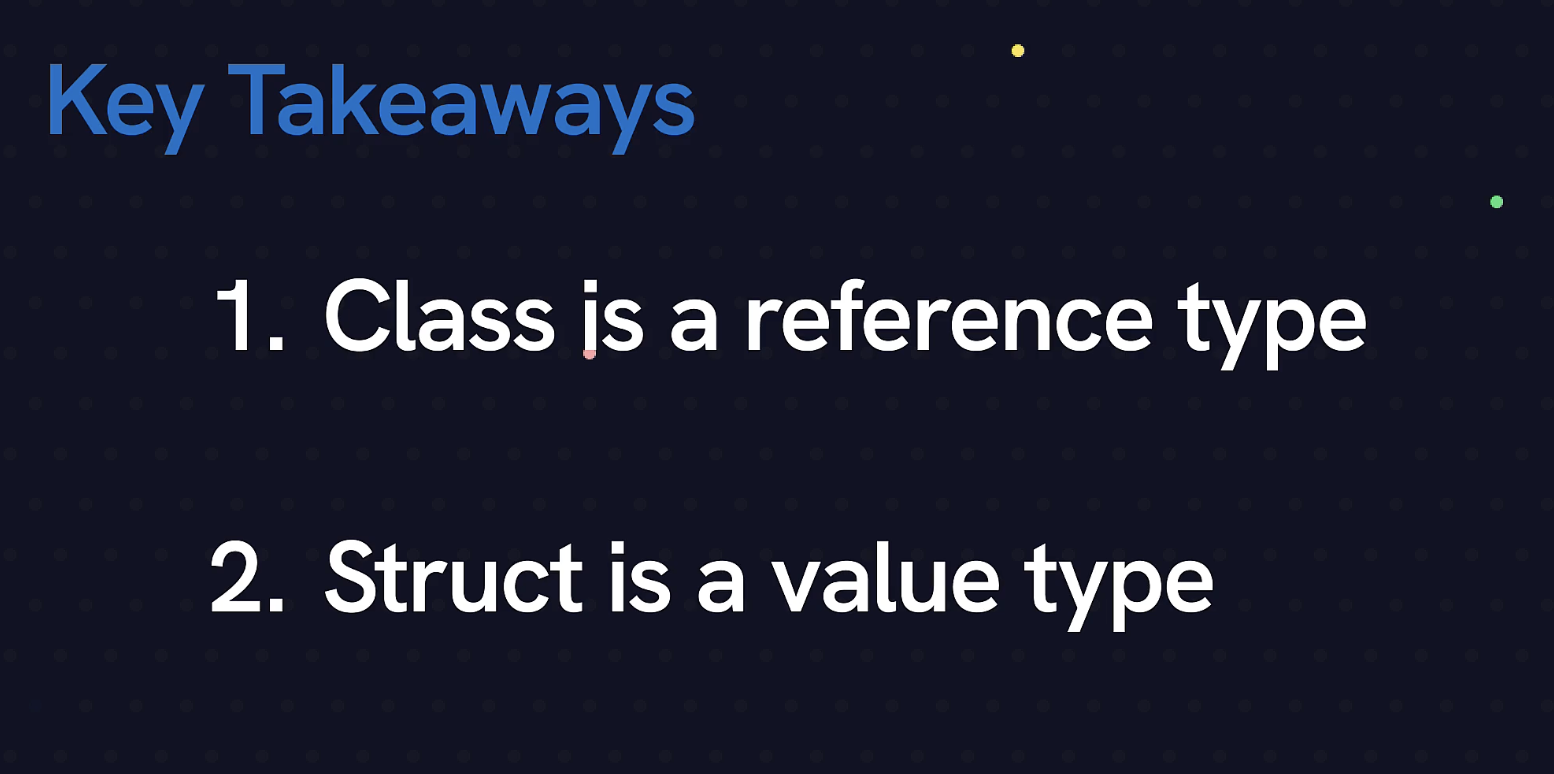
Lesson 02 - Swift Classes November 18, 2024 and Structures Part 1
-
Lesson 03 - Swift Classes and Structures Part 2
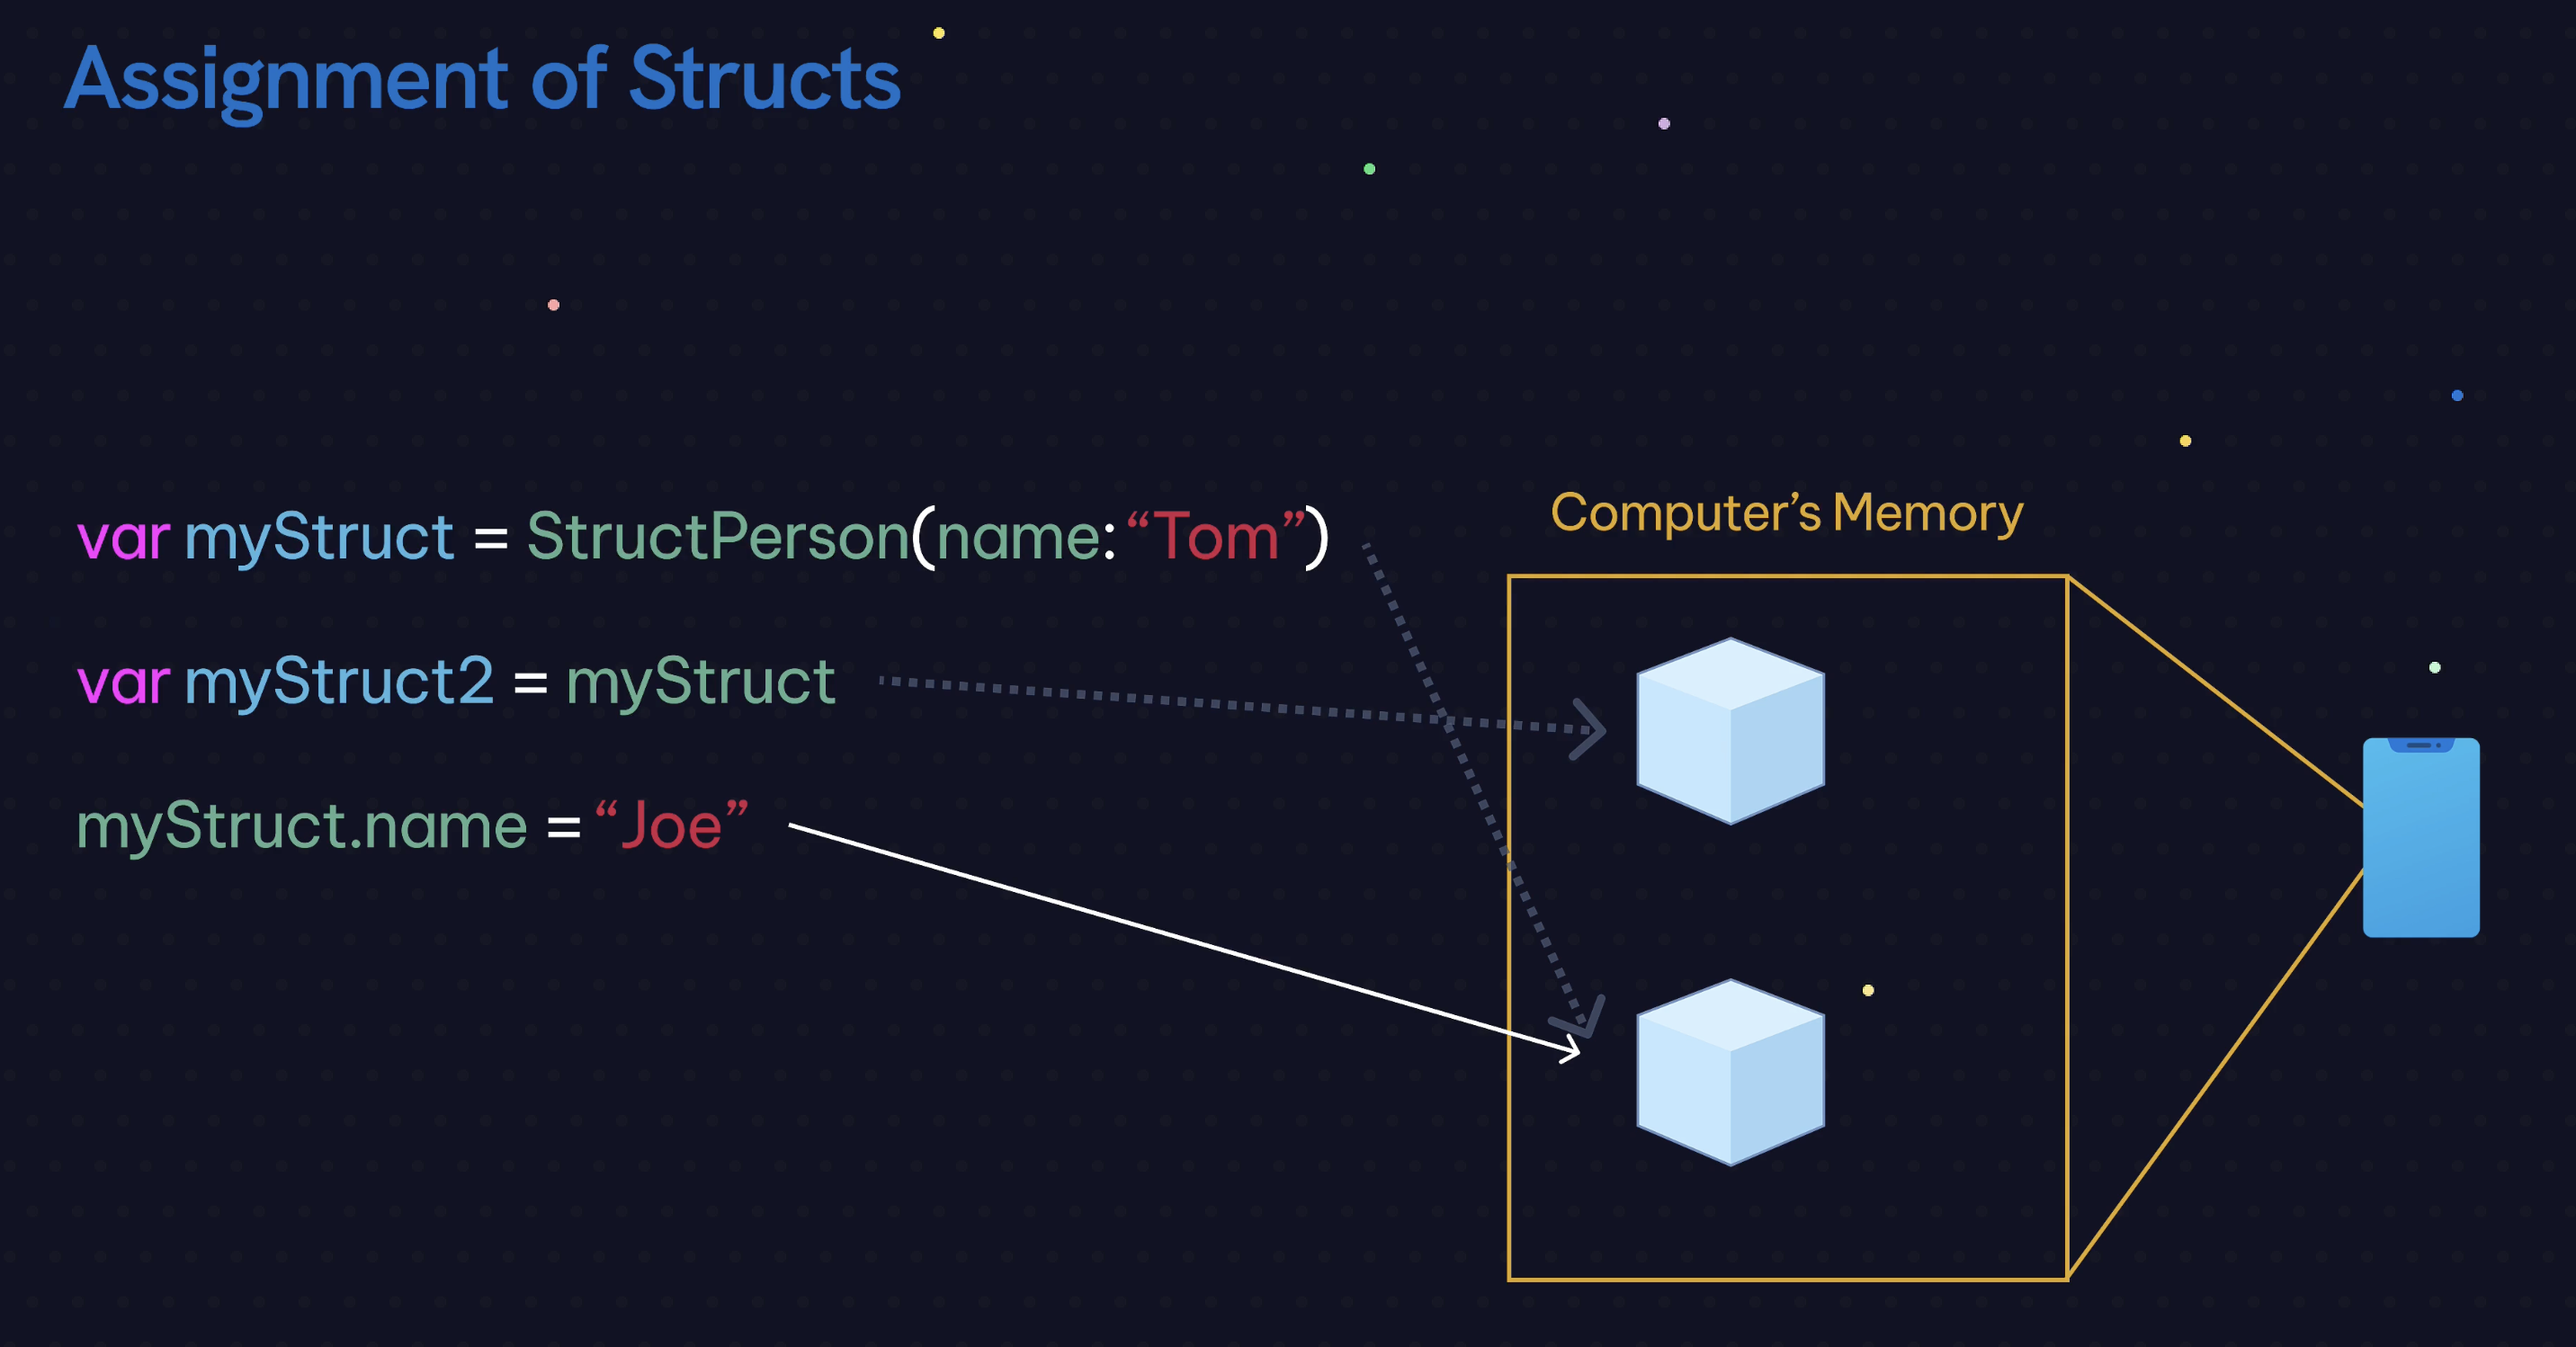
Verhalten von Structs:
creates copy and modifies copy
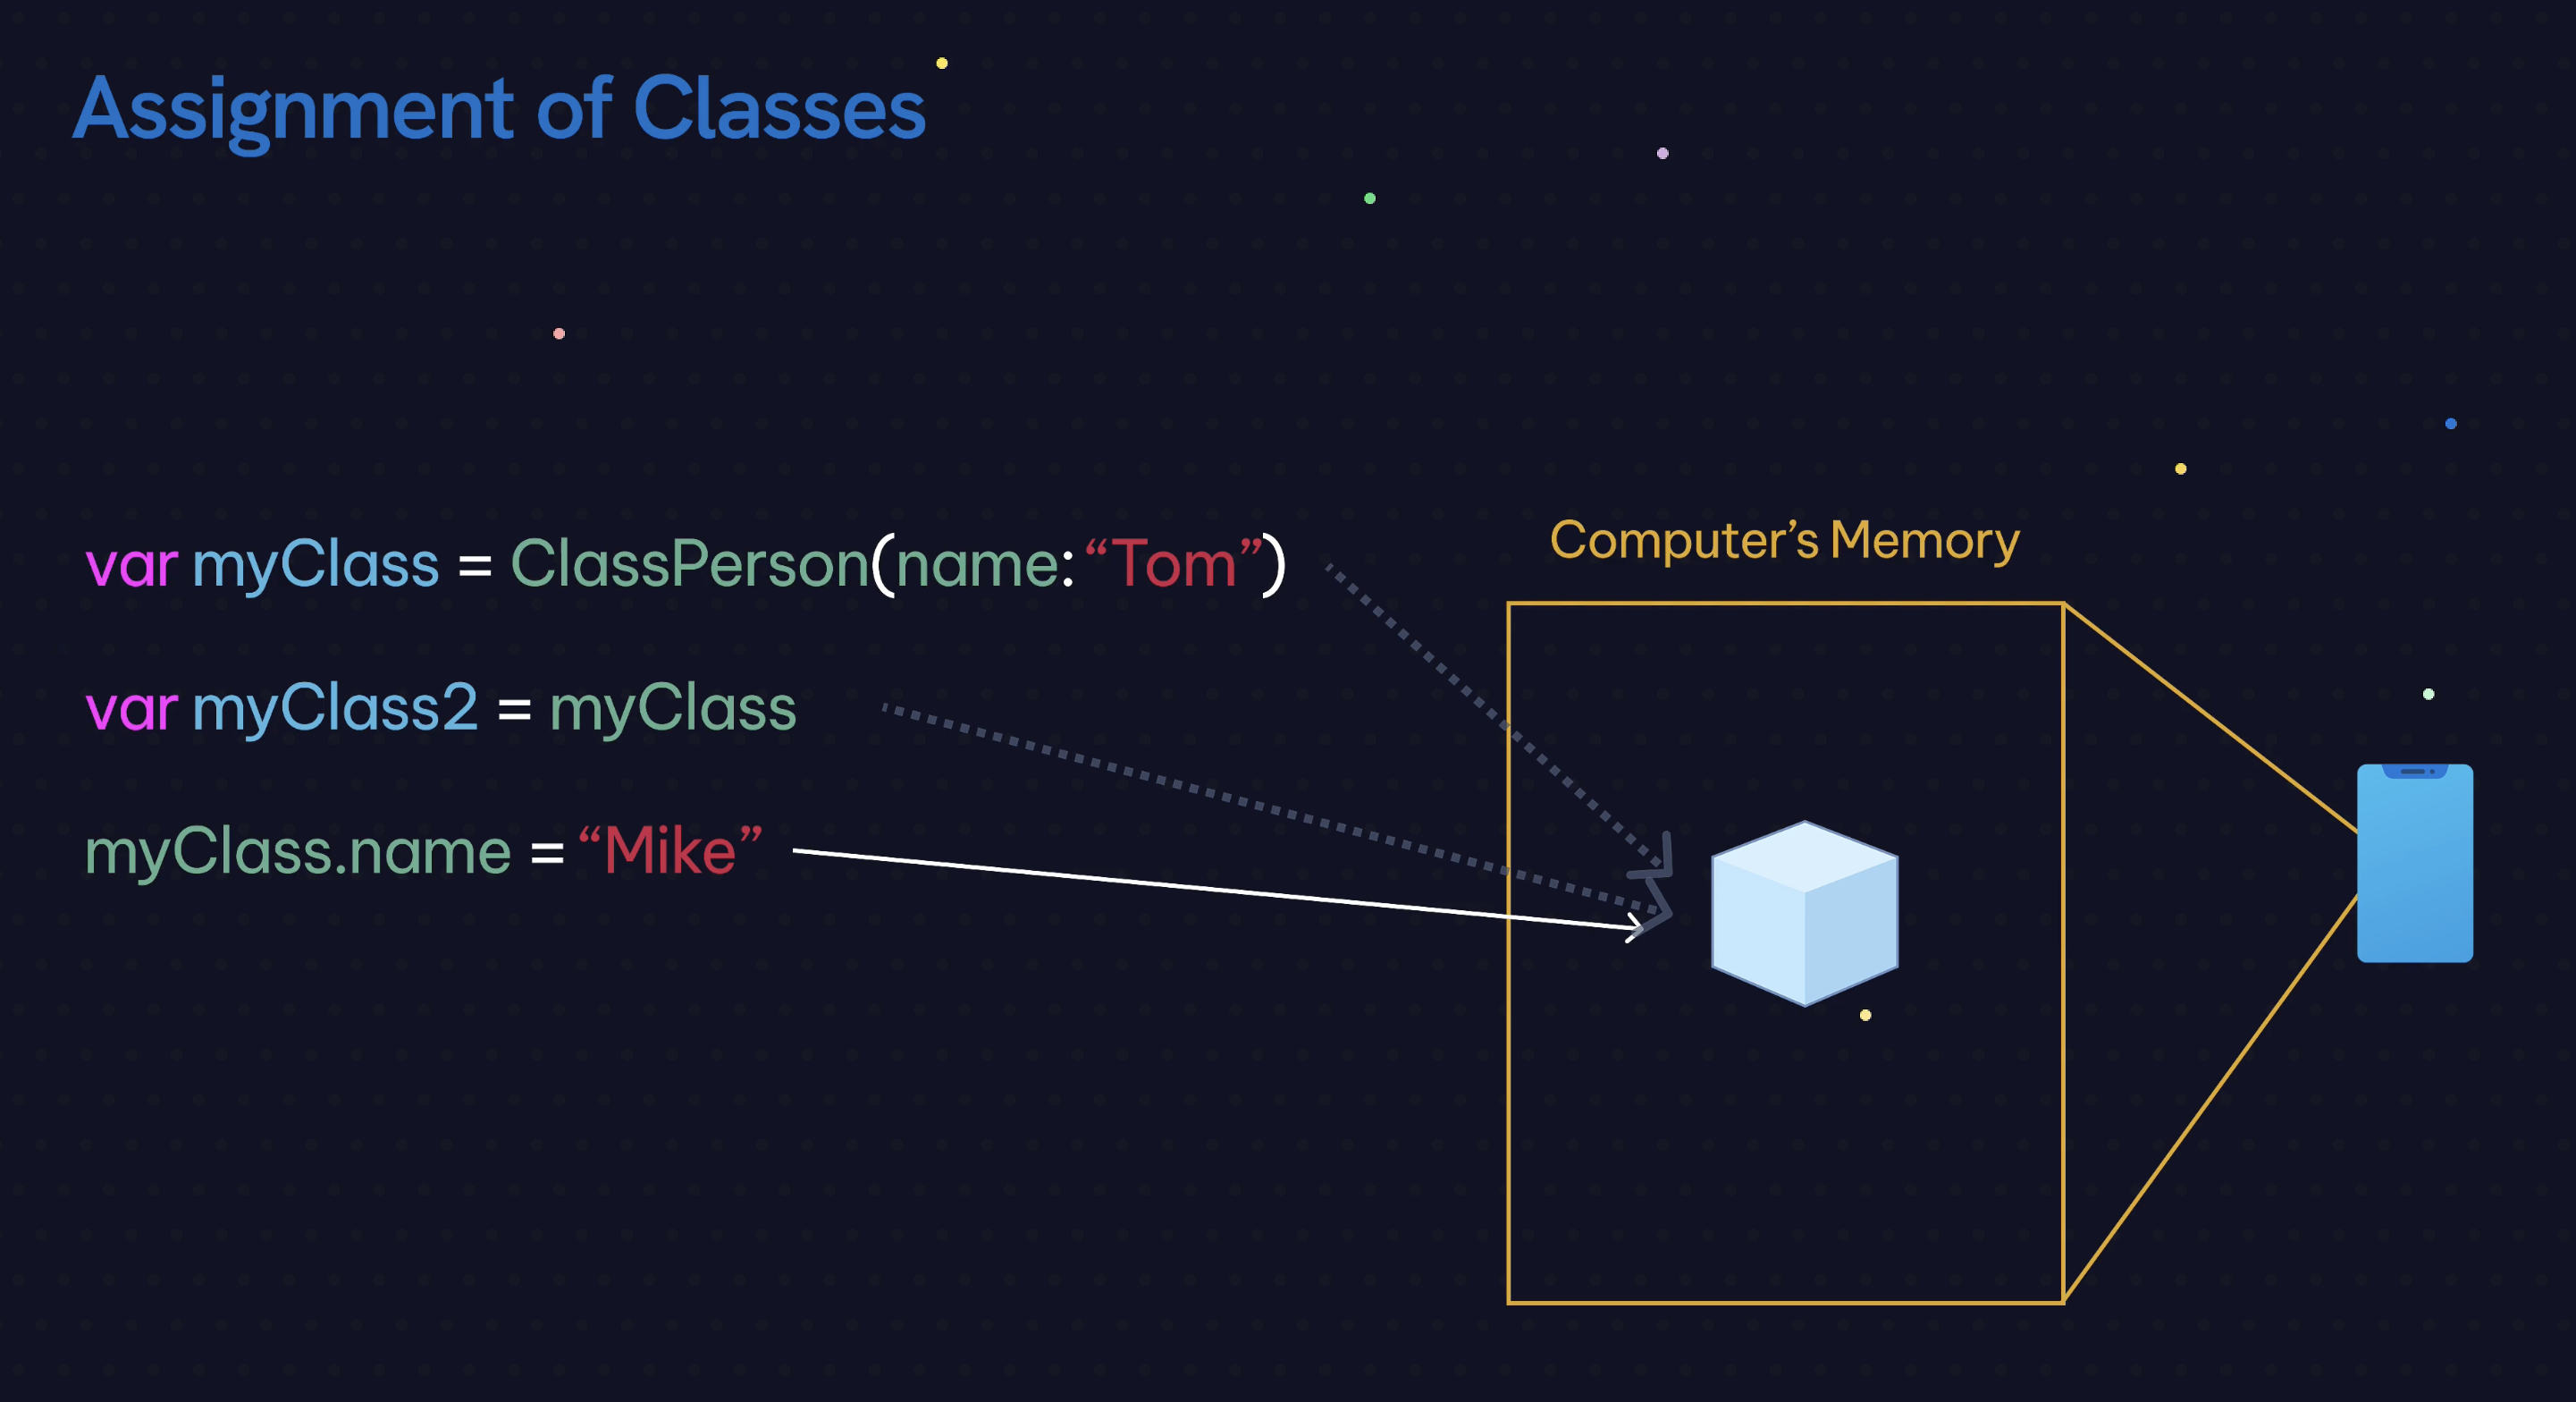
verhalten von class:
referenziert nur auf instance und erstellt keine copy. ändert werte der instance
Mutability:
// 2. Default initializers
struct StructPerson {
    var name: String
}

var struct1 = StructPerson(name: "Dominik")

class ClassPerson {
    var name: String

    init(name: String) {
        self.name = name
    }
}

var class1 = ClassPerson(name: "Dominik")

// 3. Assignment of Structs and Classes

var struct2 = struct1
struct1.name = "Mike" // Does this statement change struct2's name property?
print(struct2.name)

var class2 = class1
class1.name = "Mike" // Does this statement change class2's name property?
print(class2.name)


// 4. Mutability differences
let struct3 = StructPerson(name: "Sara")
let class3 = ClassPerson(name: "Sara")

//struct3 = StructPerson(name: "Jen")
//class3 = ClassPerson(name: "Jen")

struct3.name = "Jen"
class3.name = "Jen"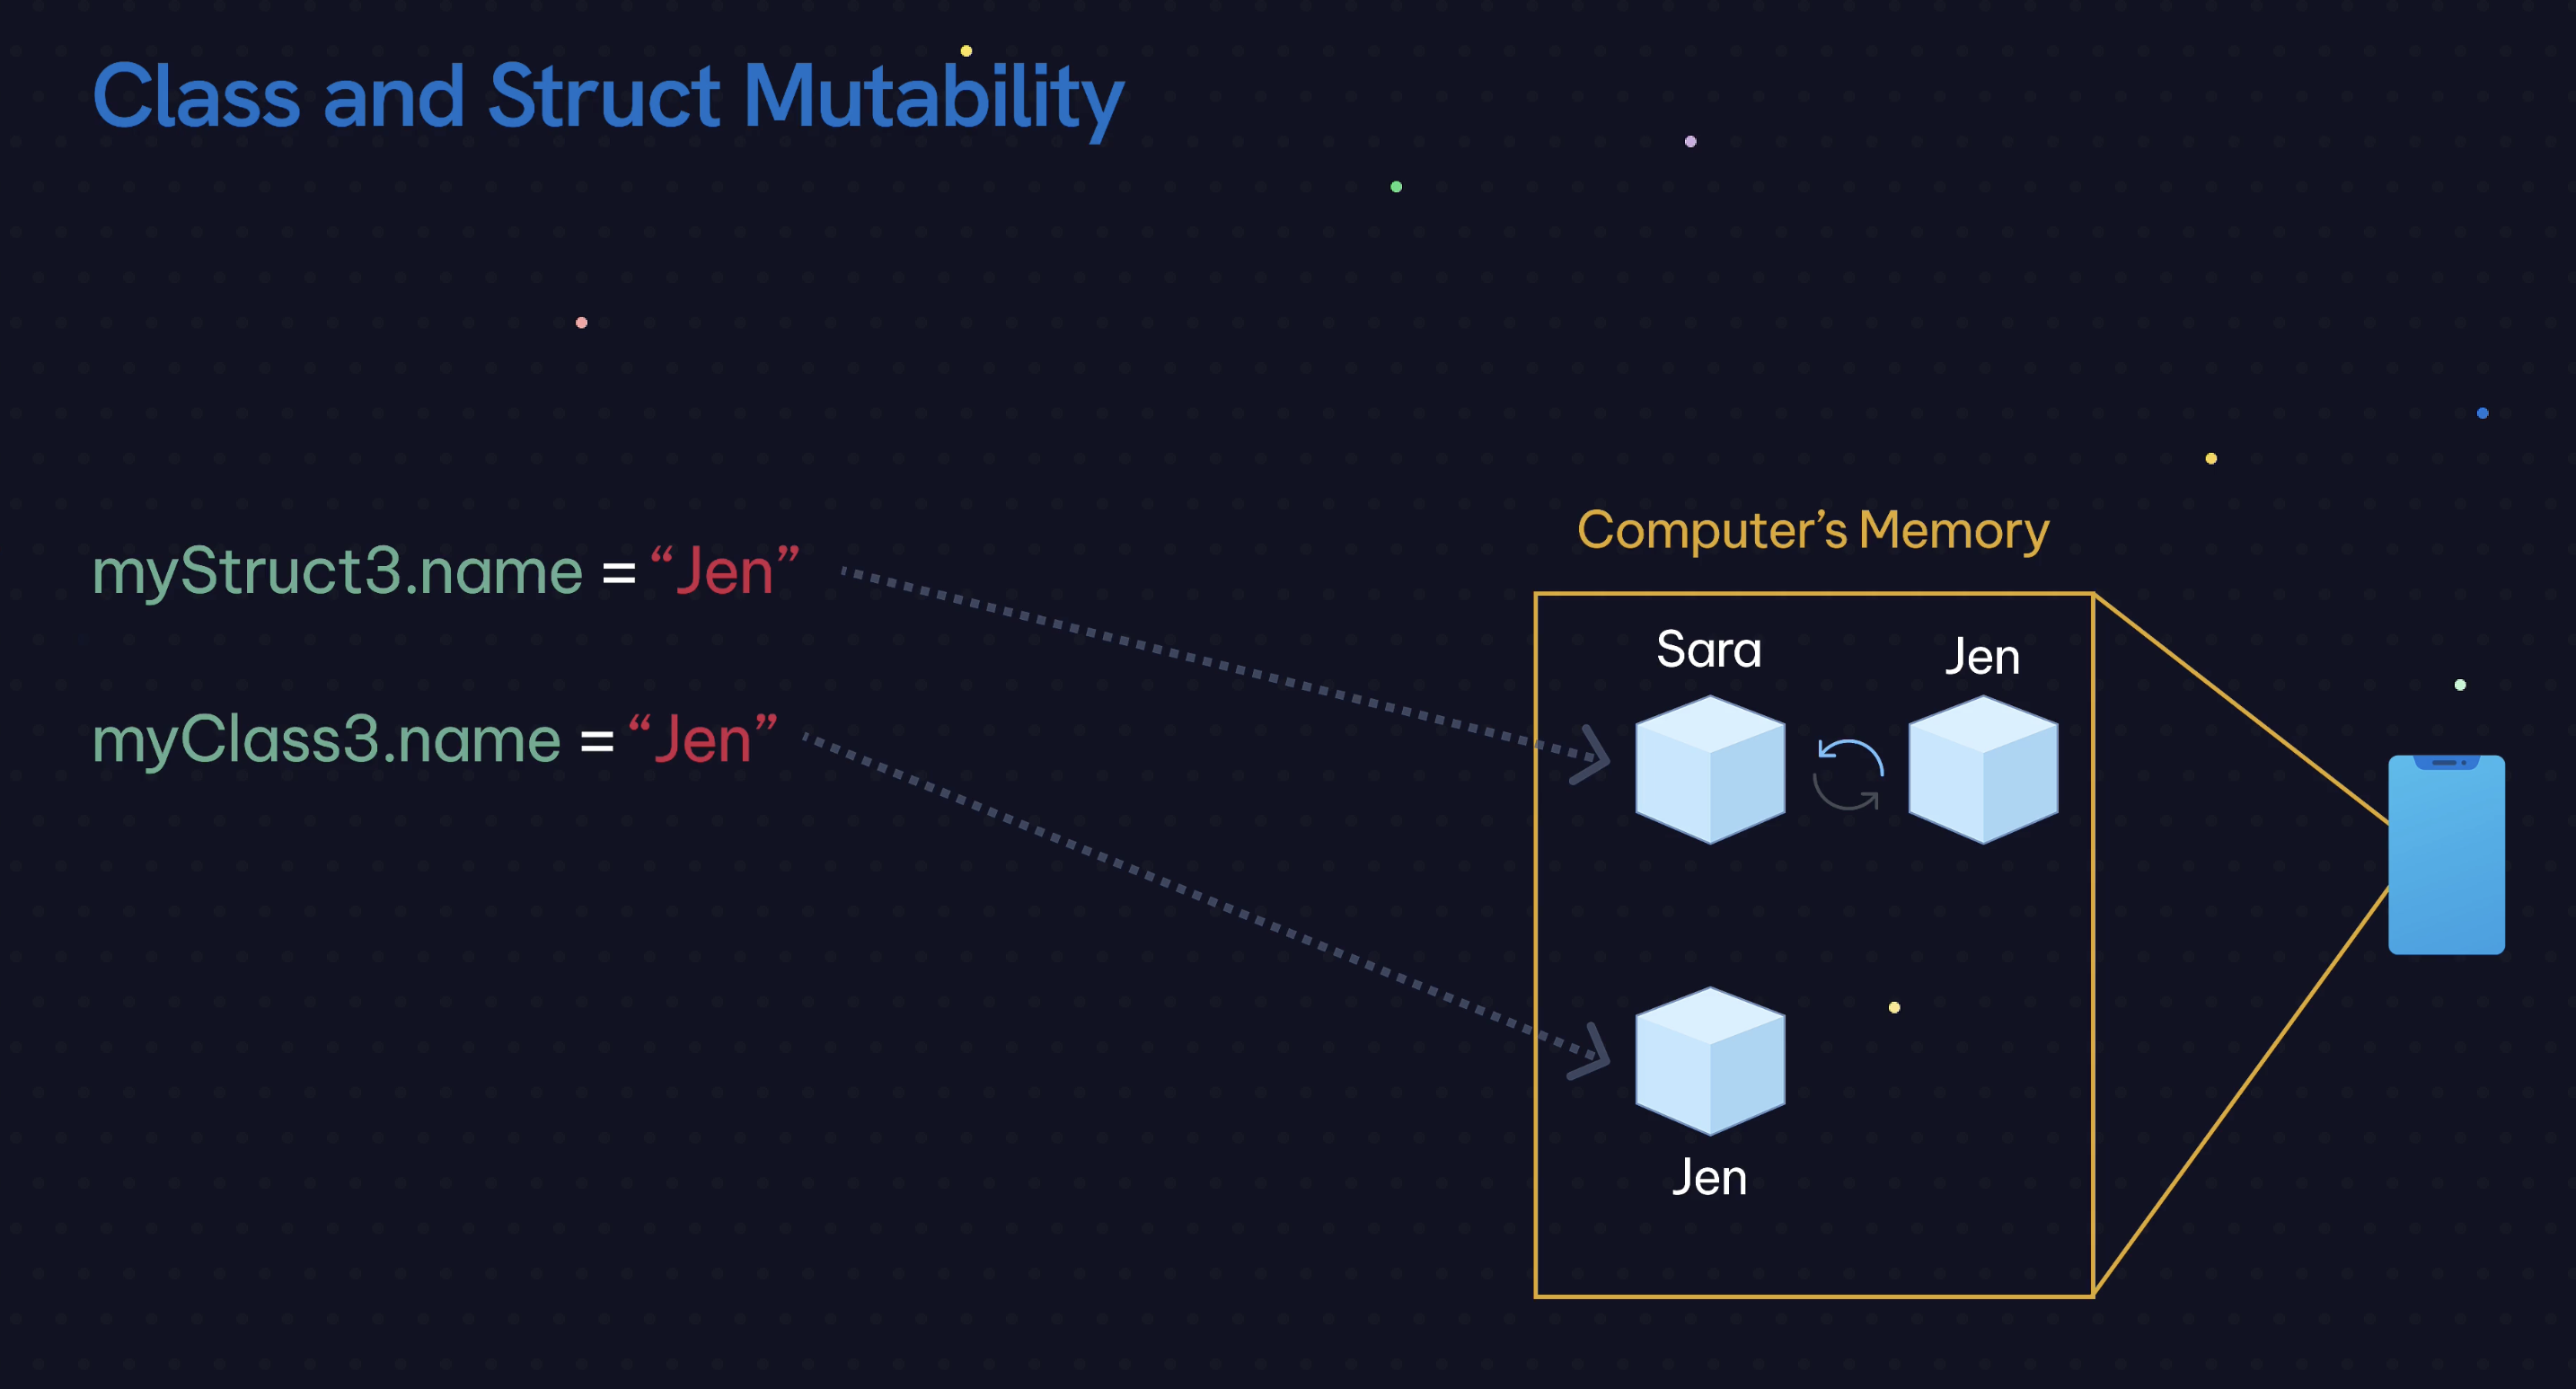
perform structs over classes because they perform less overhead
-
Lesson 04 - Swift Class Inheritance November 19, 2024
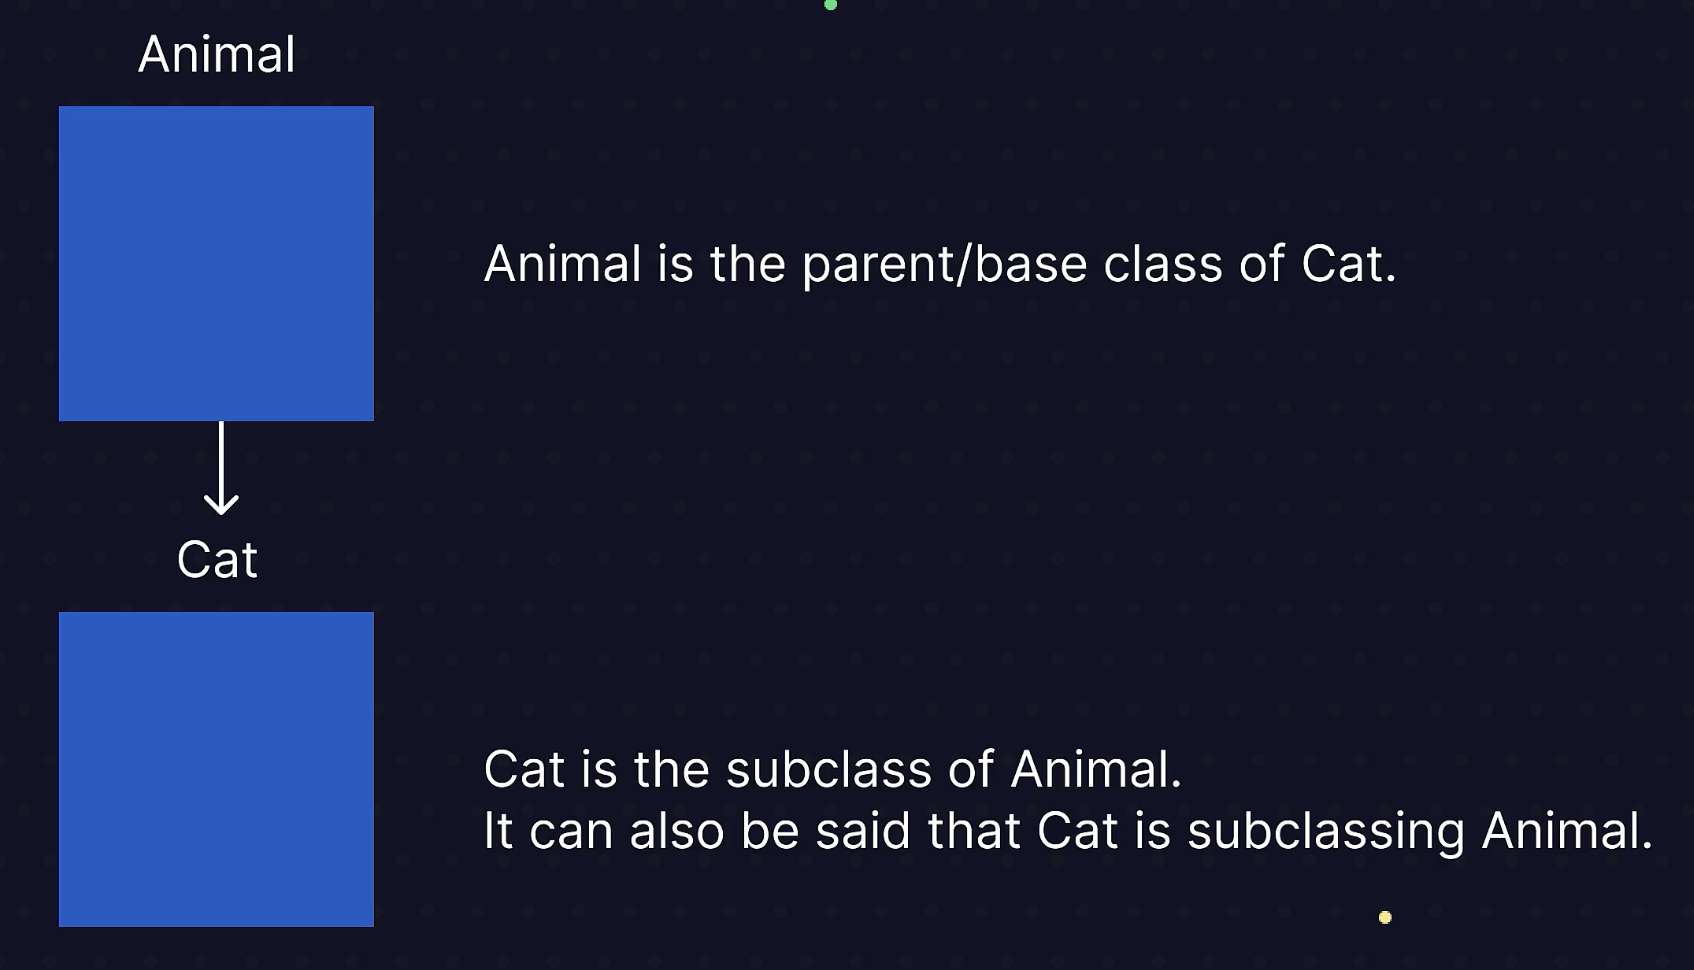
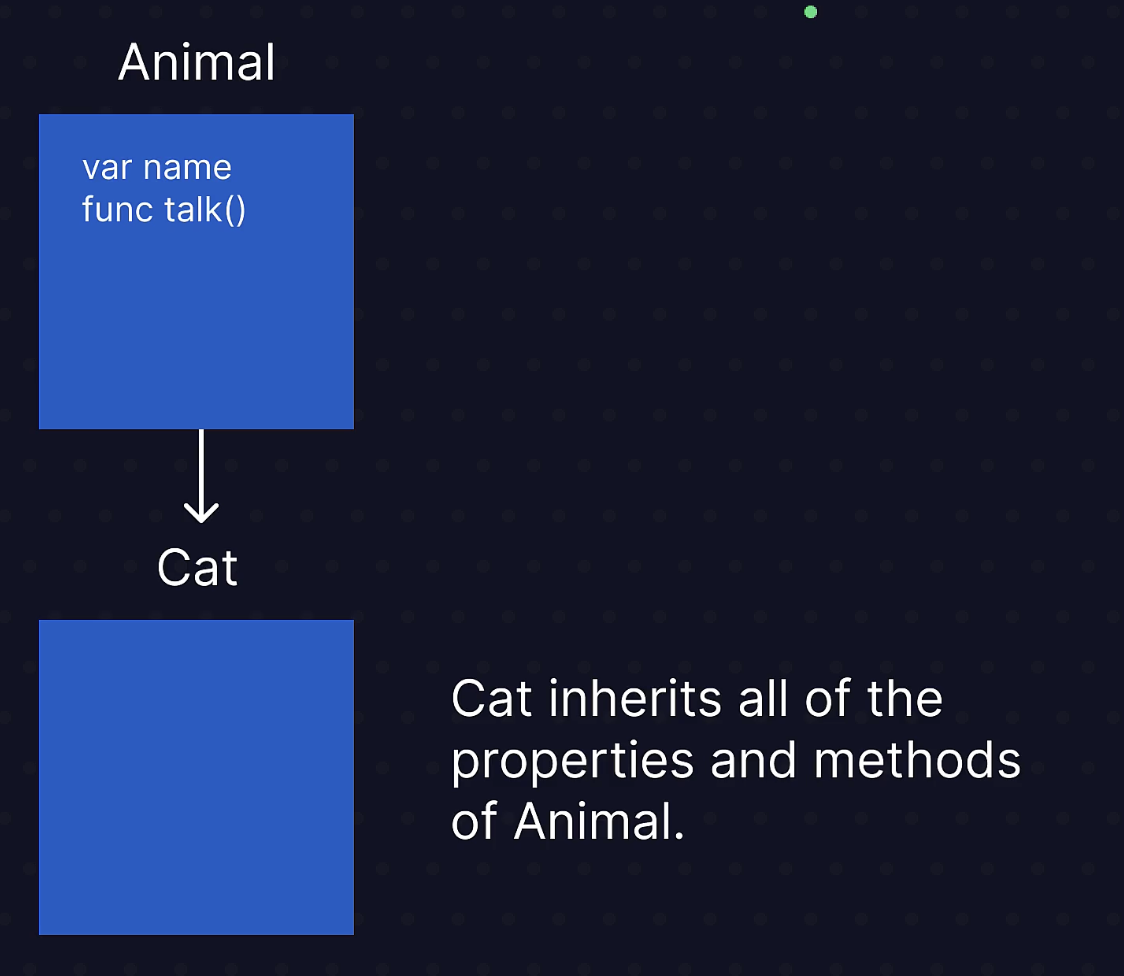
Syntax
class Animal {

		var name: String
		func talk() {
		print("woop"
		}
init(name: String) {
  self.name = name
		}
}

class Cat: Animal { //declaring Cat as subclass from animal

}

let c = Cat(name:"Bob")
print(c.name) // has accesss to property from class Animal
c.talk() // has accesss to method/function from class Animal
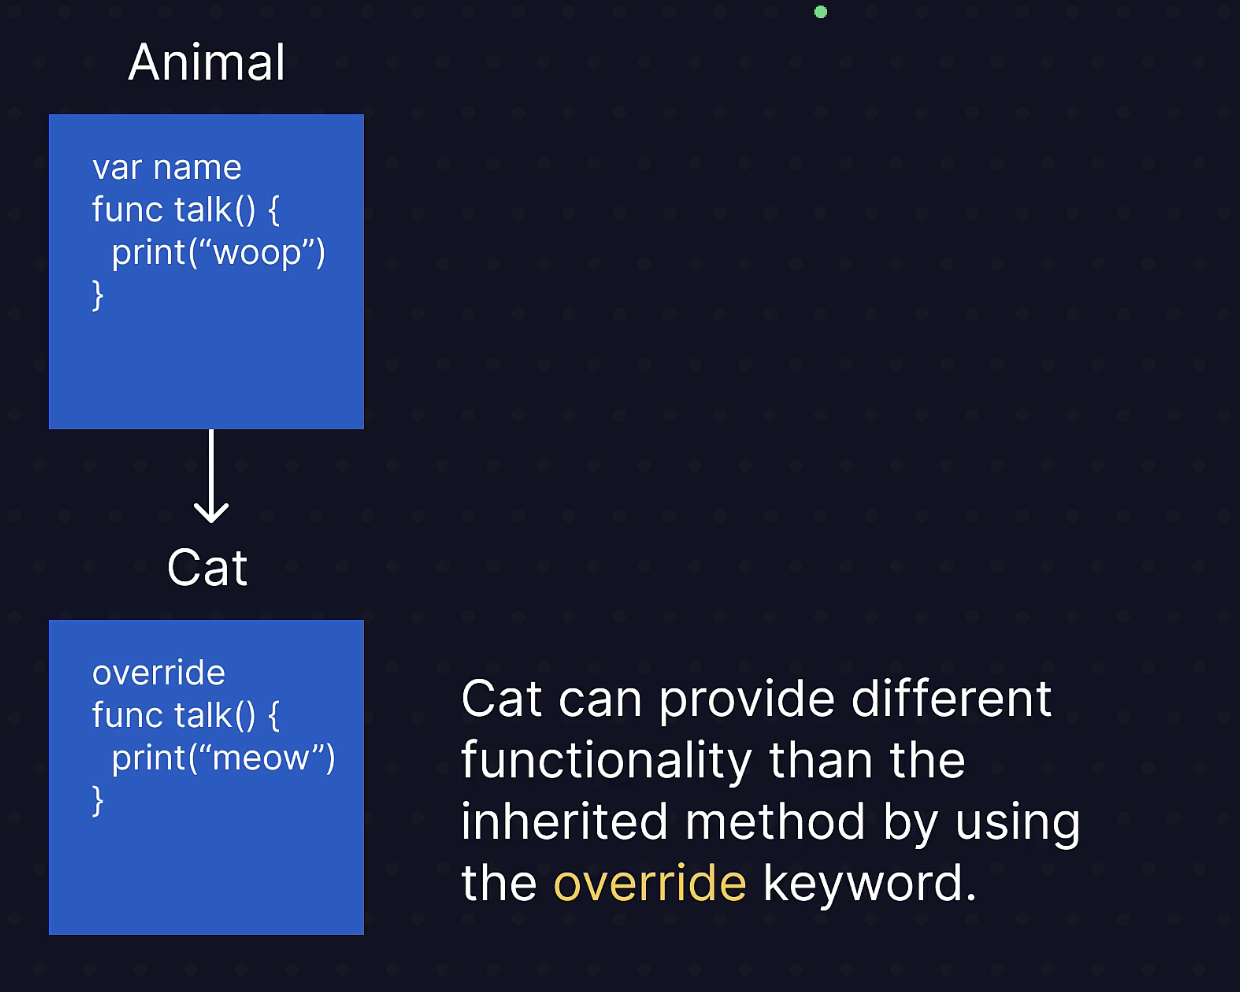
Overriding
class Cat: Animal { //declaring Cat as subclass from animal
 override func talk() { // overriding method from main class
   print("meow"
 }

}
Super
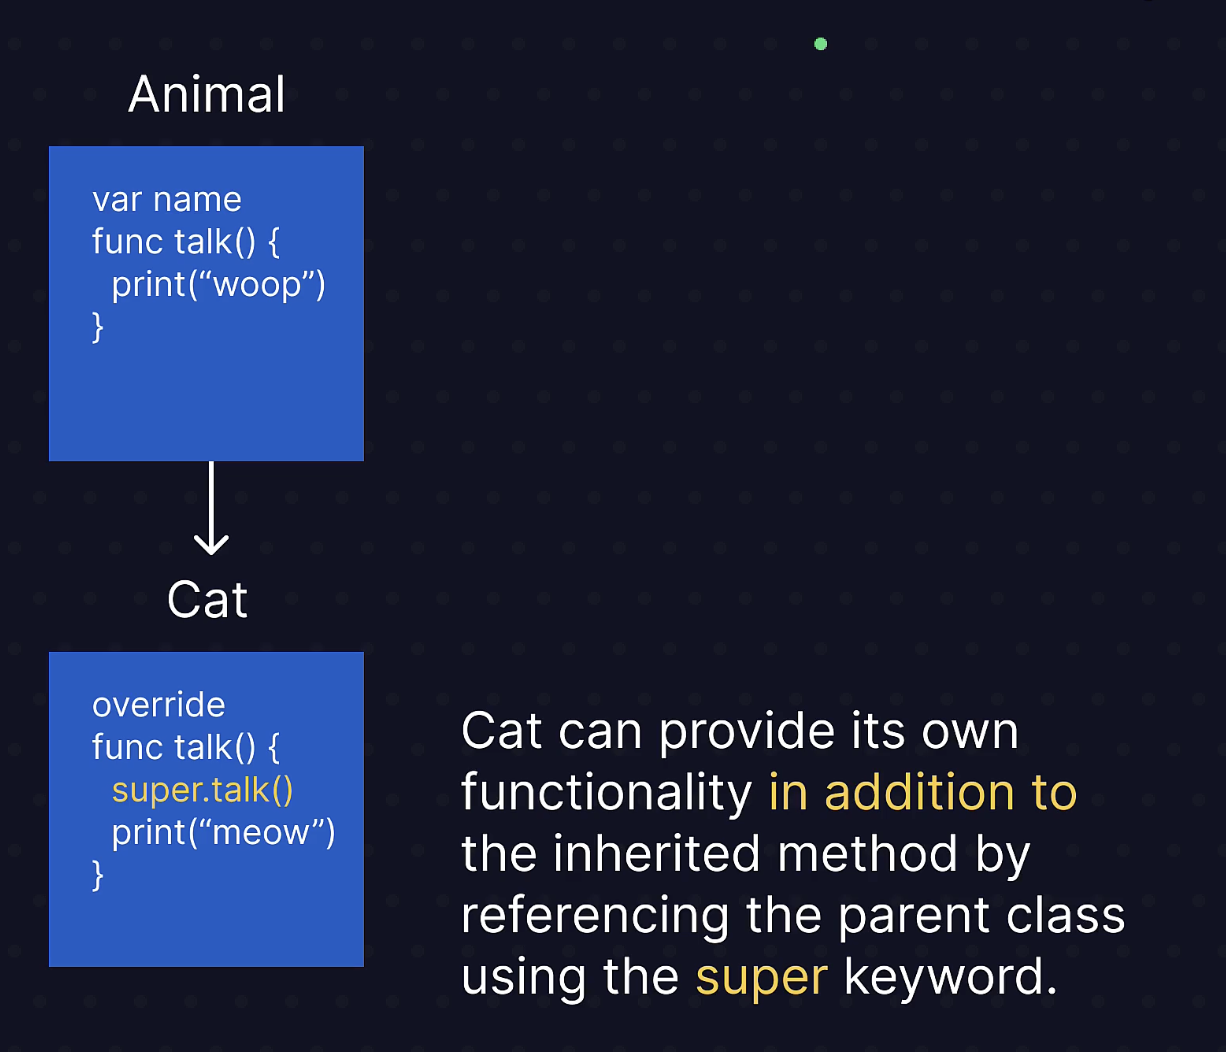
Polymorphism
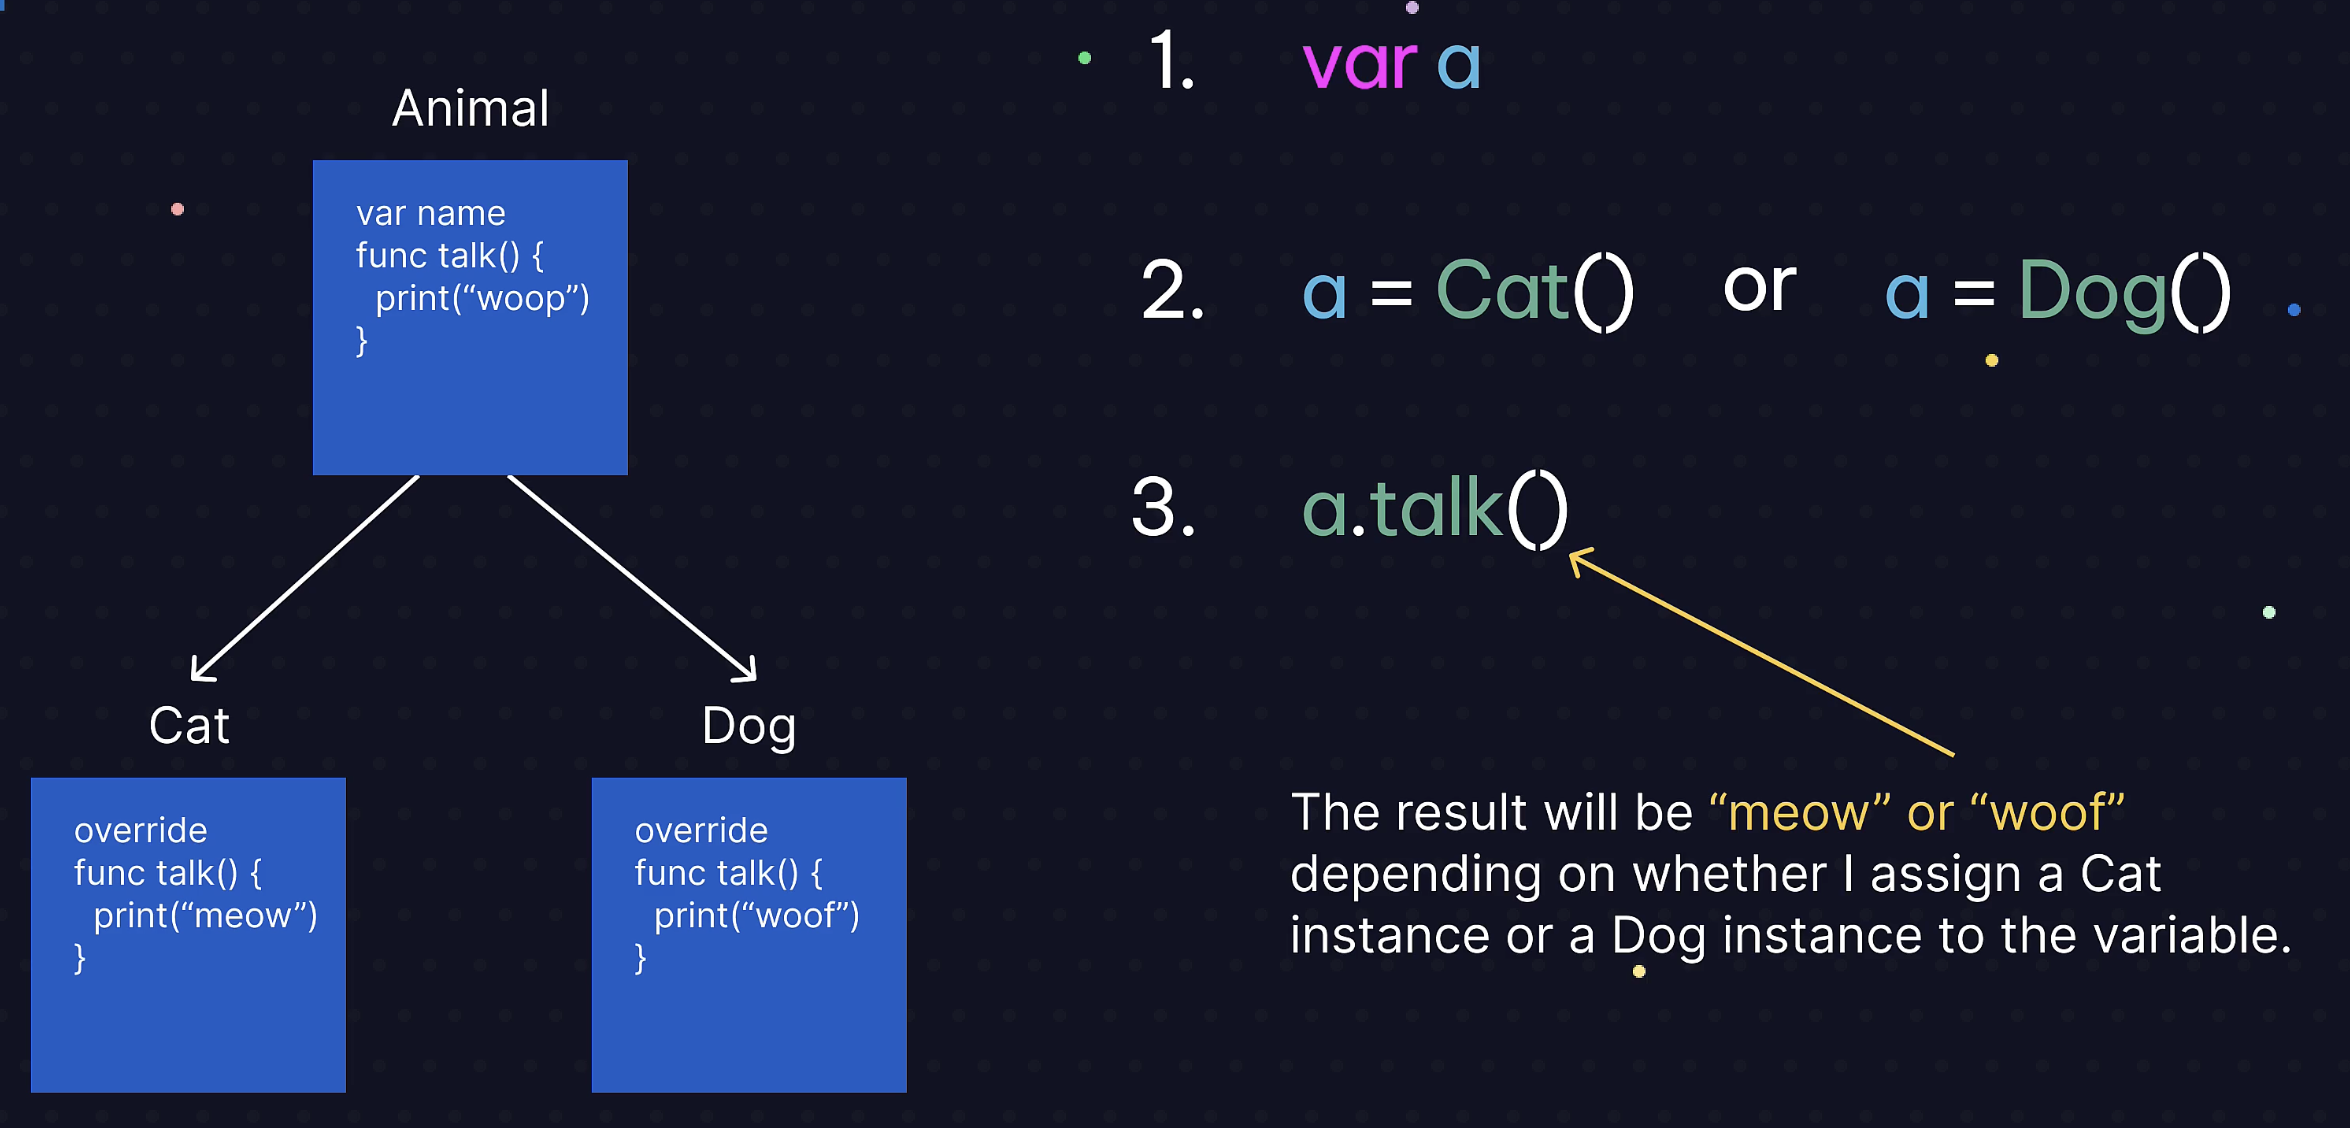
-
Lesson 05 - How to implement the Observaion pattern
Syntax Observable
@Observable // ohter views, where this class is instanced will
//notice when the value change
class ViewModel { //@Observable only works with classes
  var wordDb = ["Potato", "Cat", "Sunshin", "Raindrop"]
  var currentWord = "Cactus"


  func randomizeWord() { // randomizes word and puts into currentWord
		  currentWord = wordDb[Int.random(in: wordDb.indices)]
  }
}
Syntax Environment
@main
struct ObservationDemoApp: App {
	@State var viewModel = ViewModel()

	var body: some Scene {
		WindowGroup {
			ContentView()
				.environment(viewModel) // declaring it as an environmental
				// will make it available for all subvies of contentview

		}
	}
}
In the ContentView you need to get the reference by adding:
@Environment(ViewModel.self) var viewModel
-
Lesson 06 - Observation Pattern For City Sights
https://github.com/dmkeks1/CitySights-App/blob/main/CitySights%20App/BusinessModel.swift
Important
- observable class needs to be created in new file.
- needs to be set as environment property in app entry.
ContentView() .environment(model)-
needs to be declared as environment variable where it needs to appear
@Environment(BusinessModel.self) var model
-
Lesson 07 - SwiftUIMaps & Picker
Map
https://github.com/dmkeks1/CitySights-App/blob/main/CitySights%20App/MapView.swift
...
import MapKit //neede for map funcitonality

...

Map() //creates map
...
Picker
https://github.com/dmkeks1/CitySights-App/blob/main/CitySights%20App/HomeView.swift
Picker("", selection: $selectedTab) {
                Text("List")
                    .tag(0) //legt reihenfolge fest

                Text("Map")
                    .tag(1) //legt reihenfolge fest
            }
            .pickerStyle(SegmentedPickerStyle()) // ändert den style
            // siehe screenshot
-
Challenge Crypto Coin November 30, 2024
Module 4 - Building more App Features
-
Lesson 01 - Map Markers
https://github.com/dmkeks1/CitySights-App
Map Markers
To use Map markers we use Markers(). In this example we can go through our businesses with a foreach and iterate through every entry and display all the markers on the map:
Map() {
            ForEach(model.businesses, id: \.id) { b in
                Marker(b.name ?? "Restaurant", coordinate: CLLocationCoordinate2D(latitude: b.coordinates?.latitude ?? 0, longitude: b.coordinates?.longitude ?? 0))
            }
Marker Selection
To select a marker we have to set a tag with a unique ID for the selected item.
Also we need to create a @State var to recognize changes
@State var selectedBusinessId: String?

Map()
...

.tag(b.id ?? "None") //sets to None if is nil
...

.onChange(of: selectedBusinessId) {
...
}
Displaying Business Details
.onChange(of: selectedBusinessId) { oldValue, newValue in // Find matching business // get the first business where this is true and assign in to the constance let business = model.businesses.first { business in business.id == selectedBusinessId } // if business is foujnd set it as selected one if business != nil { model.selectedBusiness = business! } -
Lesson 02 - Onboarding View
https://github.com/dmkeks1/CitySights-App
To create an onboarding view we can use a tabview with a special modifier and set the entry point to this view:
TabView { // CODE } .tabViewStyle(.page) //in app entry point file: .fullScreenCover(isPresented: Binding.constant(true)) { //TODO on dismiss } content: { OnboardingView() } -
Lesson 03 - Saving Data with AppStorage
https://github.com/dmkeks1/CitySights-App
Dismiss Onboarding
There is an environment functionality for dismissing screens:
@Environment(\.dismiss) var dismiss


//where we want to dismiss we need to call the dismiss function
...
dismiss()
Also in the app entry we need to have a “switch” to change the ispresented
...
@State var needsOnboarding = true
...
.fullScreenCover(isPresented: $needsOnboarding) {
                    needsOnboarding = false
                } content: {
                    OnboardingView()
                }
App Storage
@AppStorage("onboarding") var needsOnboarding = trueonboarding is the key which is used to store the data on the device
if in property
Circle() .frame(width: 10) .foregroundStyle(selectedViewIndex == 1 ? .white : .gray) // if condition in a property -
Lesson 04 - Location the User with CoreLocation
CLLocationManager delegate protocol
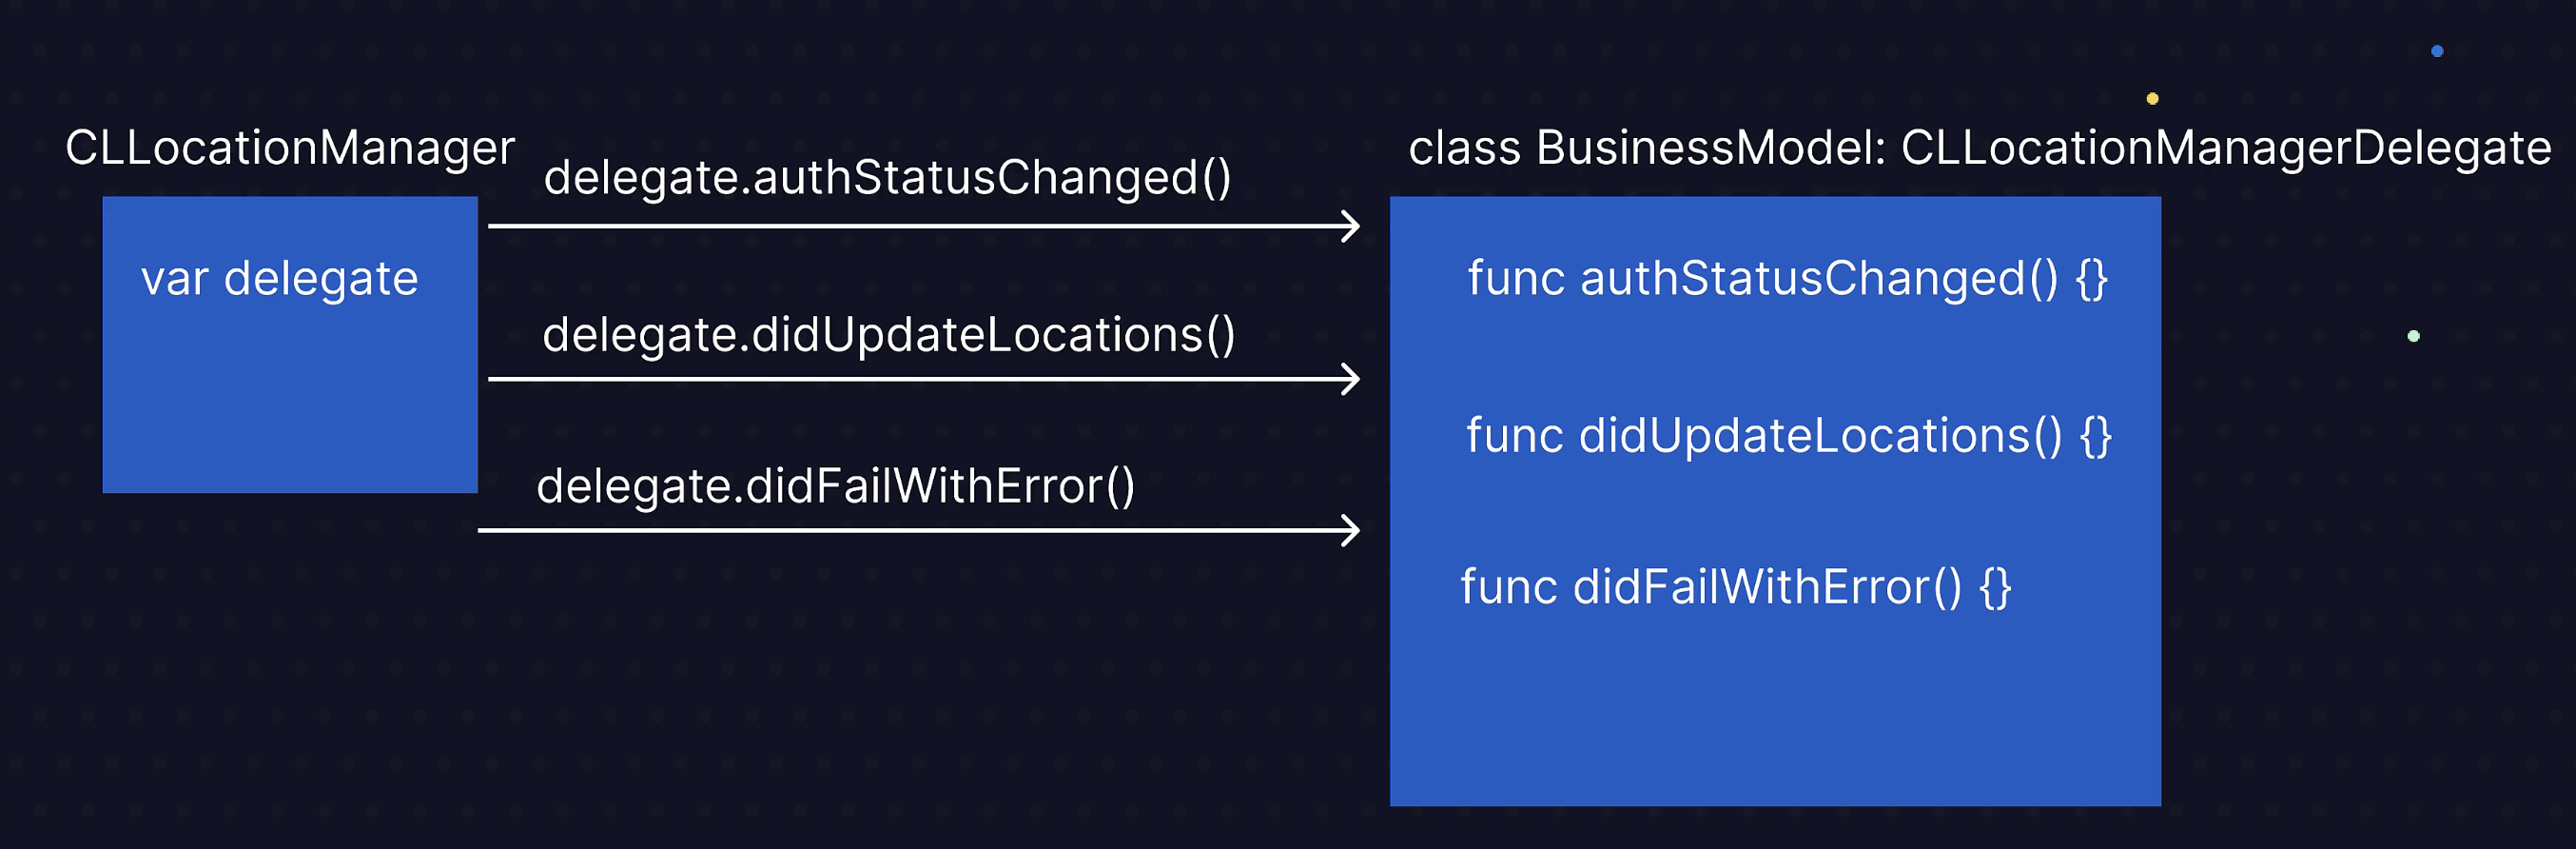
To ask for permissions for location services:
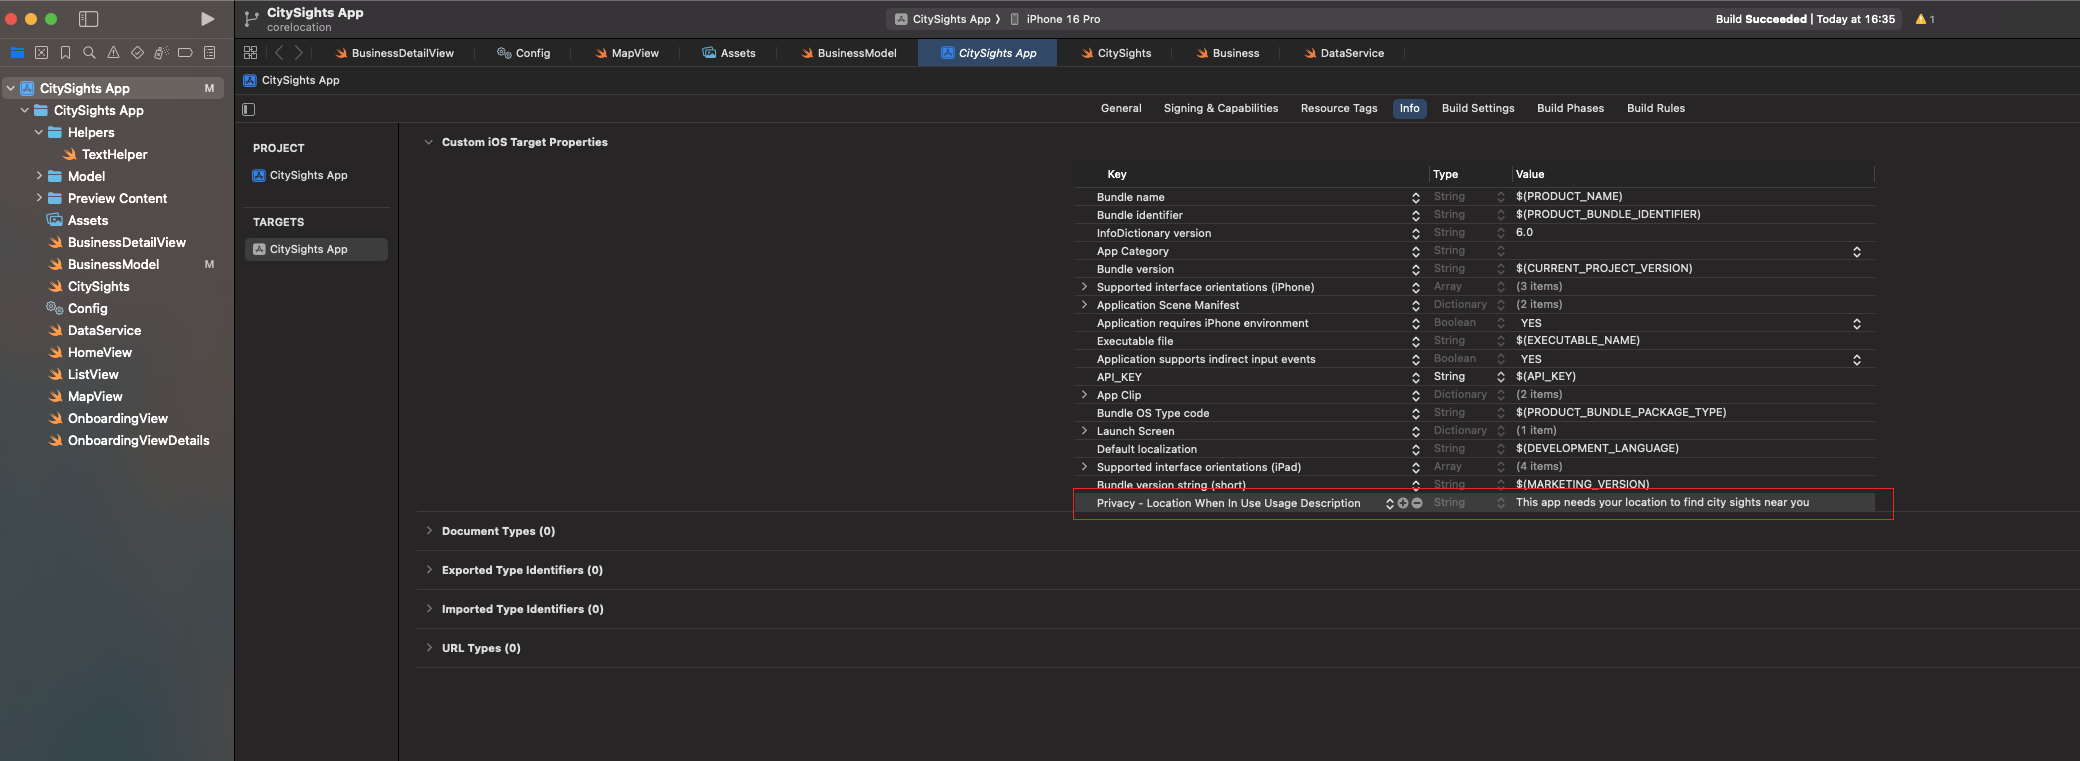
 func getUserLocation() {
        // Check if we have permission

        if locationManager.authorizationStatus == .authorizedWhenInUse {
            locationManager.requestLocation()
        }
        else {
        // requests permission
            locationManager.requestWhenInUseAuthorization()
        }

    }
we need to set something (class) as a location manger, see
Info
-
Lesson 06 - Downloading Images
see:
https://github.com/dmkeks1/CitySights-App/blob/main/CitySights%20App/ListView.swift
if let imageUrl = b.imageUrl {
                            // Display the business image
                            AsyncImage(url: URL(string: imageUrl)!) { image in
                                image
                                    .resizable()
                                    .frame(width:50, height:50)
                                    .scaledToFill()
                                    .clipShape(RoundedRectangle(cornerRadius: 6))
                                    .padding(.trailing, 16)
                            } placeholder: {
                                ProgressView()
                                    .frame(width: 50, height: 50)
                            }

                        }
                        else {
                            Image("list-placeholder-image")
                                .padding(.trailing, 16)
                        }
to cache images:
-
Lesson 07 - Enhancing the Yelp Query
https://github.com/dmkeks1/CitySights-App/tree/main
.focused($queryBoxFocus) // only shows when textbox is focused -
Lesson 08 - Launching other Apps URLSchemes
https://github.com/dmkeks1/CitySights-App
if let url = URL(string:"tel:\(business?.phone ?? "")") {
                        Link(destination: url) {
                            Text(business?.phone ?? "")
                        }
                    }
                    else {
                        Text(business?.phone ?? "")
                    }
Settings APp:
if model.locationAuthStatus == .denied {
                Text("Please allow location services for this app to see sights near you")
                    .padding(.horizontal)
                Button {
                    if let url = URL(string: UIApplication.openSettingsURLString) {
                        UIApplication.shared.open(url)
                    }
                } label: {
                    Text("Open Privacy Settings")
                }
                .buttonStyle(.bordered)

            }
iOS Databases and Basic Figma December 2, 2024
https://www.dropbox.com/scl/fo/0y5bxp06mvnoysq8cyfjd/h?rlkey=zlhlx0iqp3ihg519kg39evl9m&dl=0
-
Lesson 01 - Databases Overview
Local Database
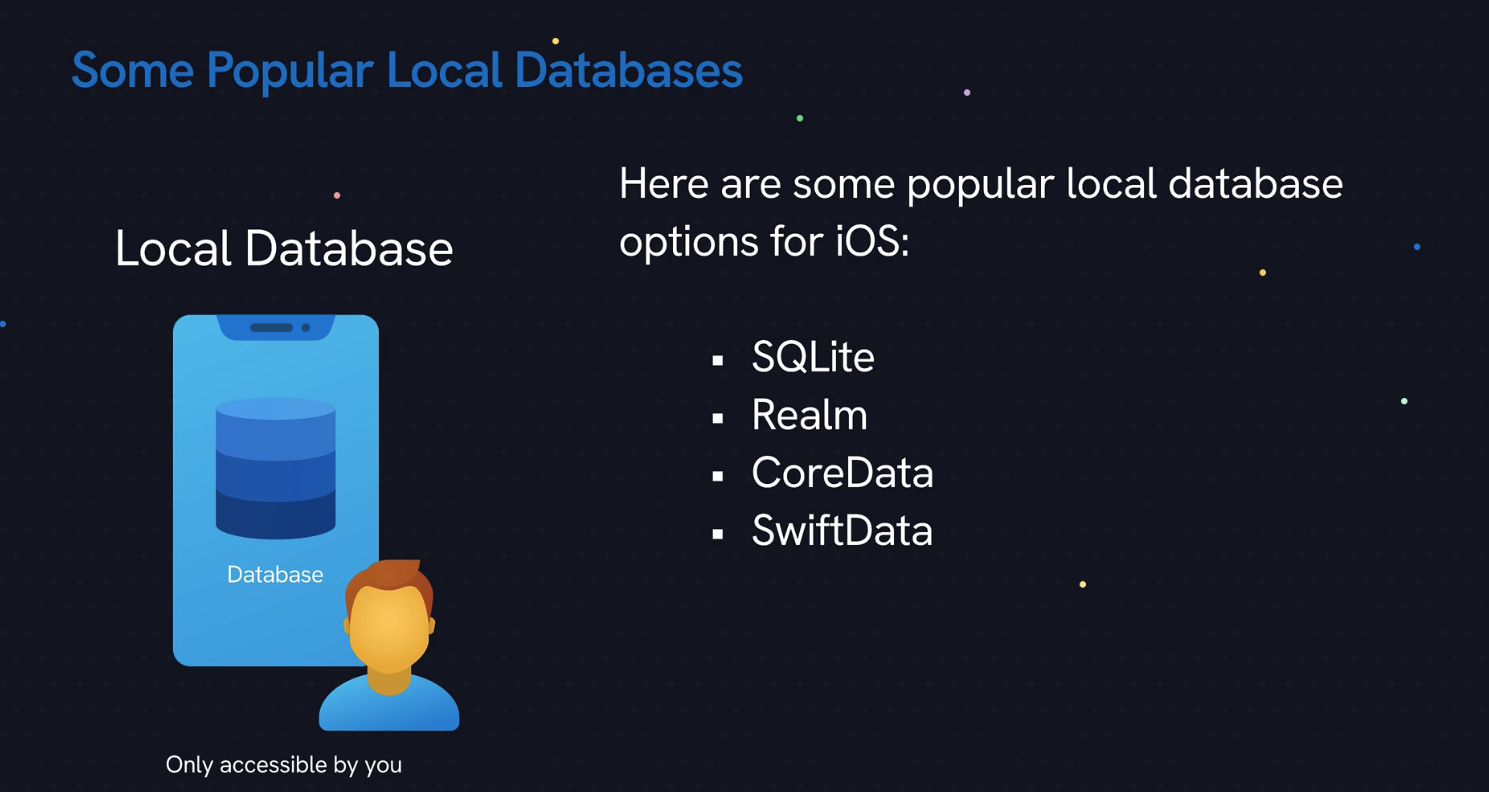
Remote Databases
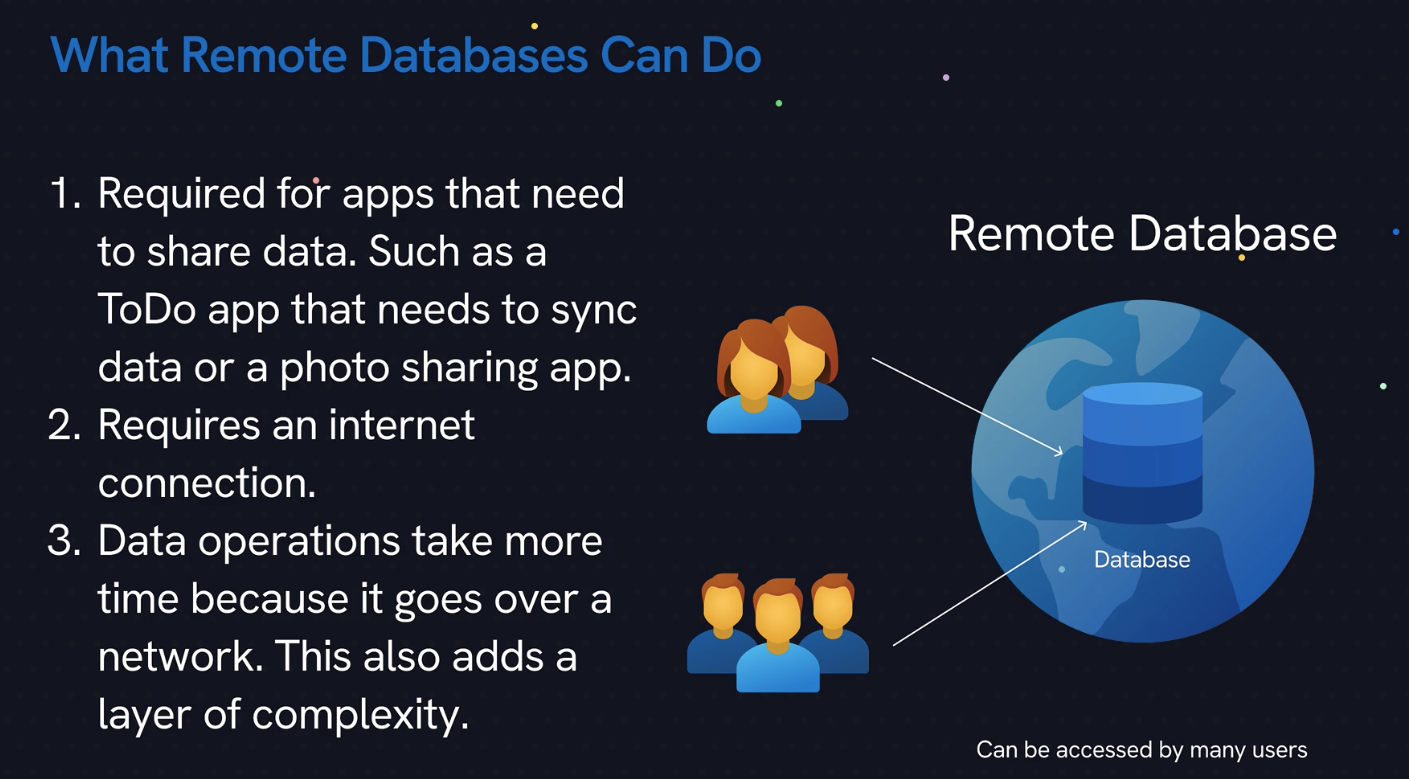
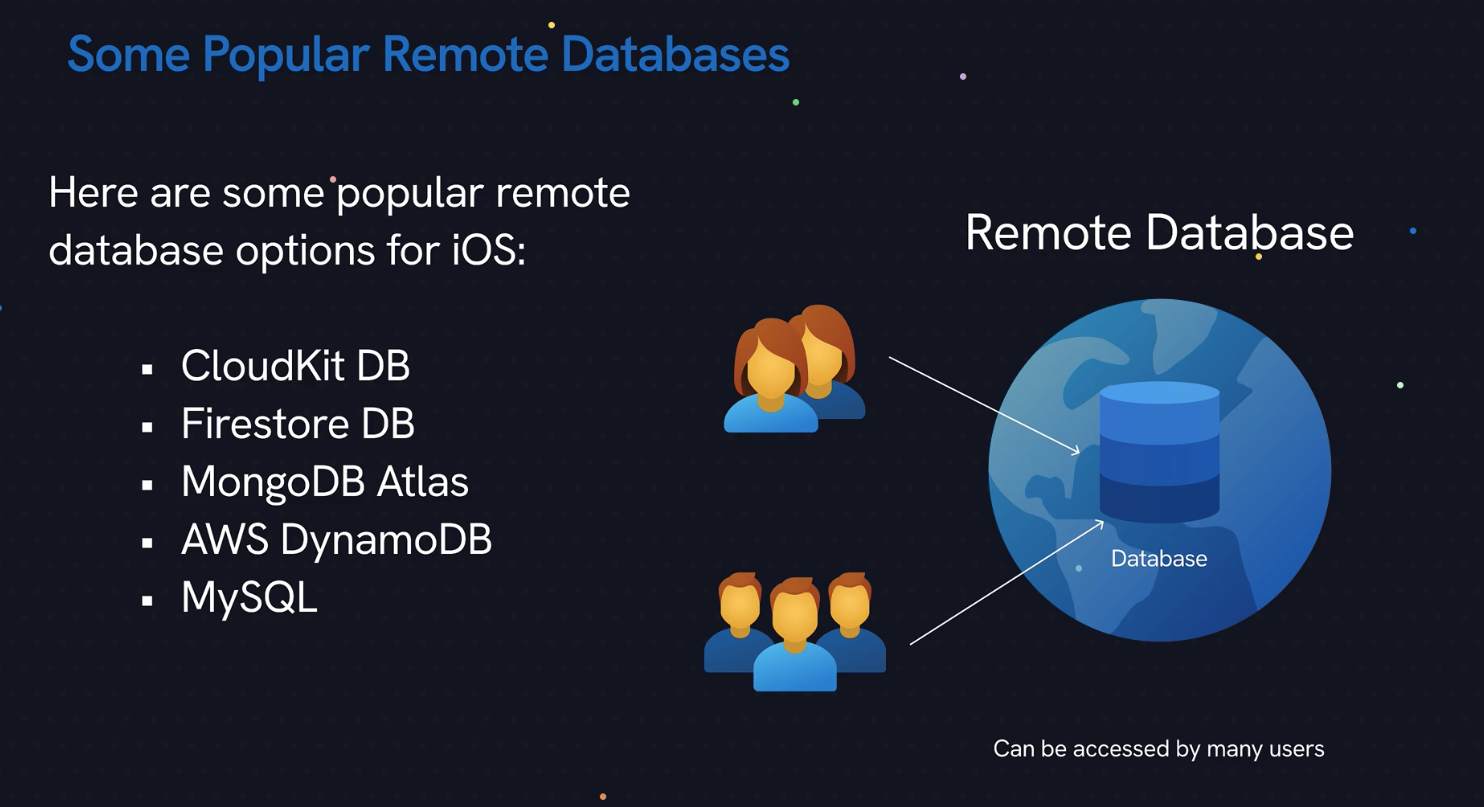
-
Lesson 02 - What is SwiftData
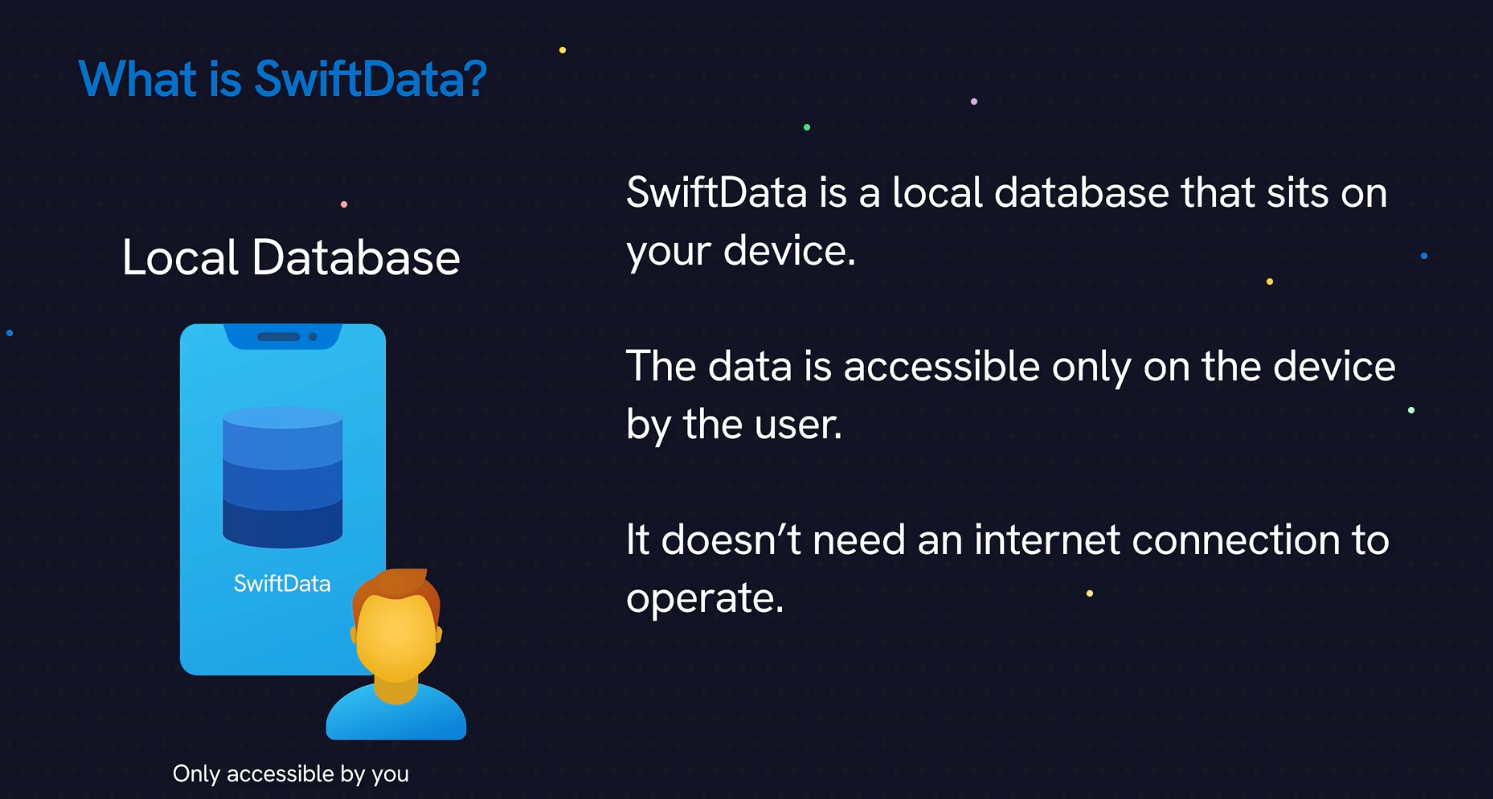
@Model
@Model // needed for SwiftData
class DataItem: Identifiable {
    var id: String
    var creationDate: Date

    init() {
        id = UUID().uuidString //every instance will get UUID
        creationDate = Date() // and date
    }
}
https://github.com/dmkeks1/swiftdata-demo/blob/main/swiftdata-demo/DataItem.swift
modelContainer in entry point
@main
struct swiftdata_demoApp: App {
    var body: some Scene {
        WindowGroup {
            ContentView()
                .modelContainer(for: DataItem.self) // if you have more datatypes you can put an array here
        }
    }
}
https://github.com/dmkeks1/swiftdata-demo/blob/main/swiftdata-demo/swiftdata_demoApp.swift
@Environment Instance where we need it
@Environment(\.modelContext) private var contexthttps://github.com/dmkeks1/swiftdata-demo/blob/main/swiftdata-demo/ContentView.swift
-
Lesson 03 - SwiftData Operations - CRUD
see add, update, create in source code
you can turn off “autosave” with
isAutosaveEnabled:**false**https://github.com/dmkeks1/swiftdata-demo/blob/main/swiftdata-demo/ContentView.swift
-
Lesson 04 - SwiftData Queries December 3, 2024
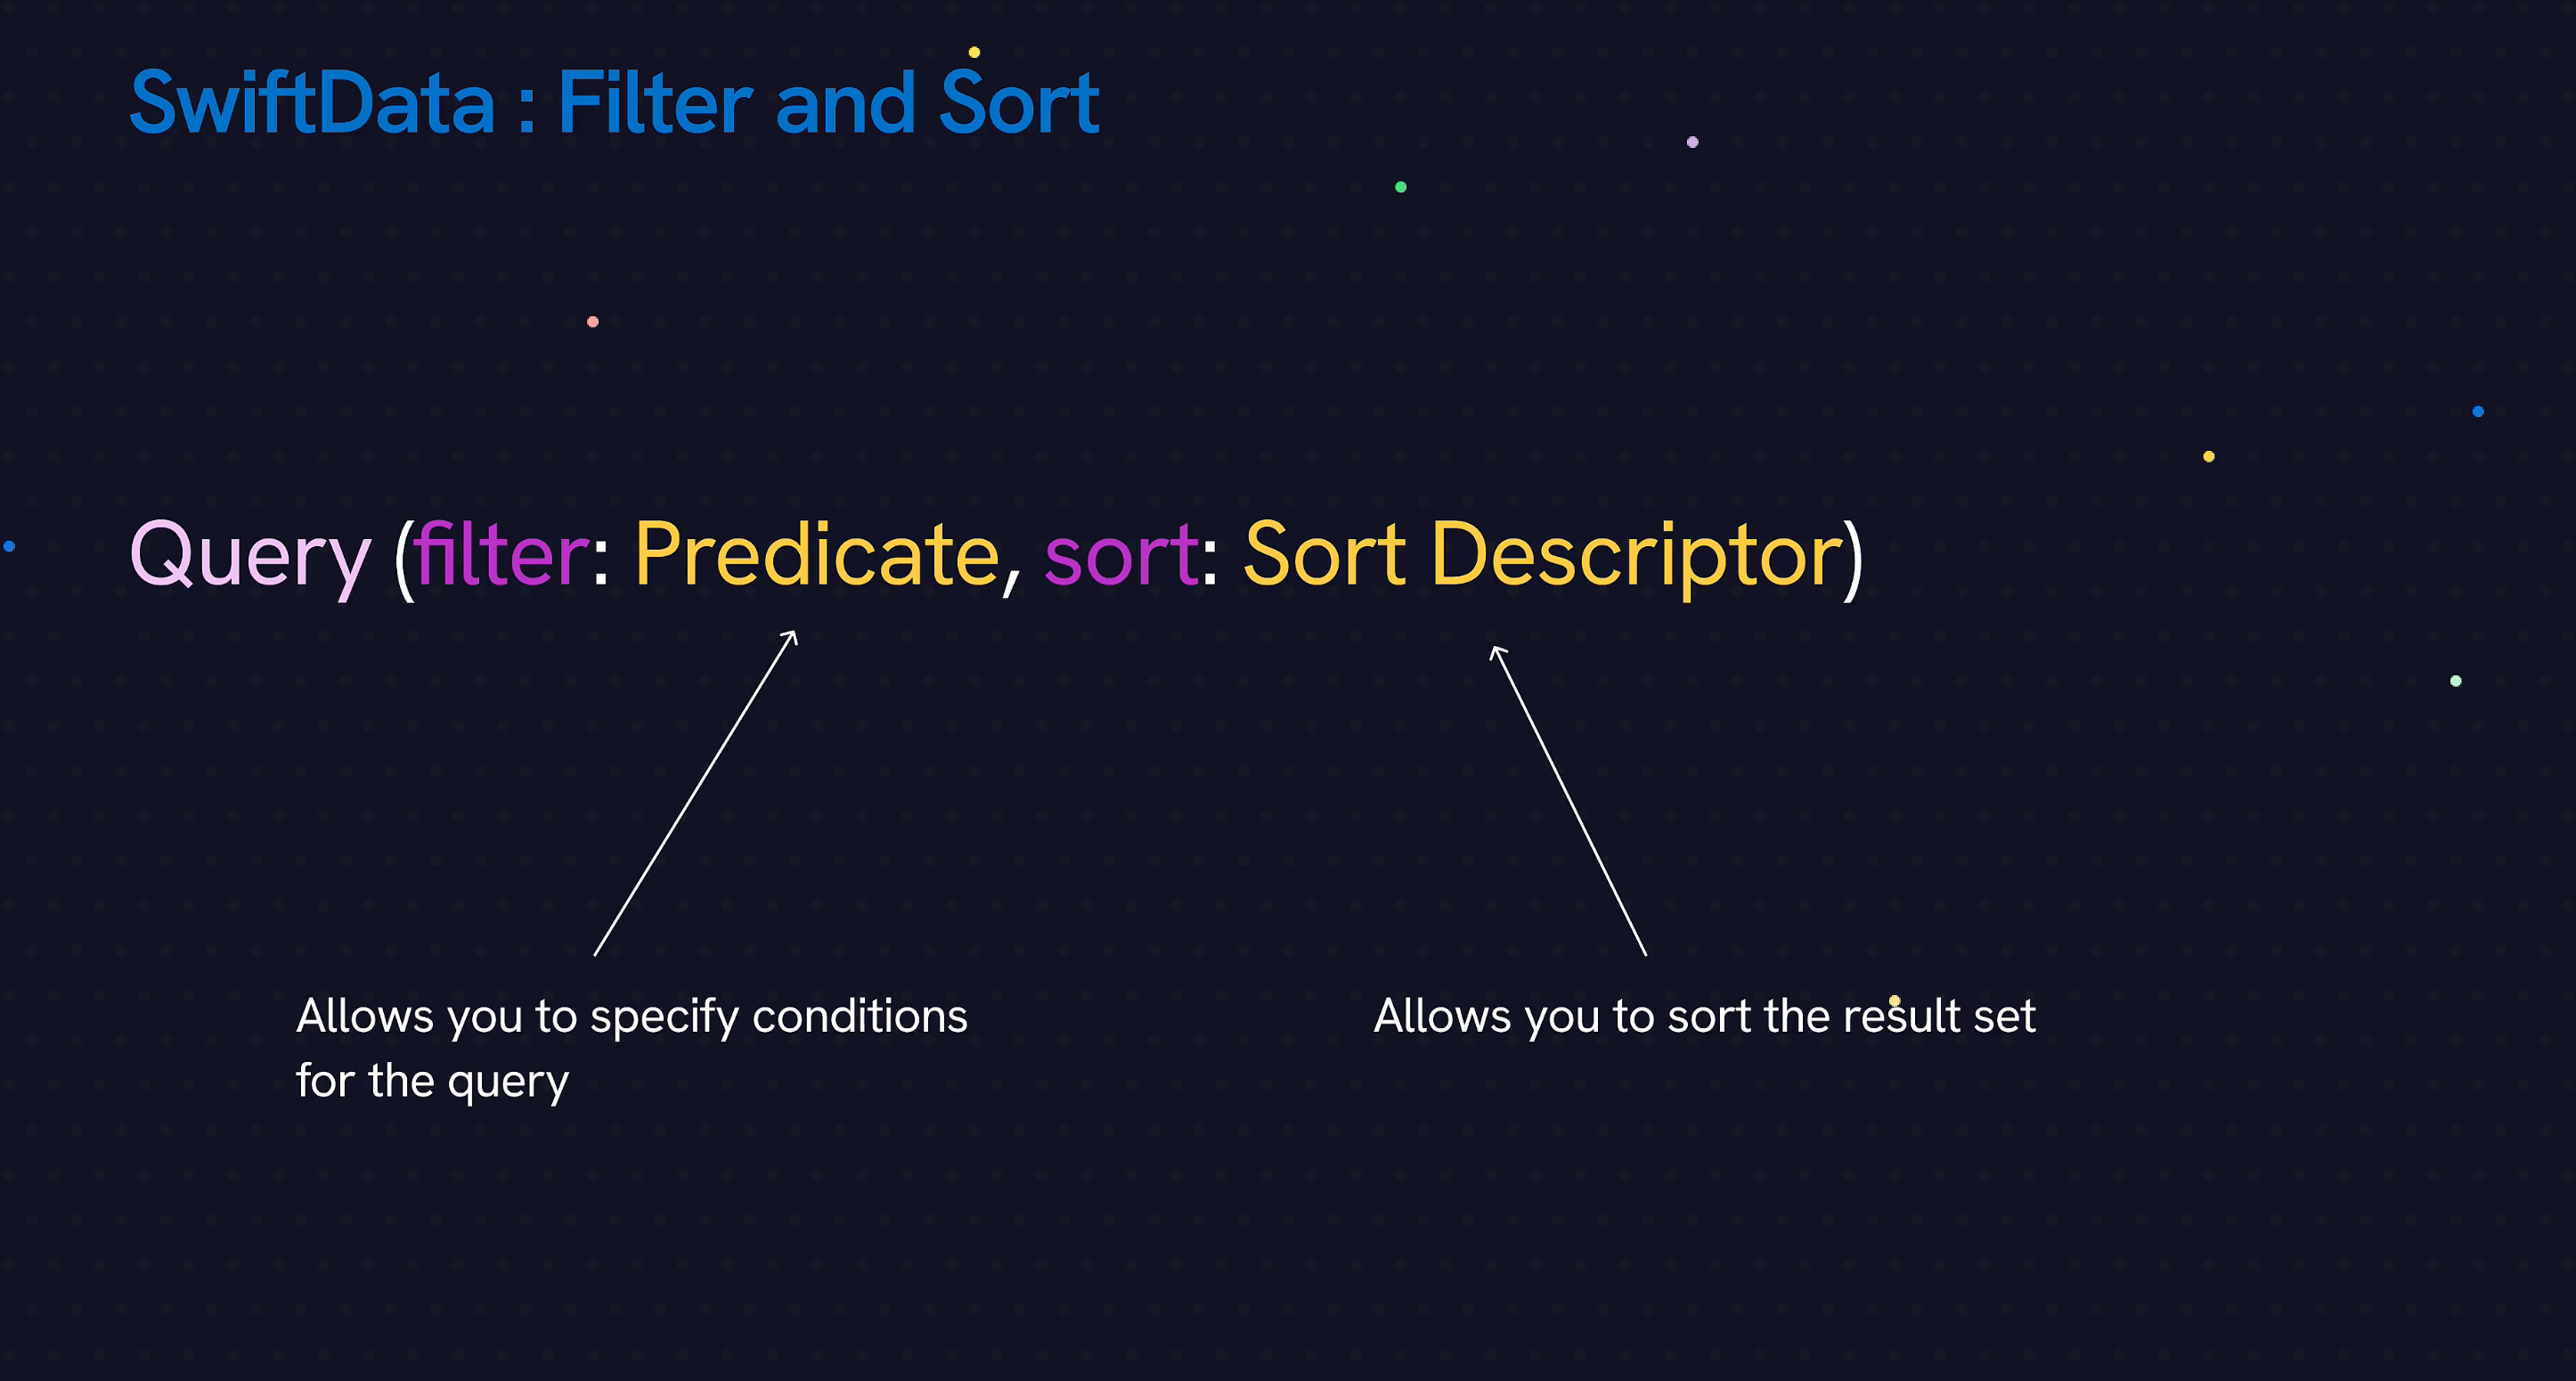
https://developer.apple.com/documentation/foundation/predicate
Filter with @Query predicate

@Query(filter: \#Predicate<Person> { person in
	person.age > 50 || person.age < 20

}, sort: \Person.age, order: .reverse)  //order is adjustable
Example for changing filters while using a picker:
we are passing the selection to the initializer:
import SwiftUI
import SwiftData

struct PeopleListView: View {

    @Environment(\.modelContext) private var context

    @Query(filter: \#Predicate<Person> { person in
        person.age < 20
    }, sort: \Person.name, order: .reverse)
    private var people: [Person]

    var body: some View {
        List(people) { p in

            HStack {
                Text(p.name)
                Spacer()
                Text("Age: \(String(p.age))")
            }
                .swipeActions {
                    Button("Delete") {
                        context.delete(p)
                    }
                }
        }
    }

    init(filter: Filter) {
        // Based on the filter, set the predicate
        if filter == Filter.kids {
            _people = Query(filter: \#Predicate<Person> { person in
                person.age < 20
            }, sort: \Person.age)
        }
        else if filter == Filter.adults {
            _people = Query(filter: \#Predicate<Person> { person in
                person.age >= 20
            }, sort: \Person.age)
        }

    }
}